The Trap Door
System
A connected web of attacks, sweeps, and submissions
that flow naturally from one to the next.
Foreword
A note from the author.
The Trap Door System was born from years of rolling and refining what works. What you hold is not a collection of random techniques — it is a connected web of attacks, sweeps, and submissions that flow naturally from one to the next.
The roots of this system go deeper than the mat. I spent years studying old catch wrestling — a brutal, efficient style that never wasted movement — and became fascinated with how Kazushi Sakuraba weaponized the Kimura in the early days of MMA. Sakuraba used it not just as a submission but as a control tool, a threat, a way to dictate the entire fight. That idea never left me. I began pulling that thread, exploring what a full system built around that shoulder control could look like in a no-gi grappling context.
My old sensei sharpened the rest. Over years of drilling, competing, and countless rounds of working these positions with training partners who made me prove every detail, the pieces came together. Tricks, adjustments, entries that only reveal themselves through repetition — those came from him, from the mats, and from the failures that pointed the way forward.
Every position in this system has a purpose. Every failure leads to another option. That is the philosophy behind the Trap Door: there is always a next move.
This instructional represents the system as it stands today — but it is not finished. New positions, new submissions, and new connections are still being discovered with every training session. As the system grows, so will this instructional. What you have now is the foundation. What comes next will be built on top of it.
Study the flowchart. Drill the transitions. Trust the system.
— Brian "Dread Pirate" Wilkinson
How to Use This Book
A guide to getting the most out of this instructional.
This instructional is organized the way the system is taught at a seminar — starting with how you get in, then what you do once you're there. Each section covers a key position or transition, with step-by-step instructions, photo references, and a video you can expand to watch the technique in action.
- Read Part One in order — entries and setups build on each other.
- Part Two covers everything available once you've closed the Trap Door.
- Use the System Flowchart as a quick reference during drilling sessions.
- Click ▶ Watch the Technique under any section to open the video.
- Coaching callout boxes highlight the most common mistakes and how to avoid them.
The System Flowchart
Use this map to orient yourself throughout the book. Each box is a position.
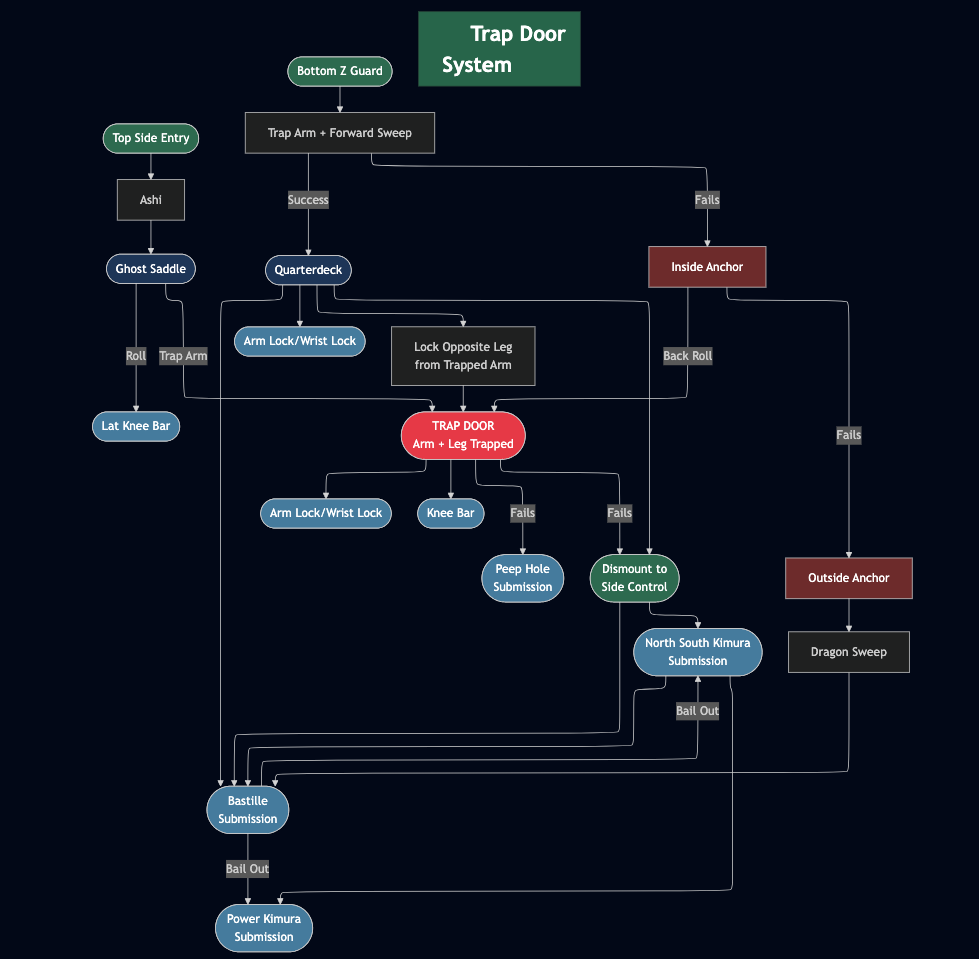
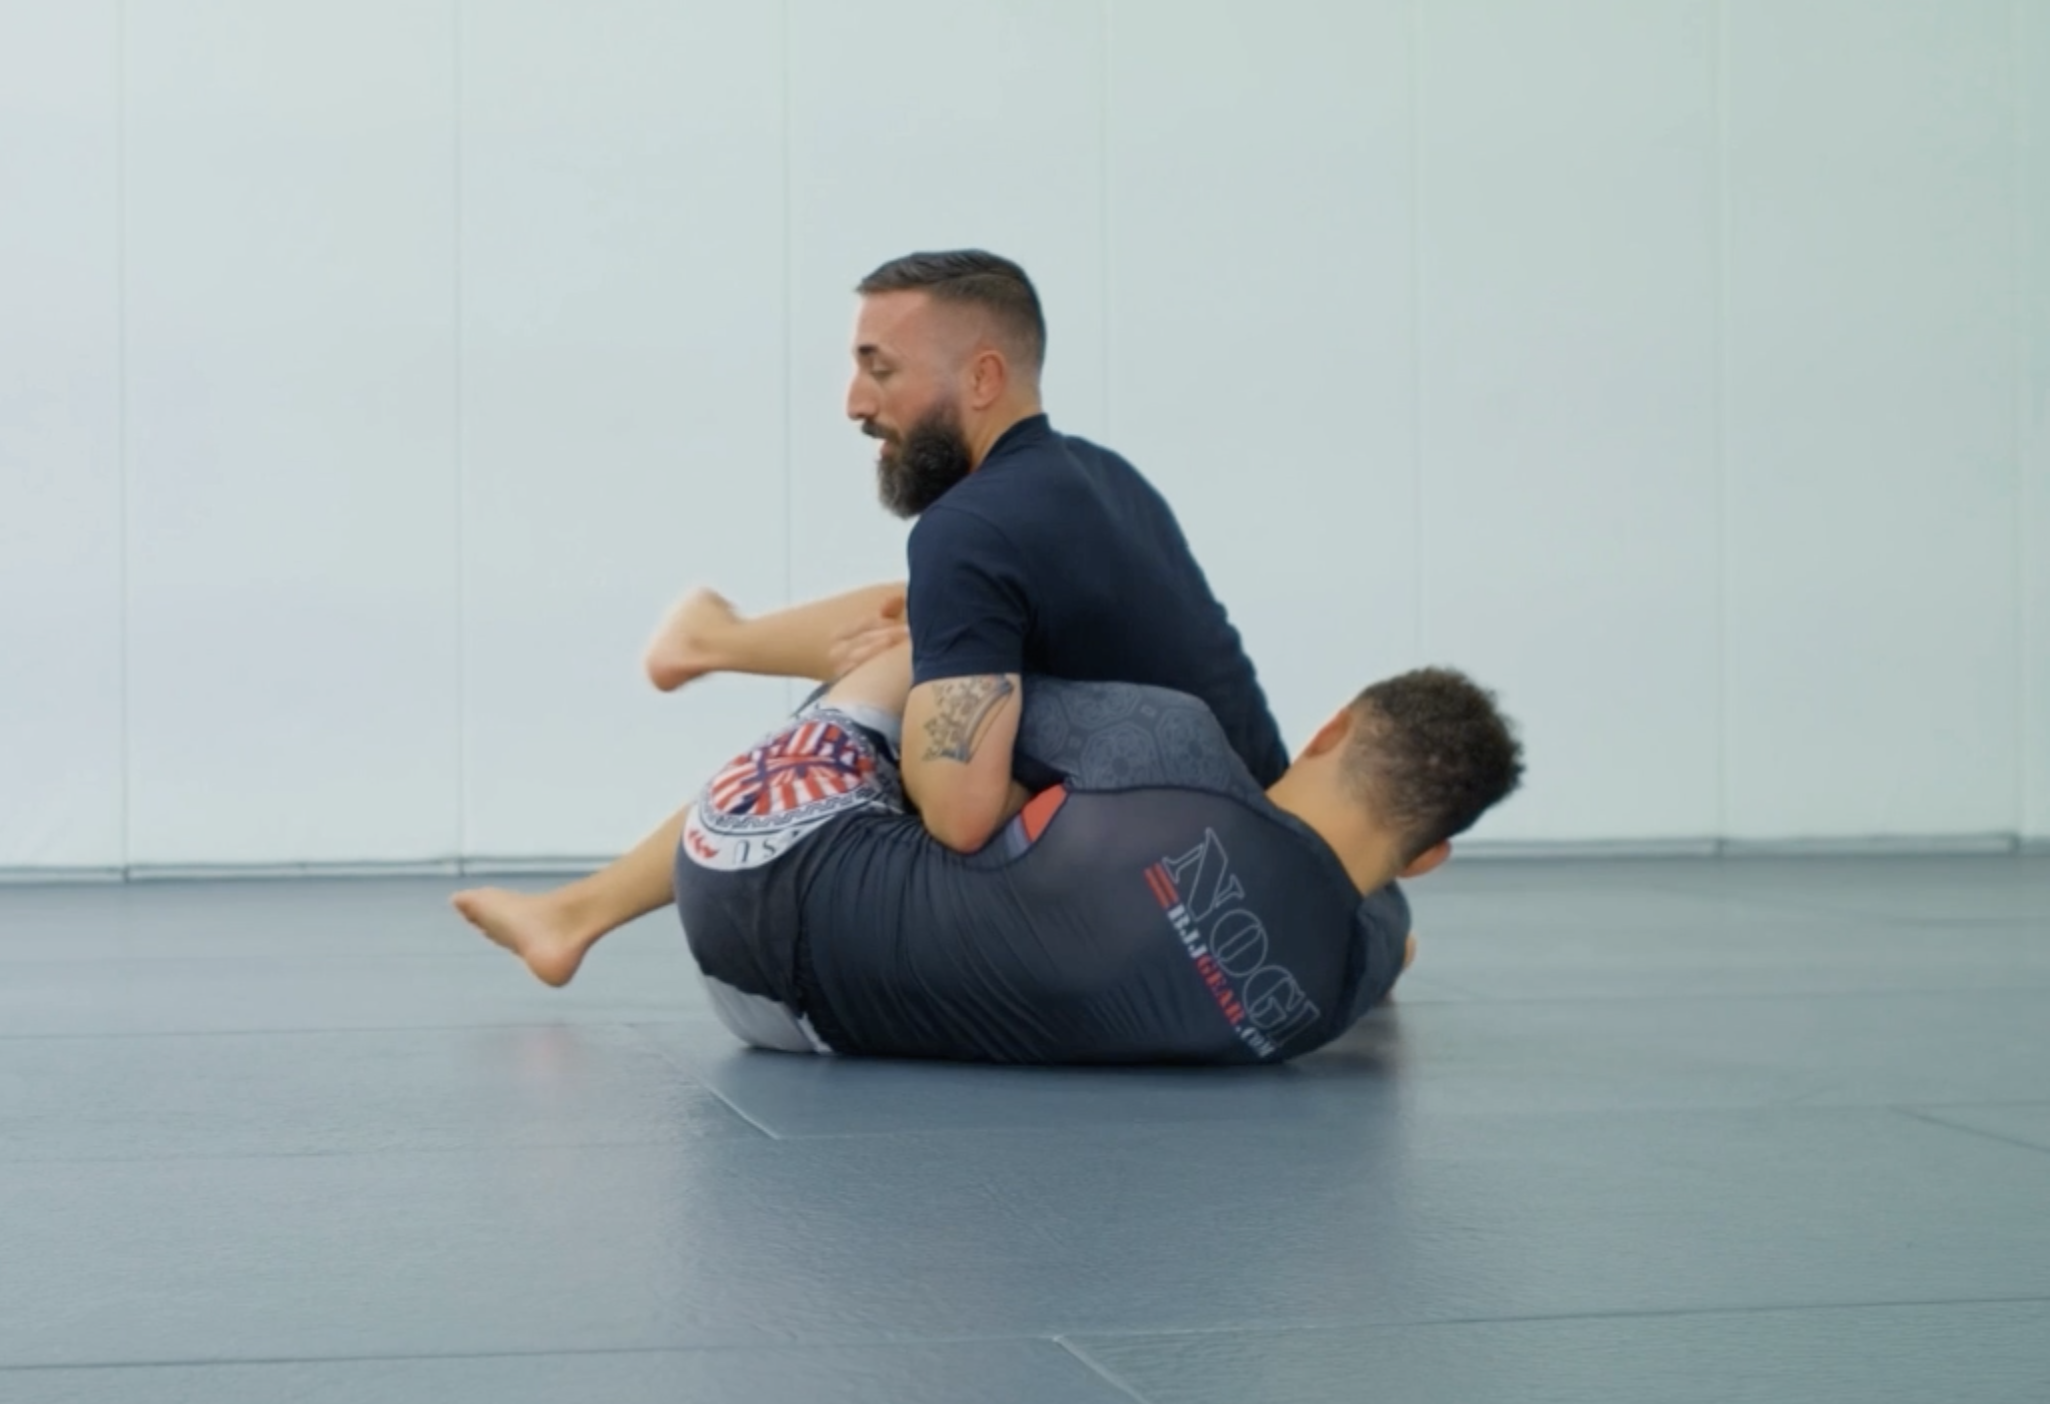
Trap Door
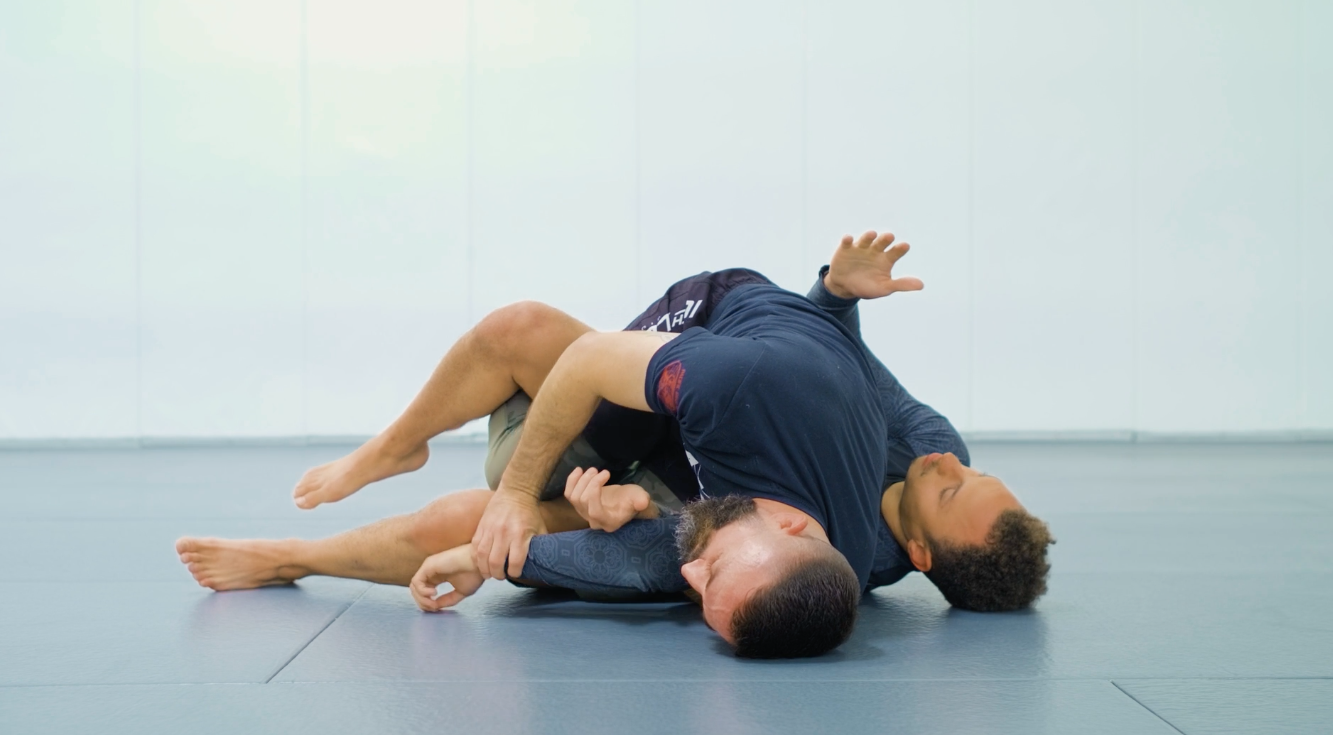
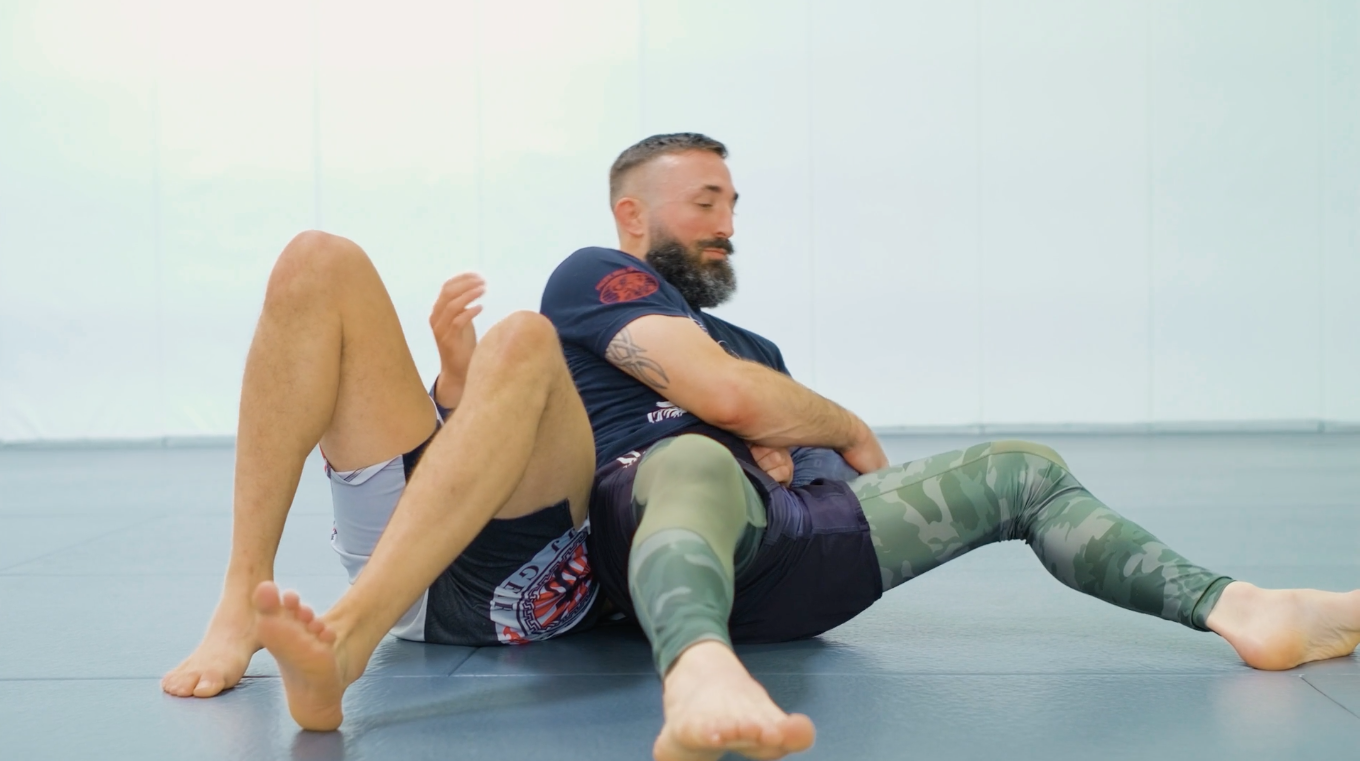
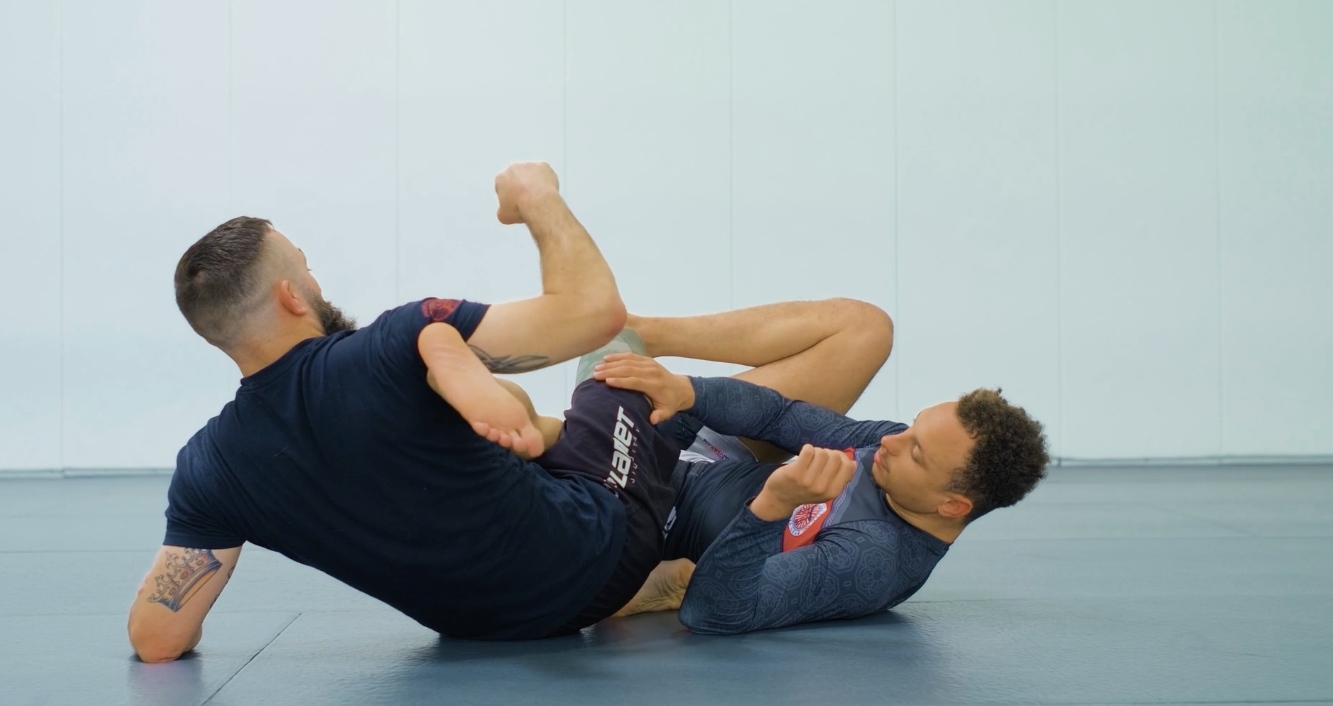
Z Guard to Quarterdeck
Your starting point. Control the arm, earn the position.
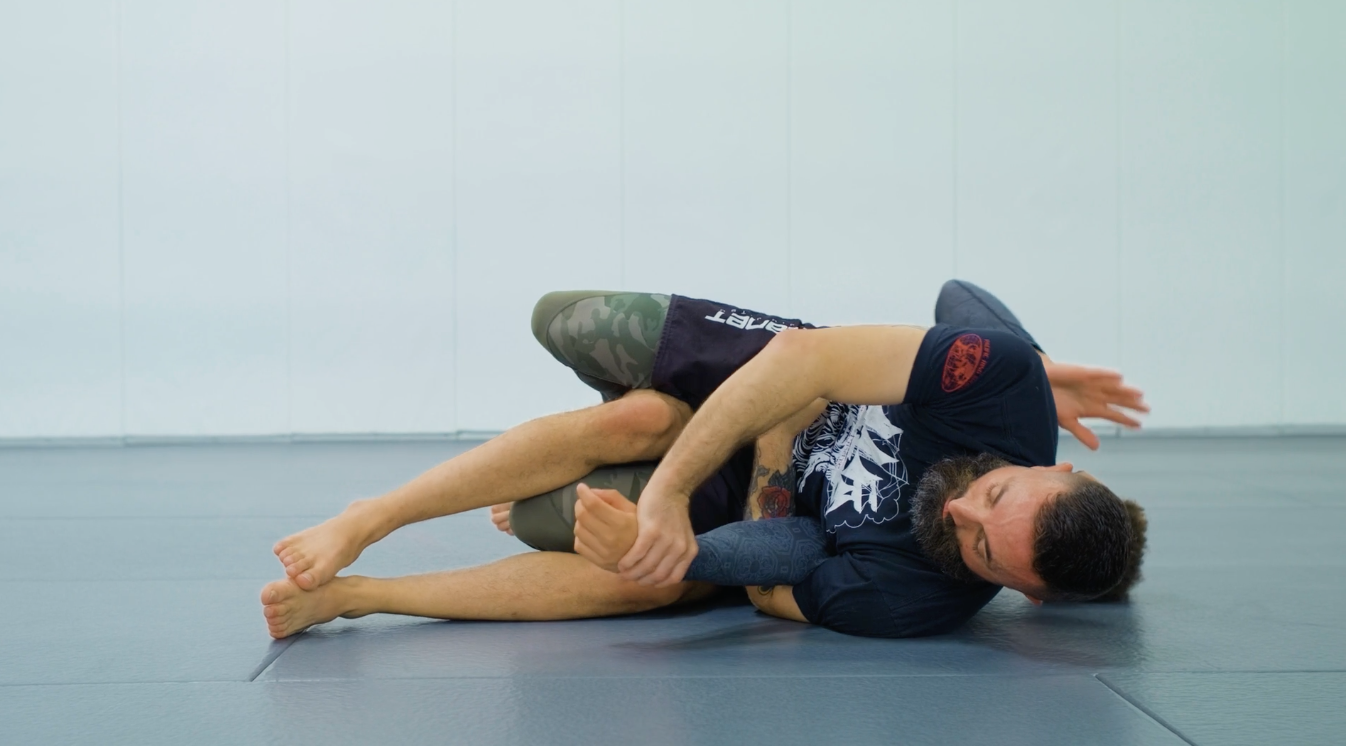
The Position
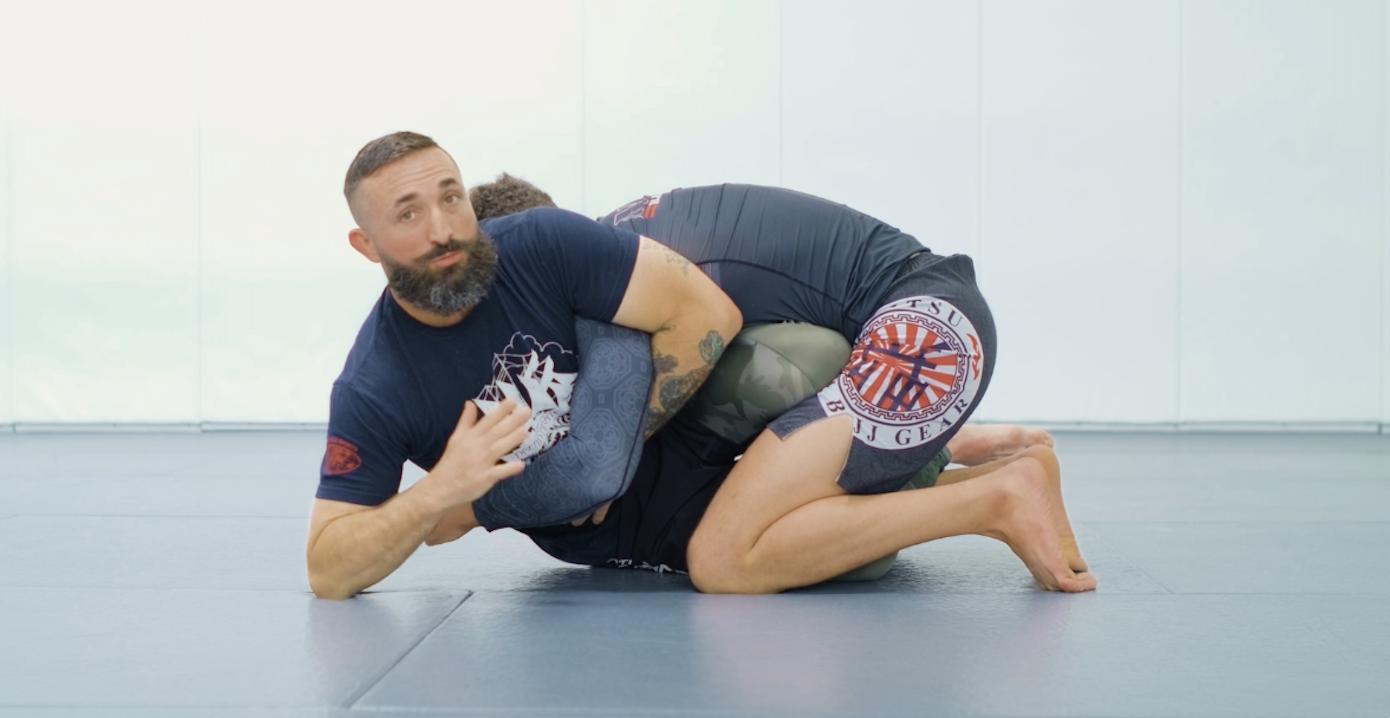
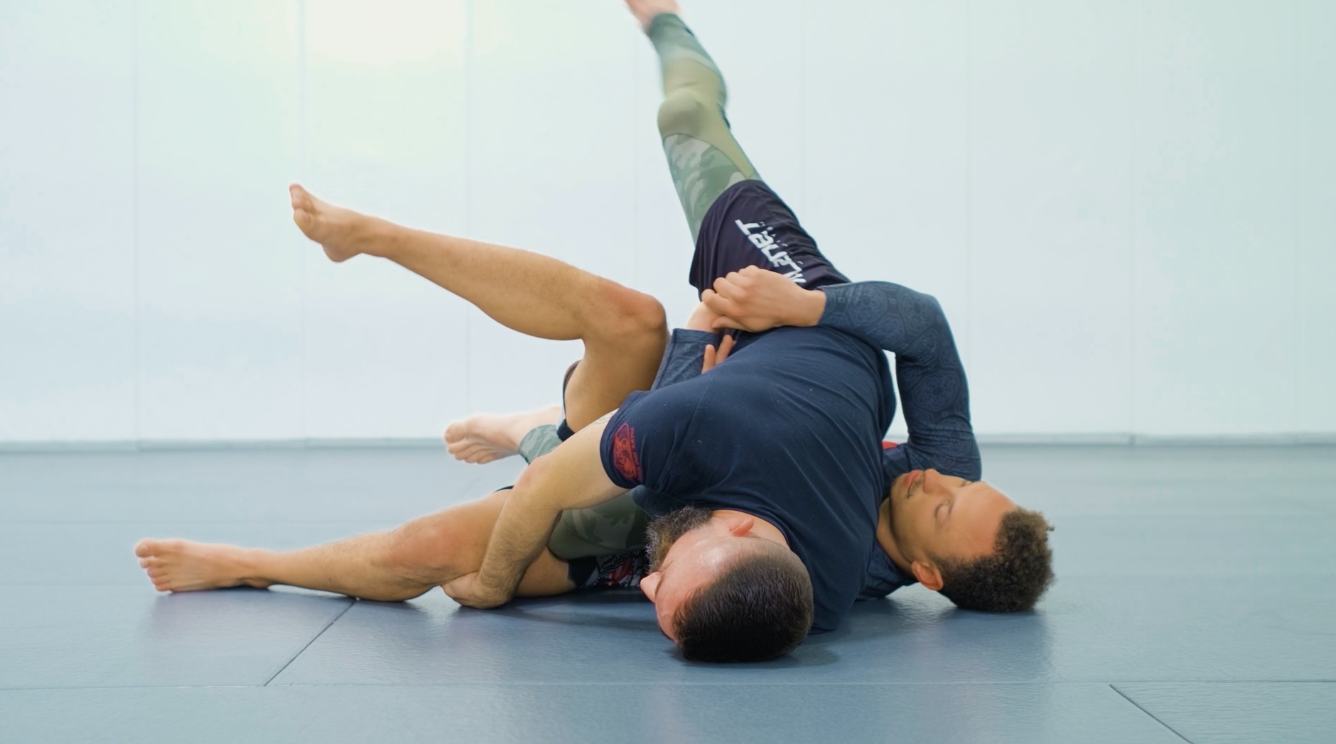
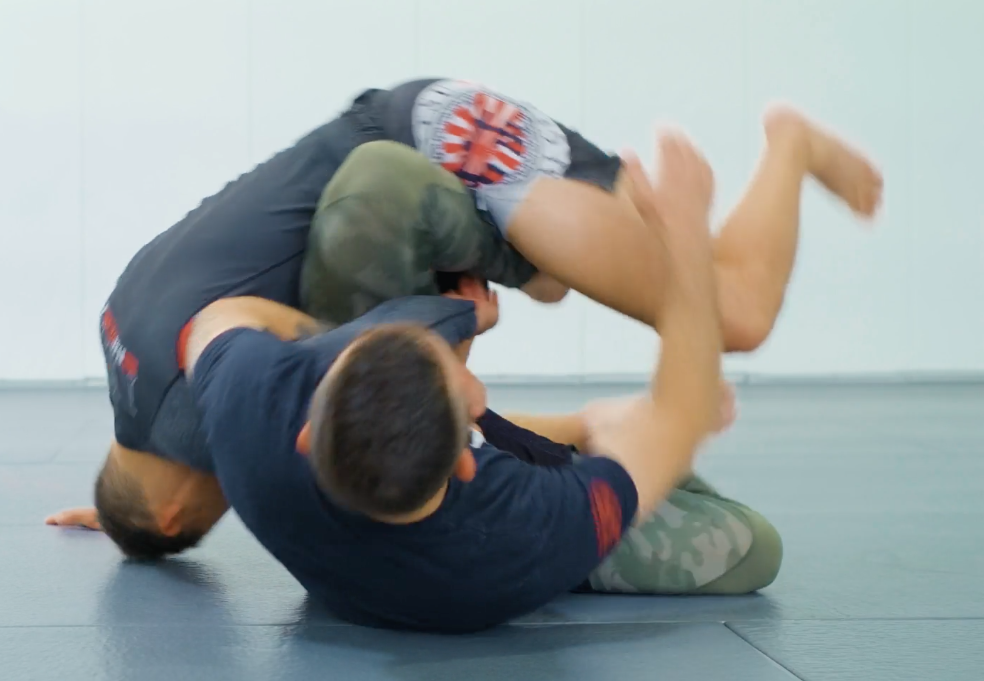
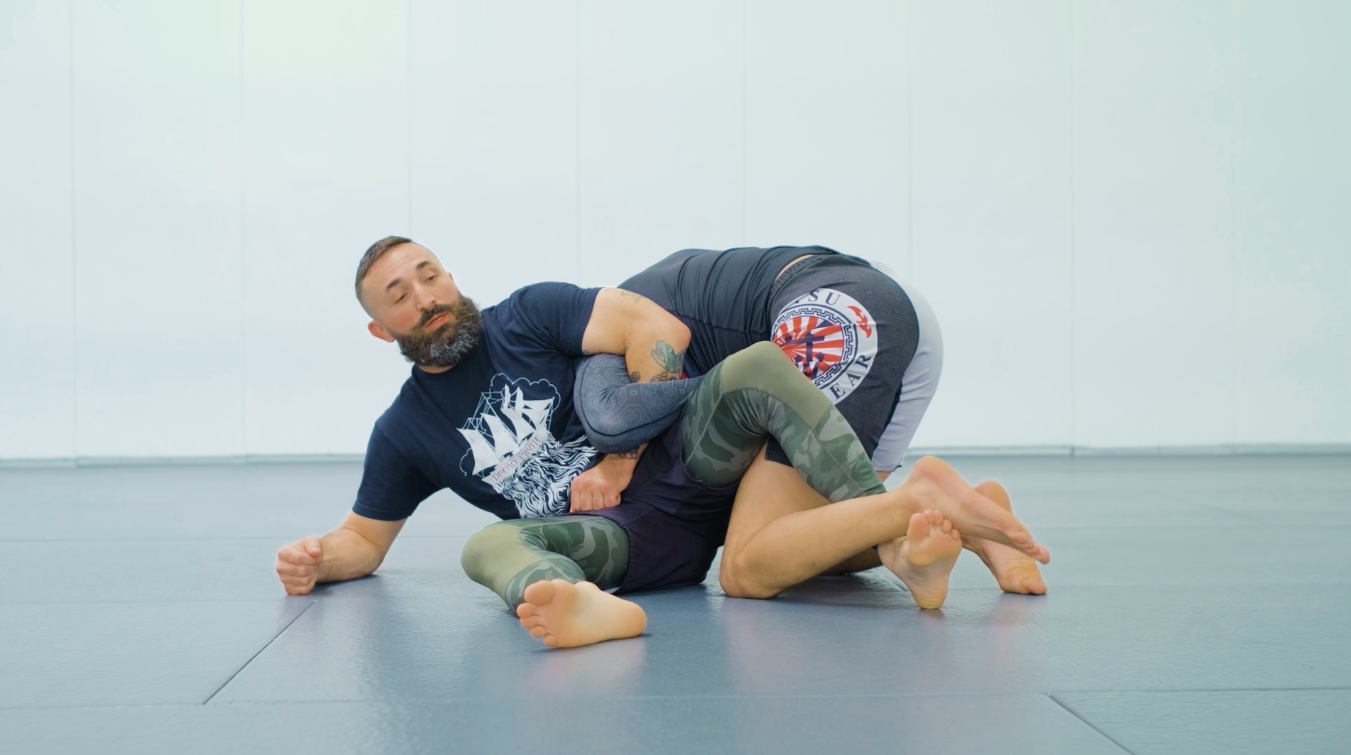
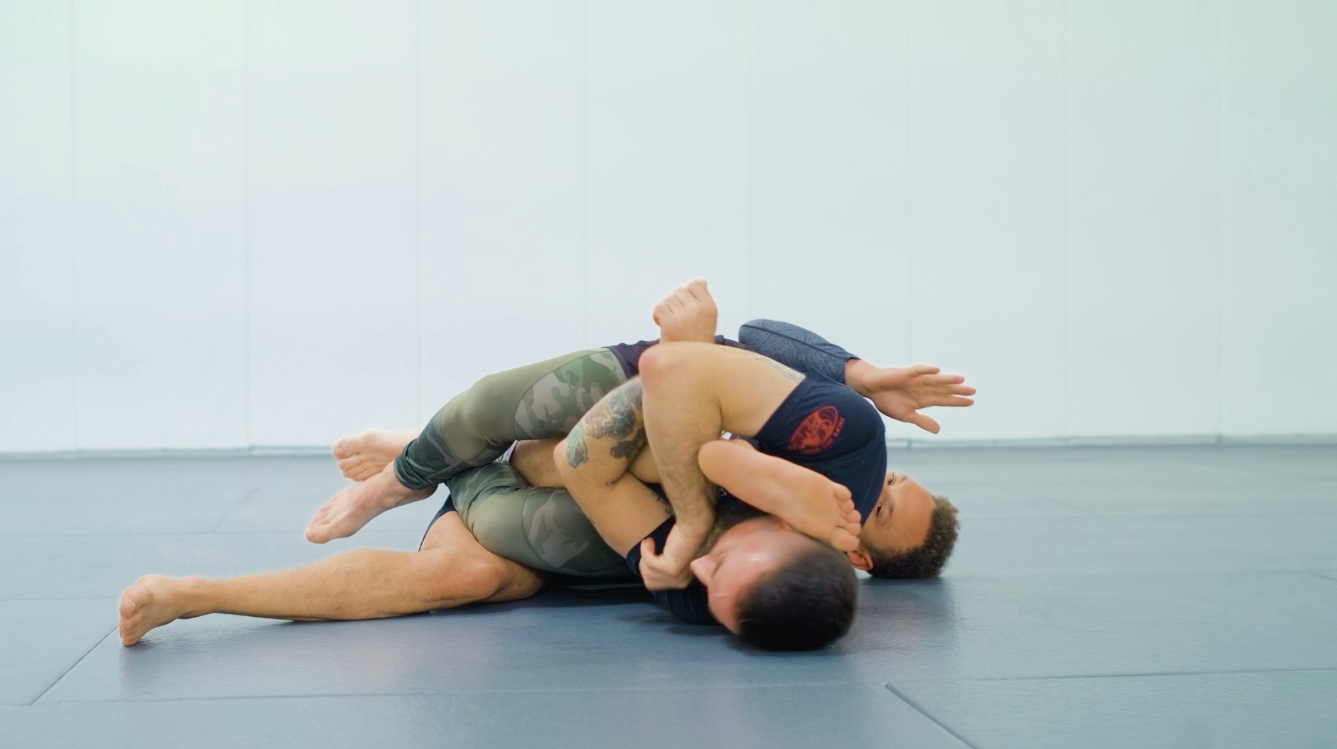
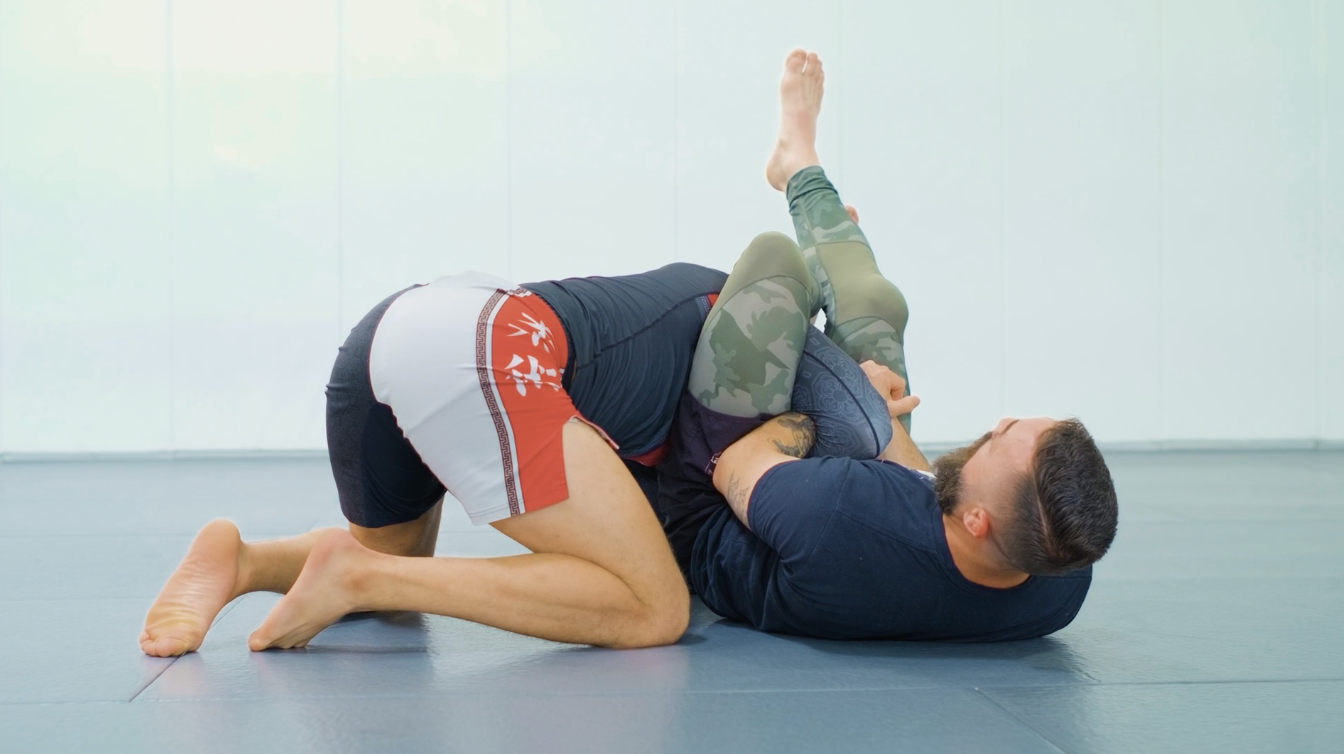
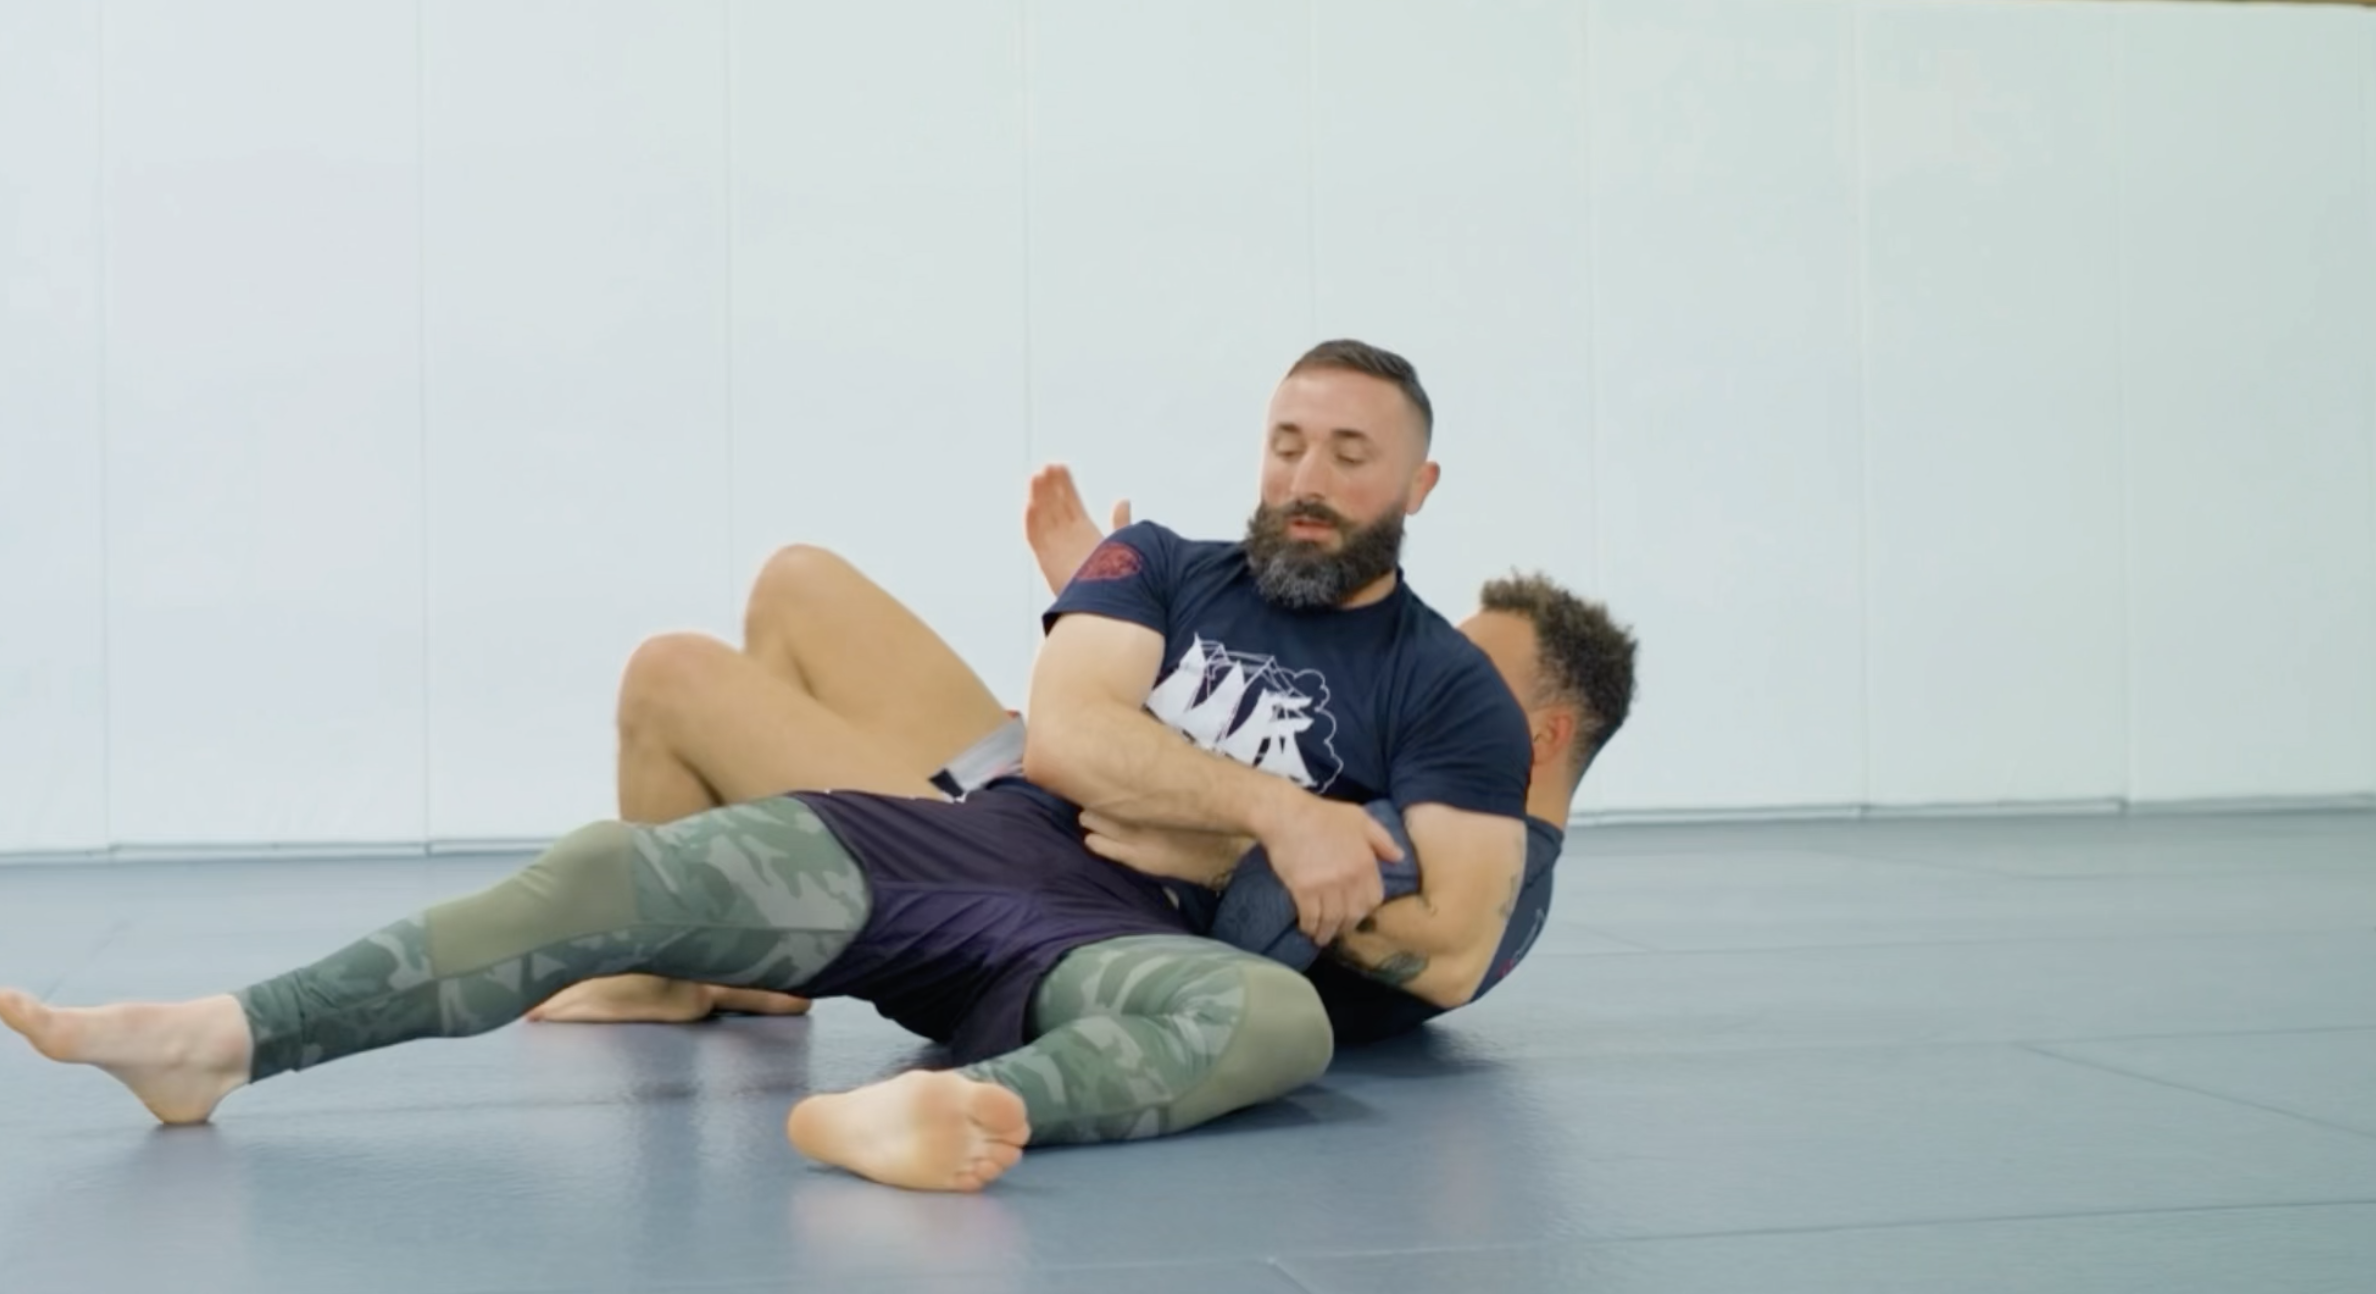
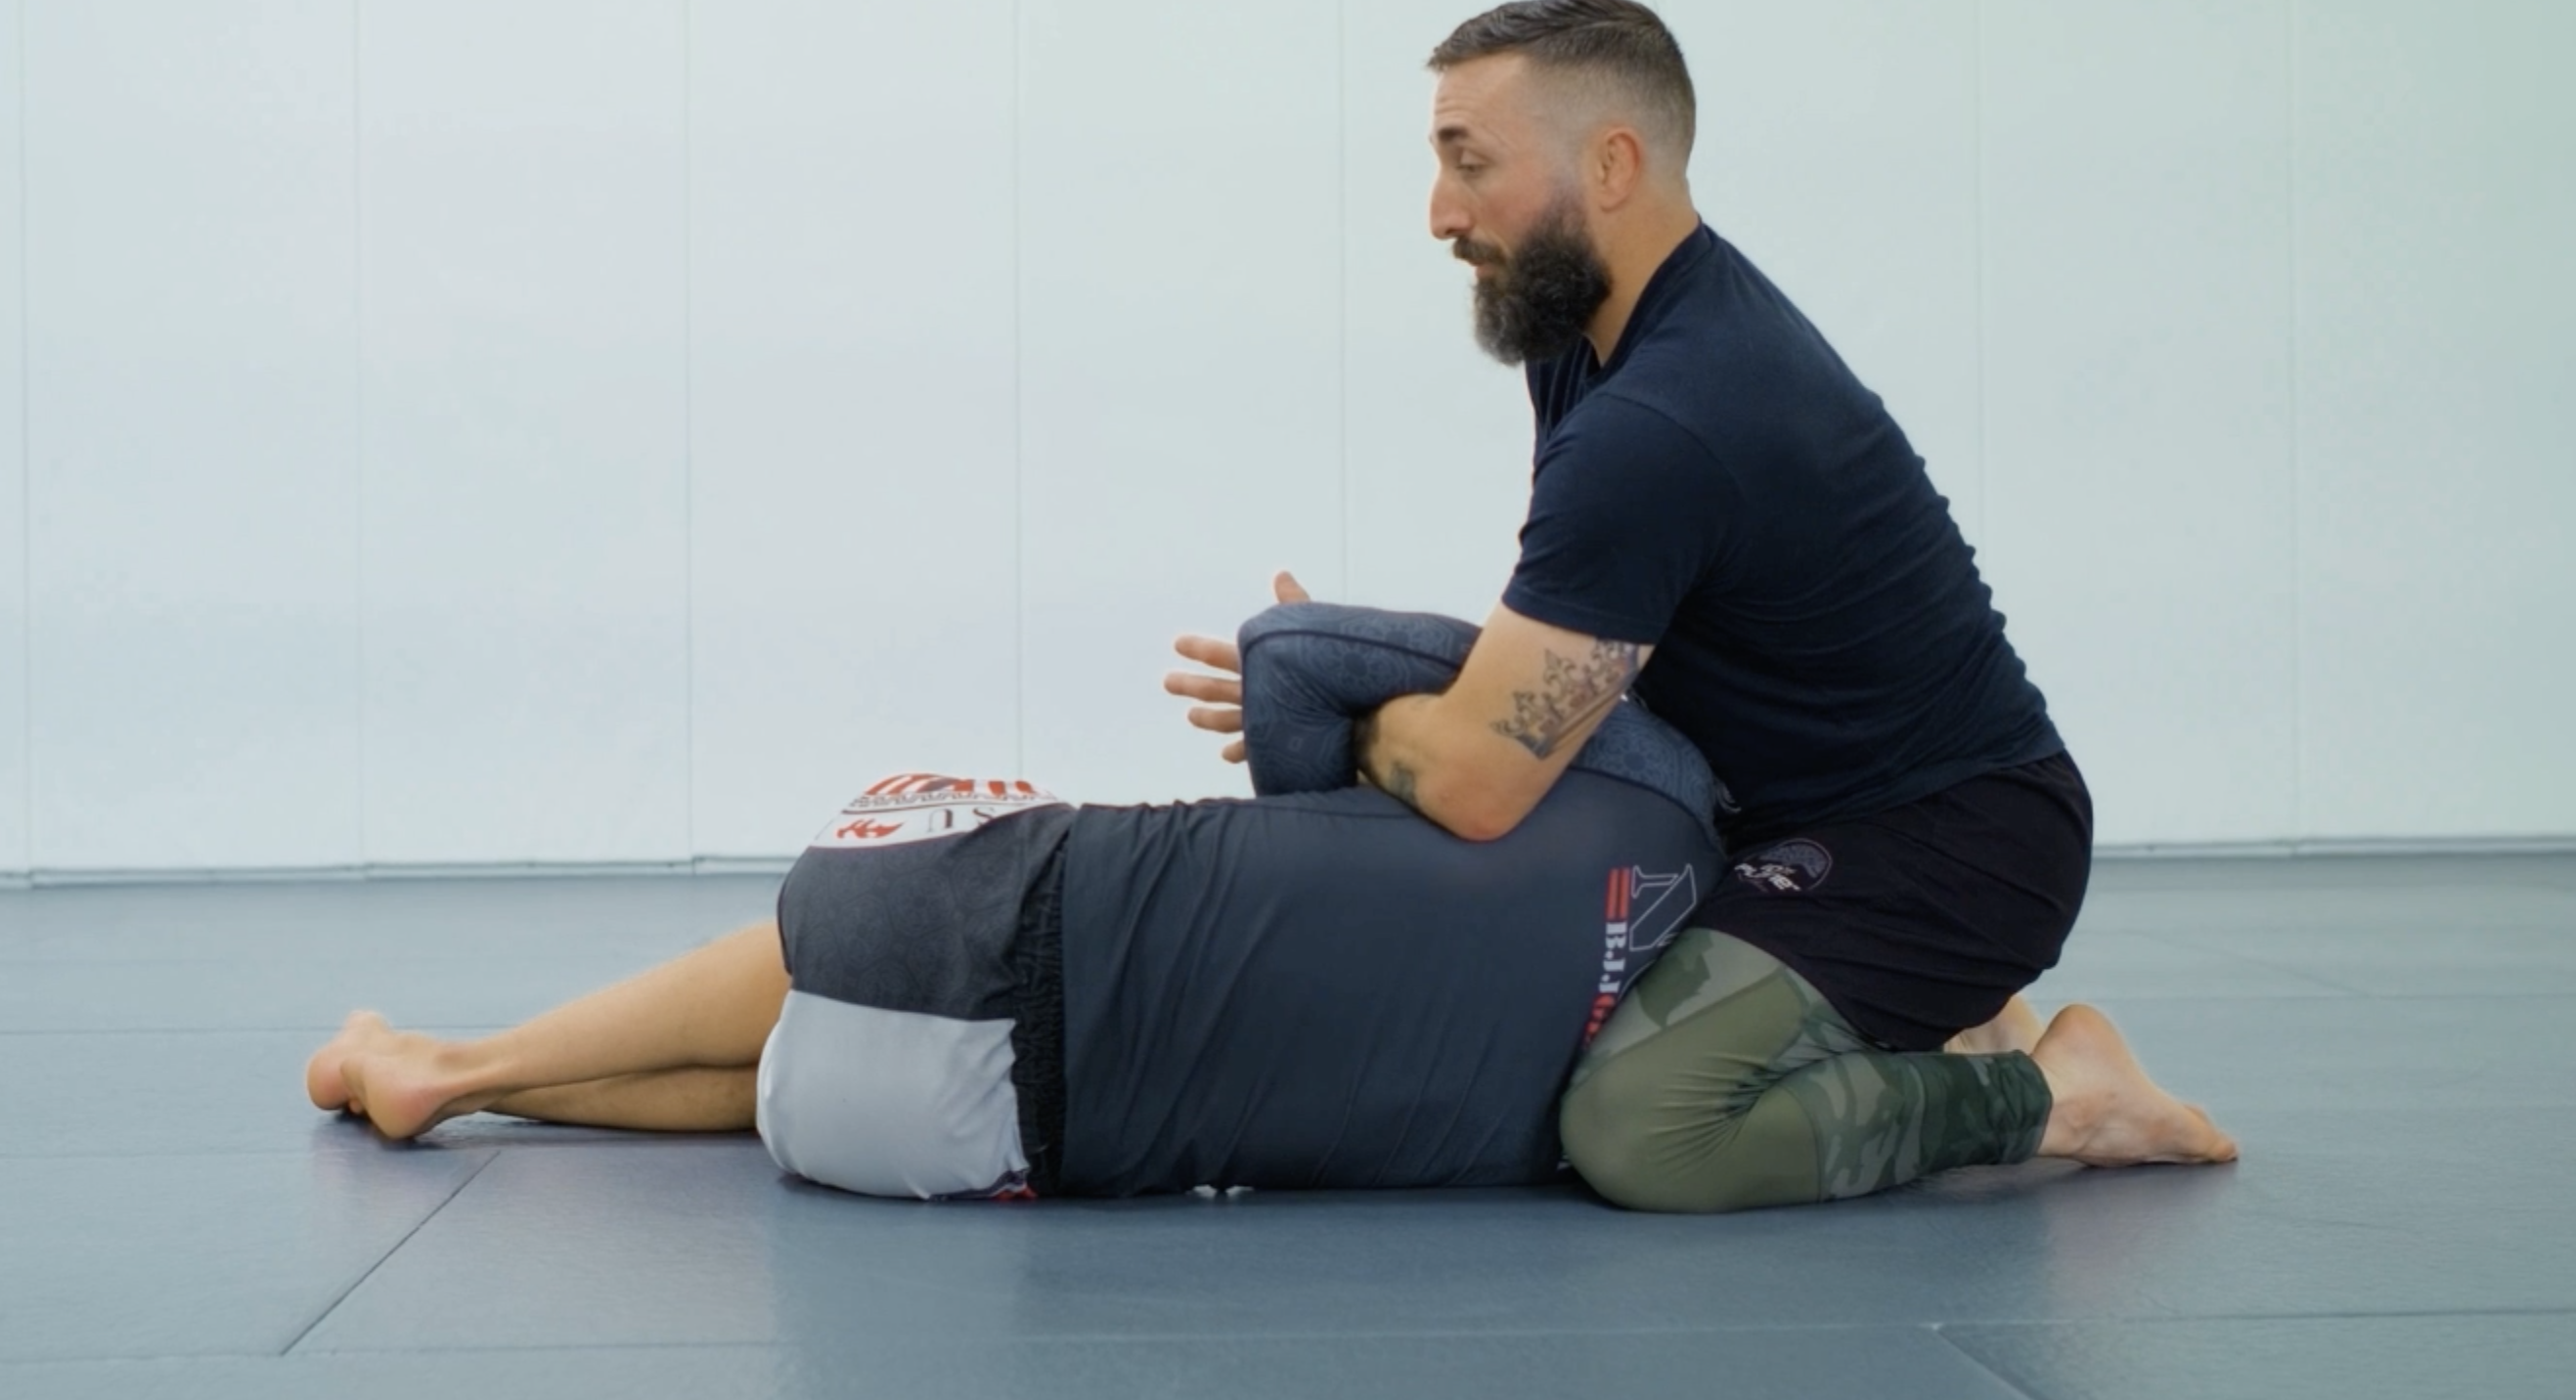
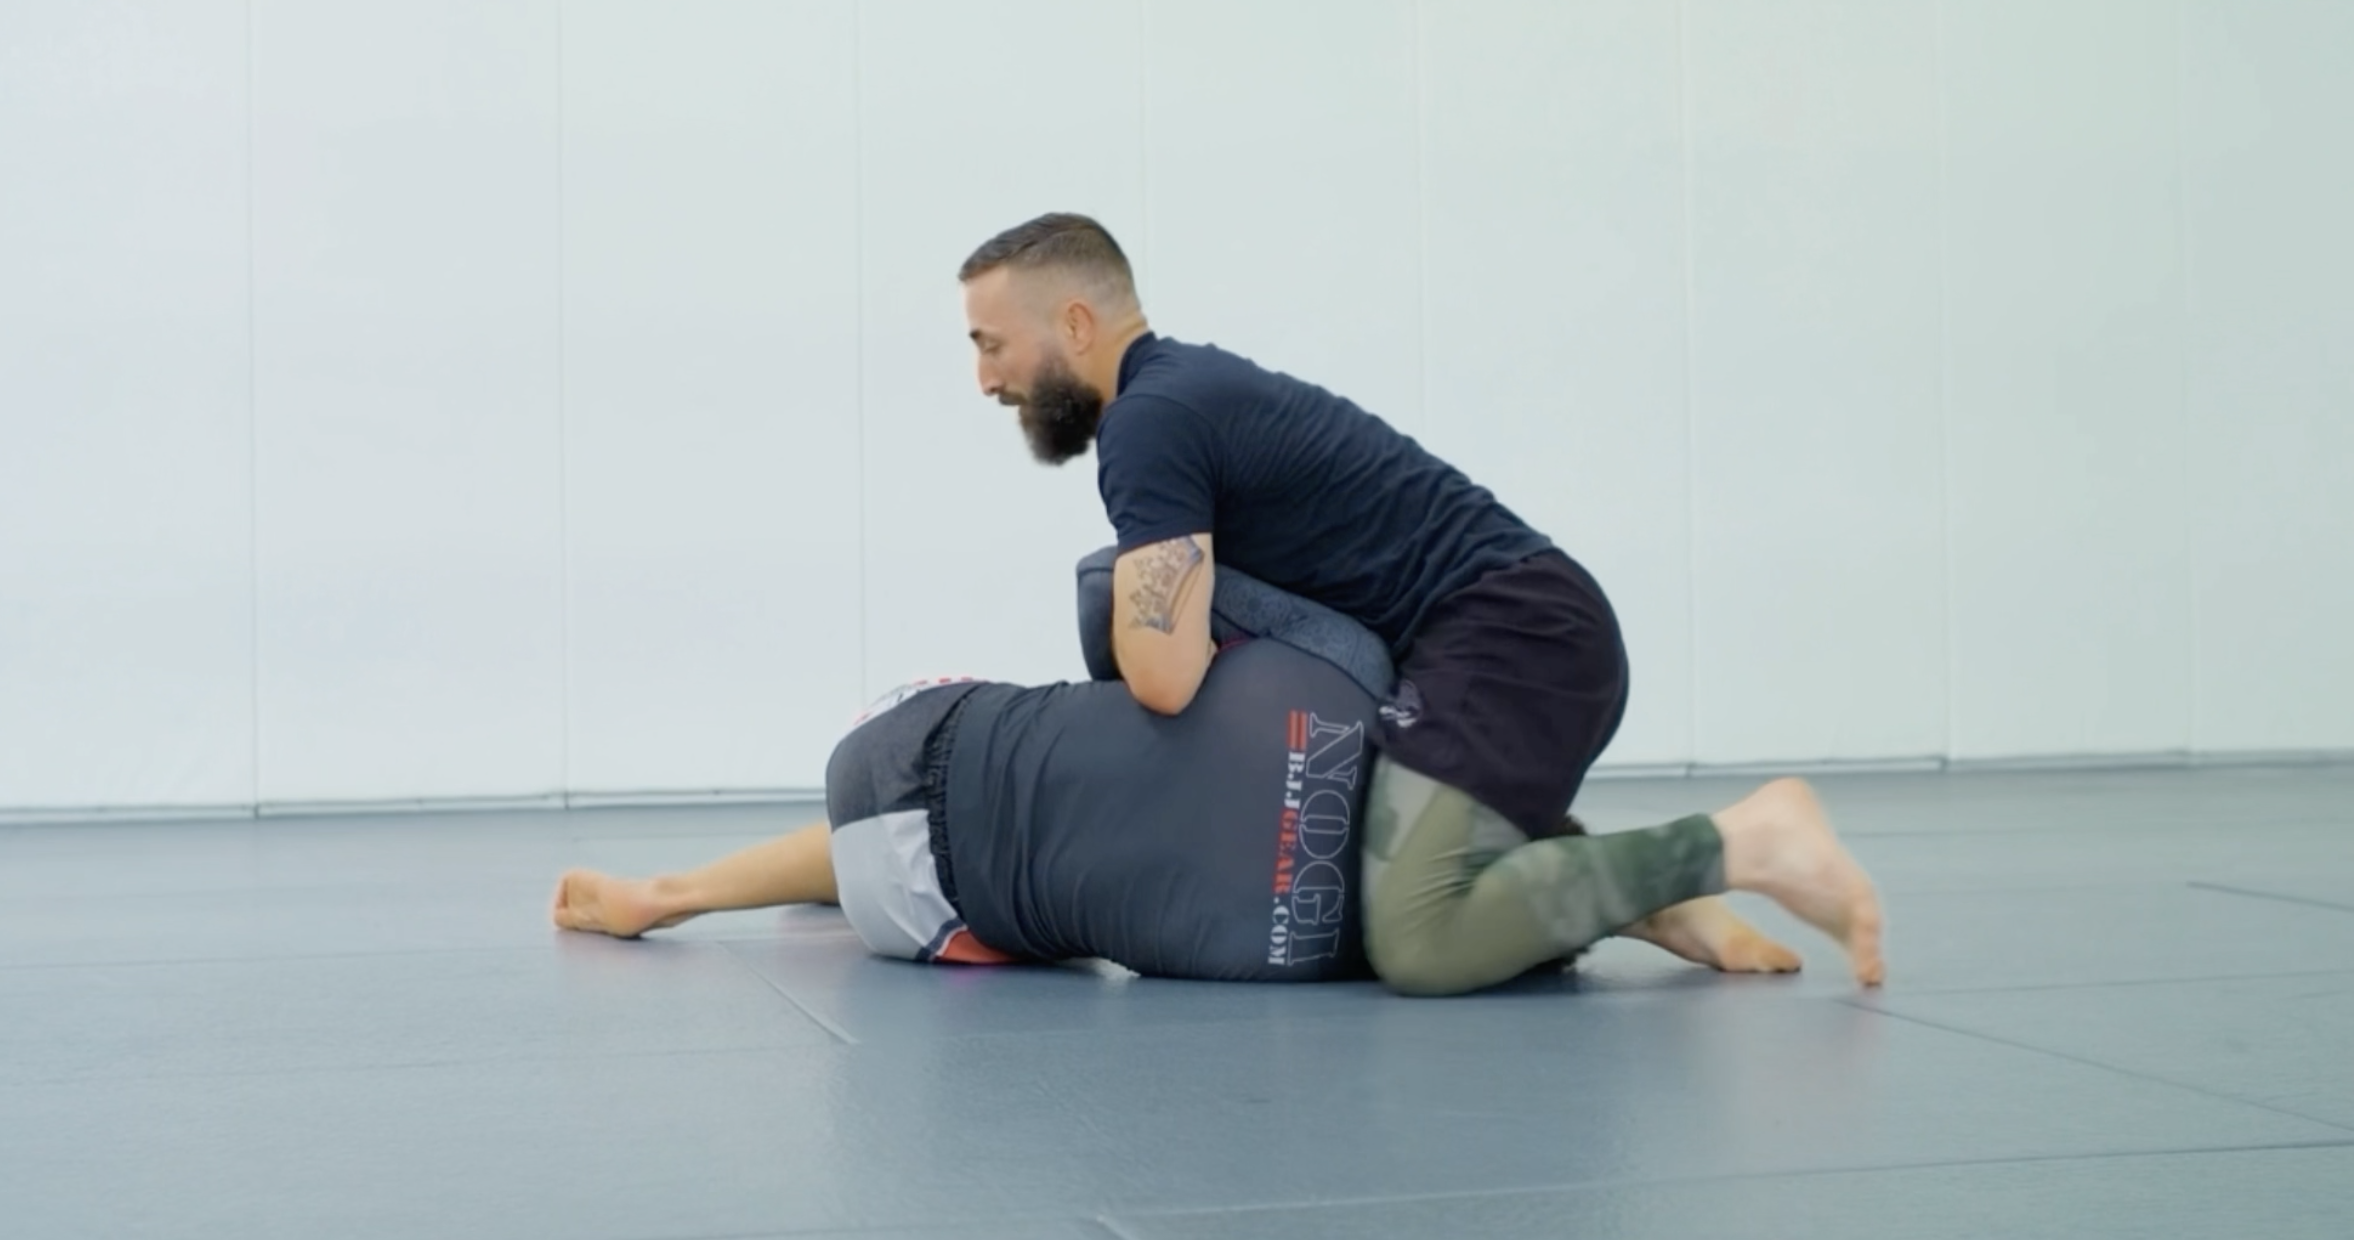
Z Guard is the foundation of the entry. Your legs wrap one of your opponent's legs while you control the near-side arm. That arm trap is the key — without it nothing else in the system opens up.
From here there are many options to pull your opponent into traps.
Key Control Points
- Secure the arm trap — elbow pinched tight.
- Get to your side. Do not stay flat.
- Drive your hips forward as you roll into the sweep.
- Pull the trapped arm across your body as you go.
- Land in Quarterdeck with the arm still under your control.
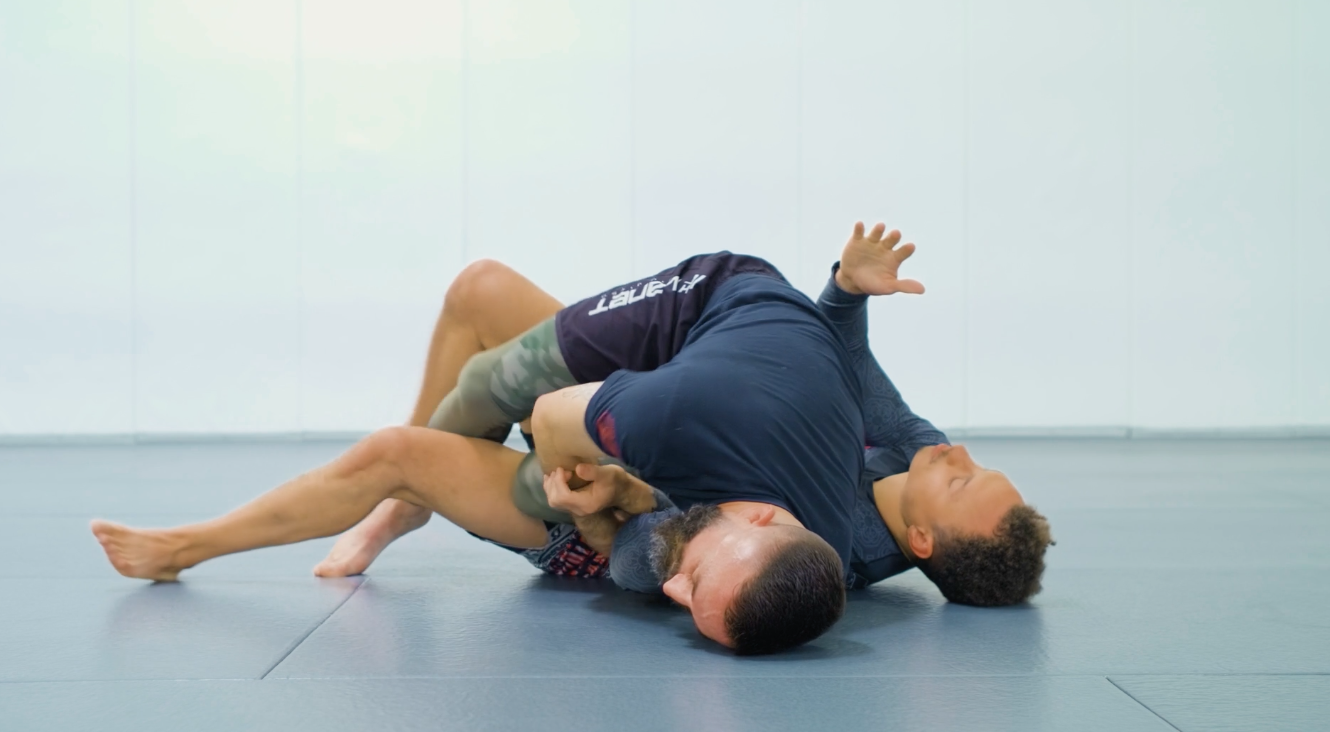
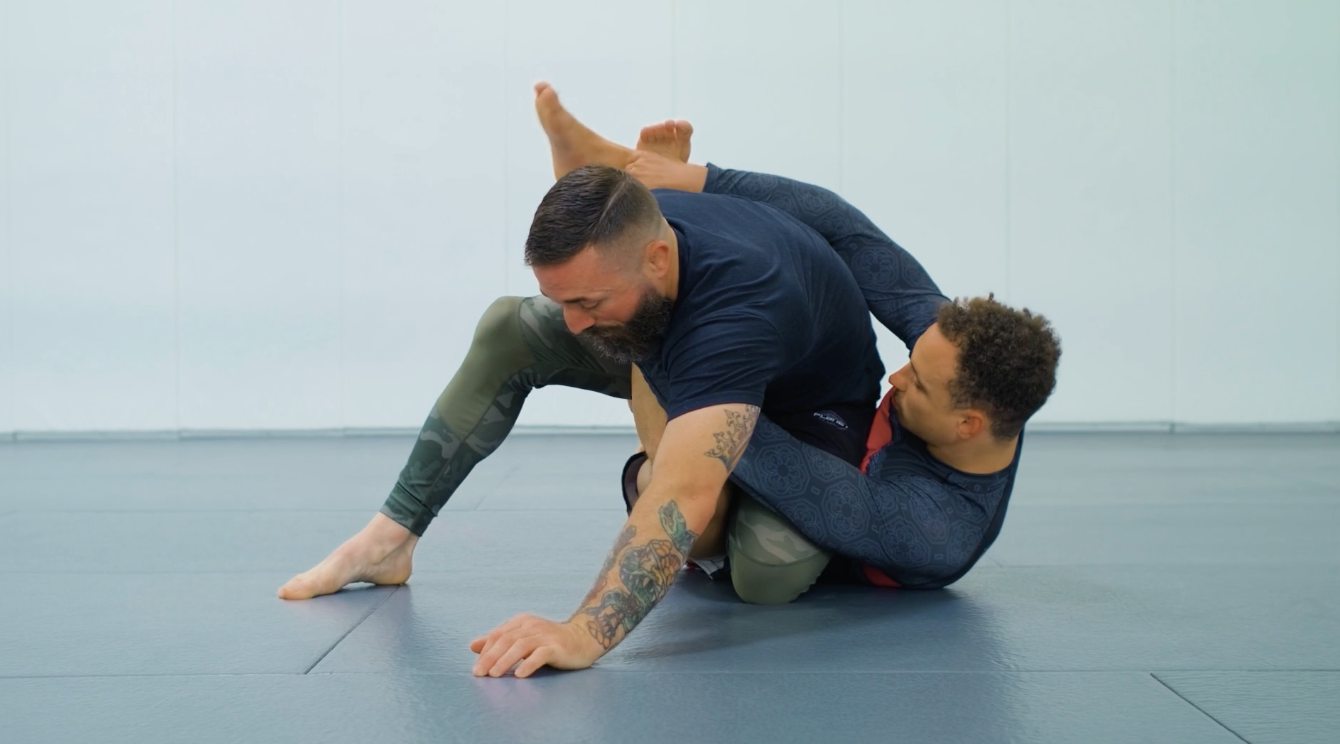
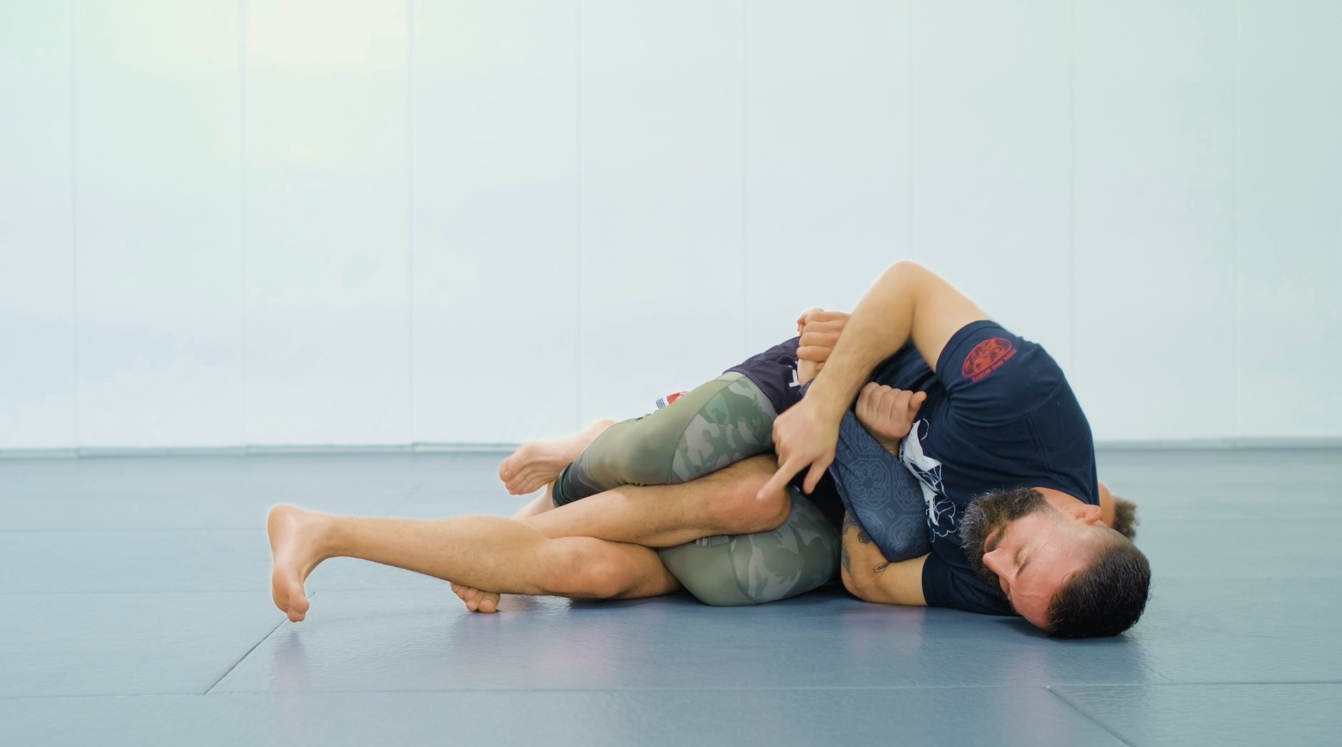
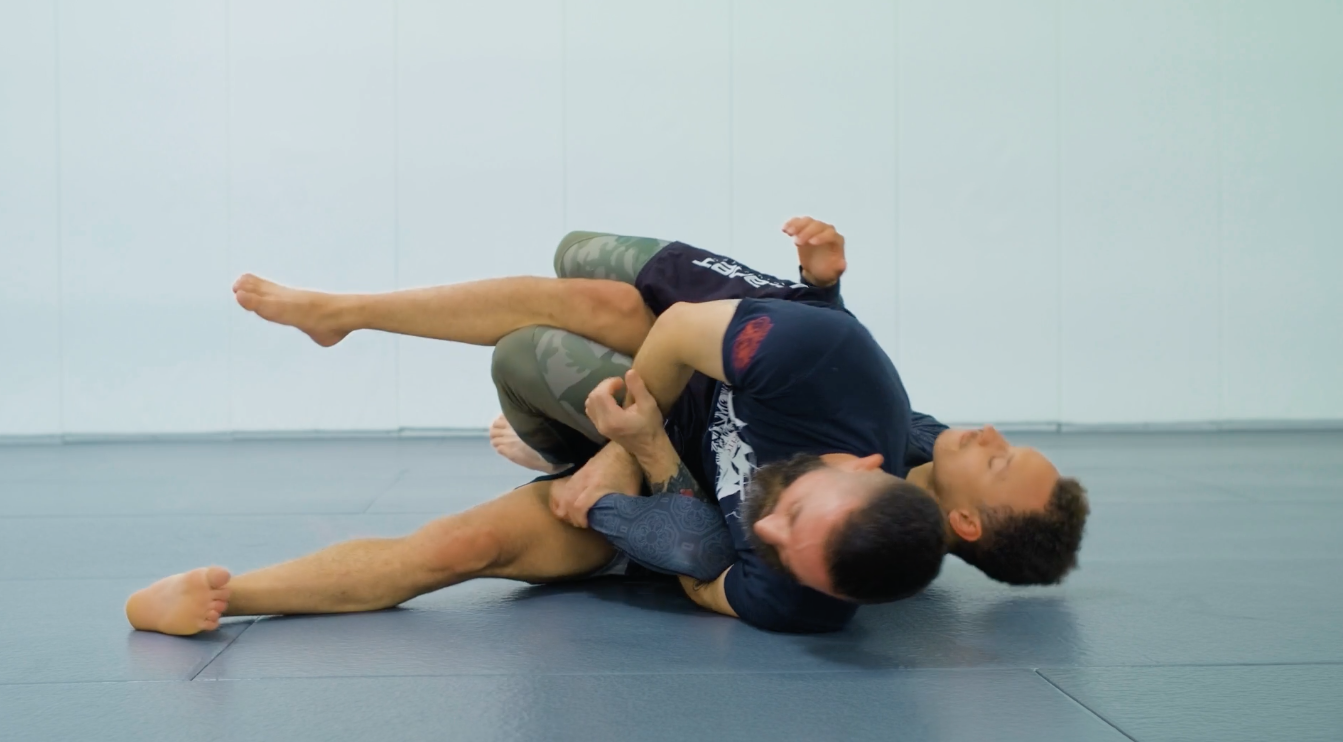
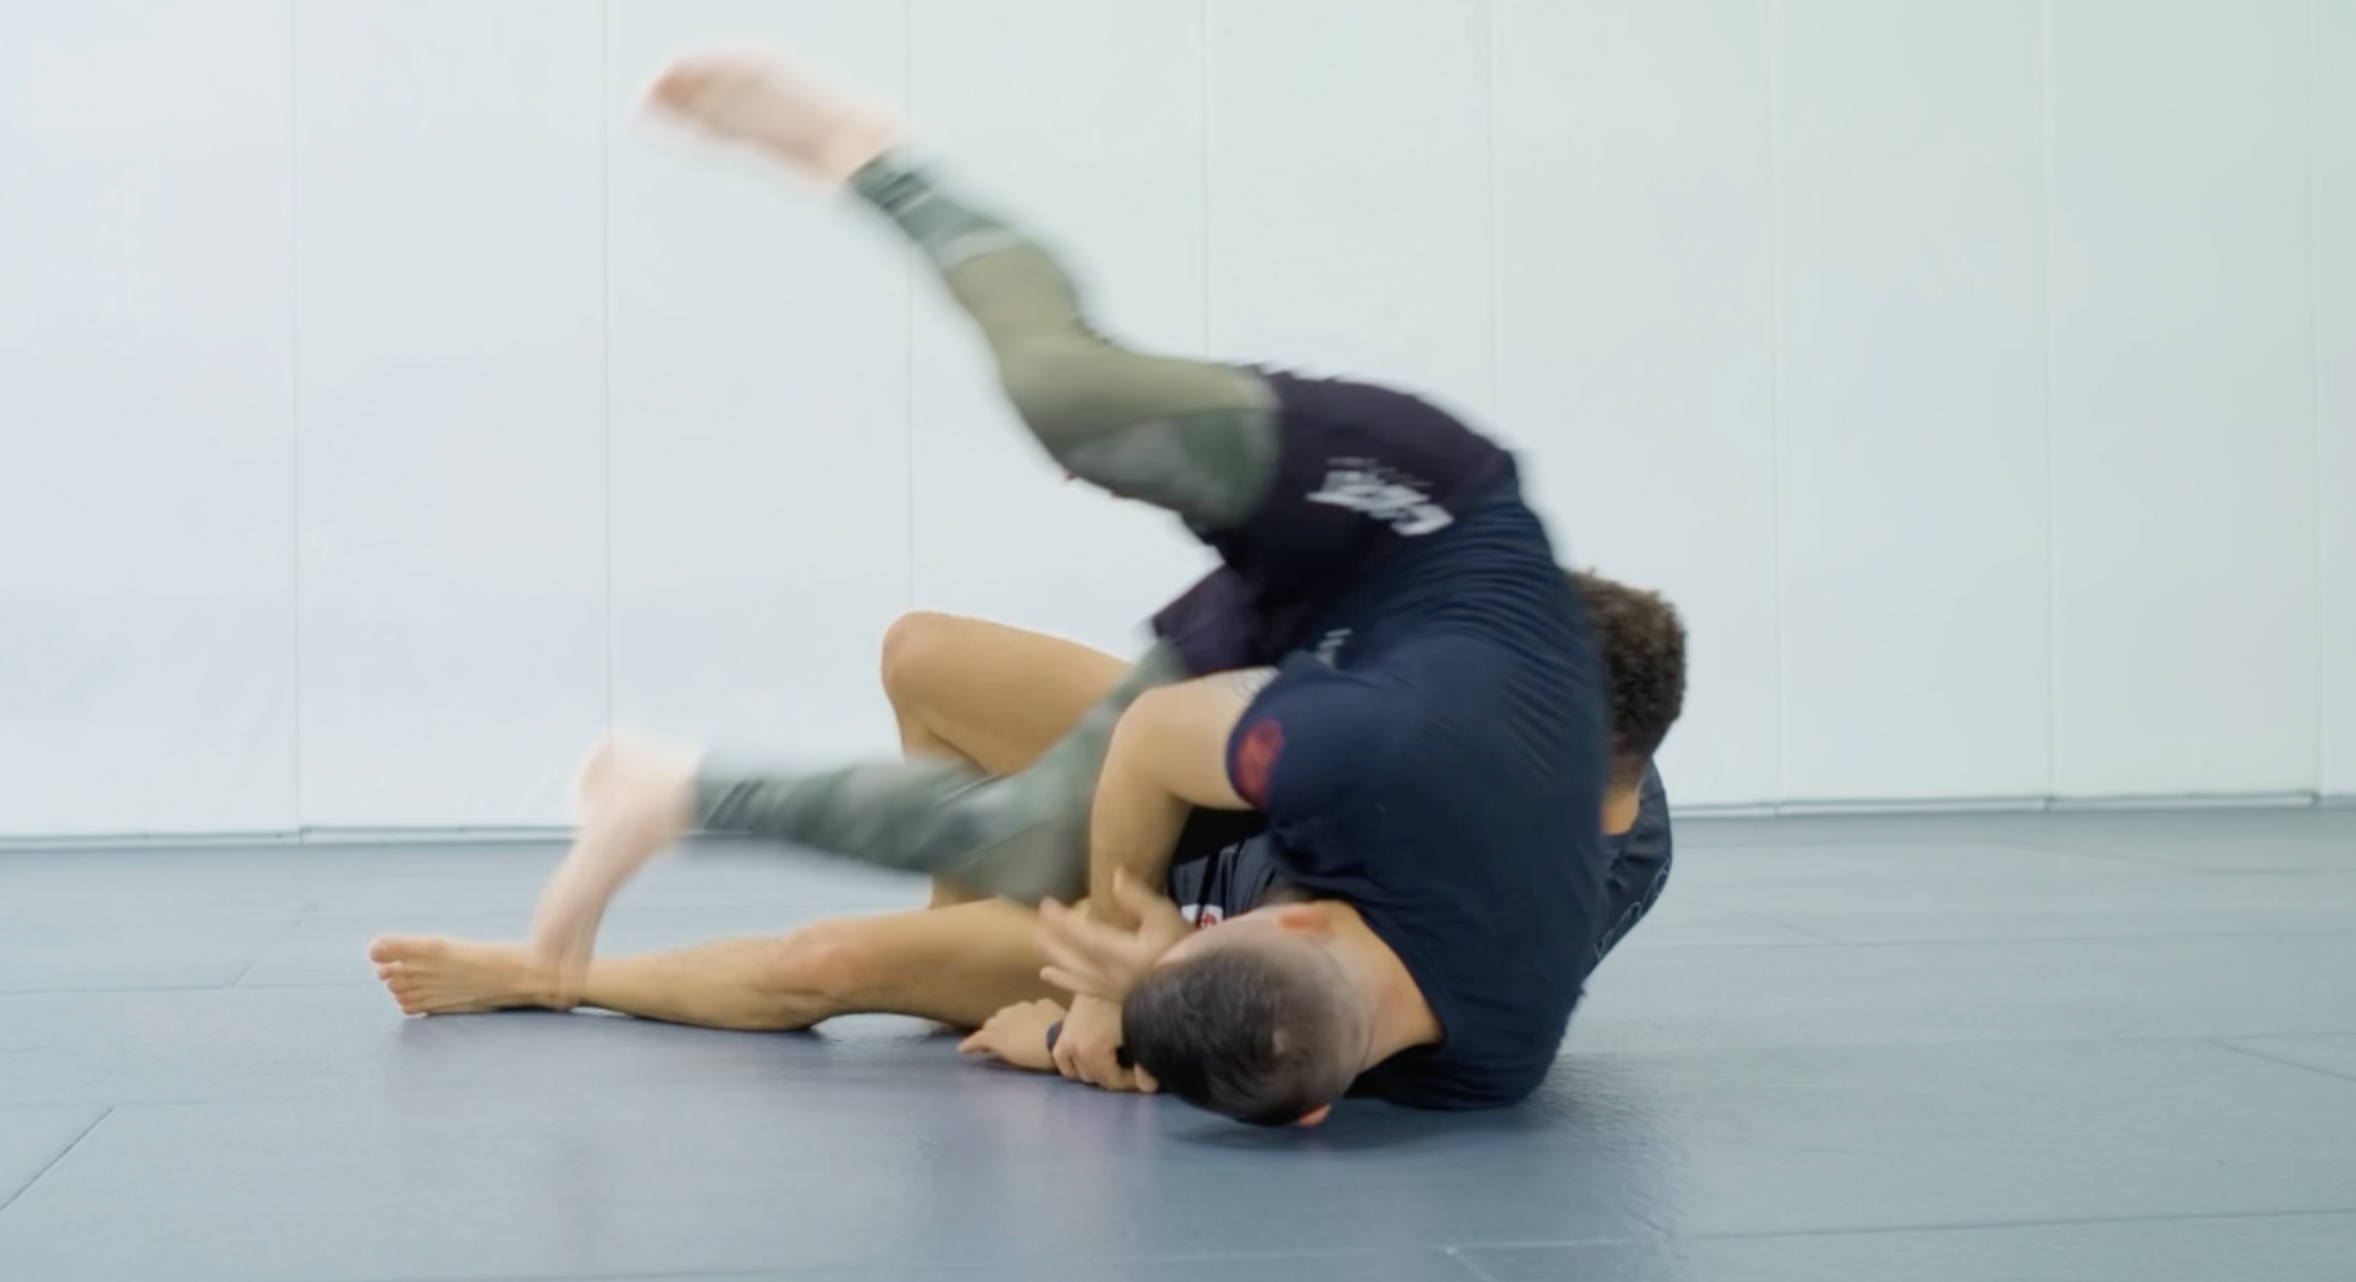
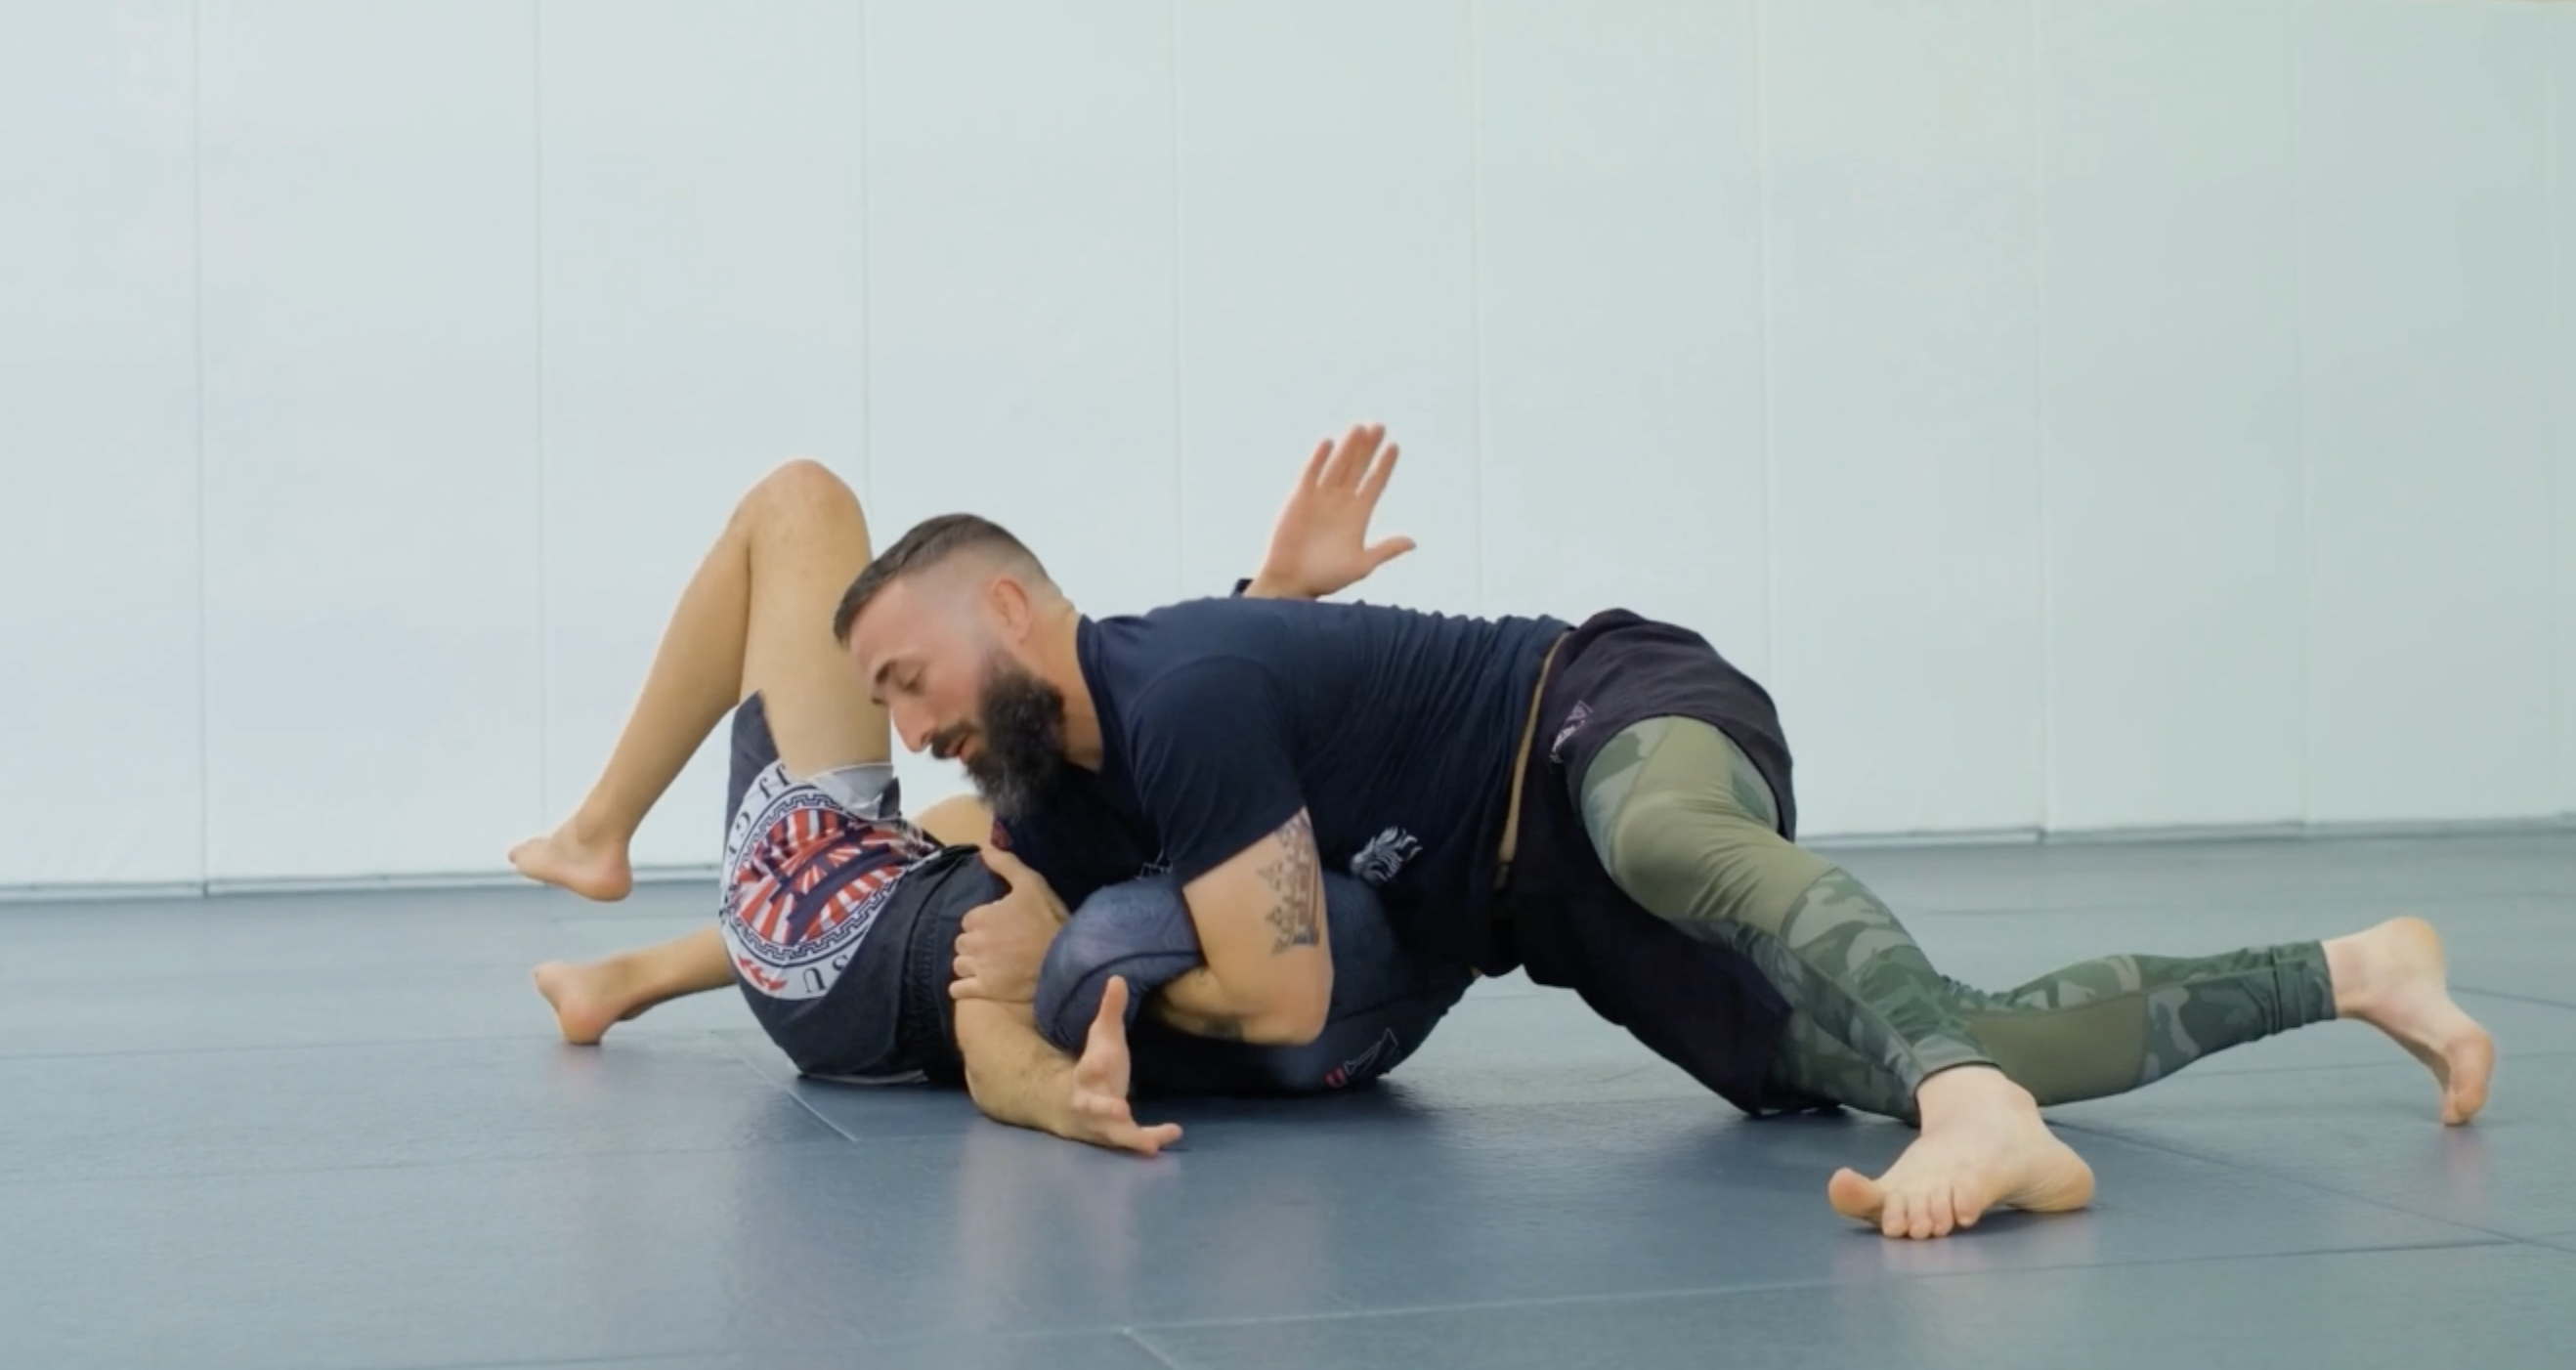
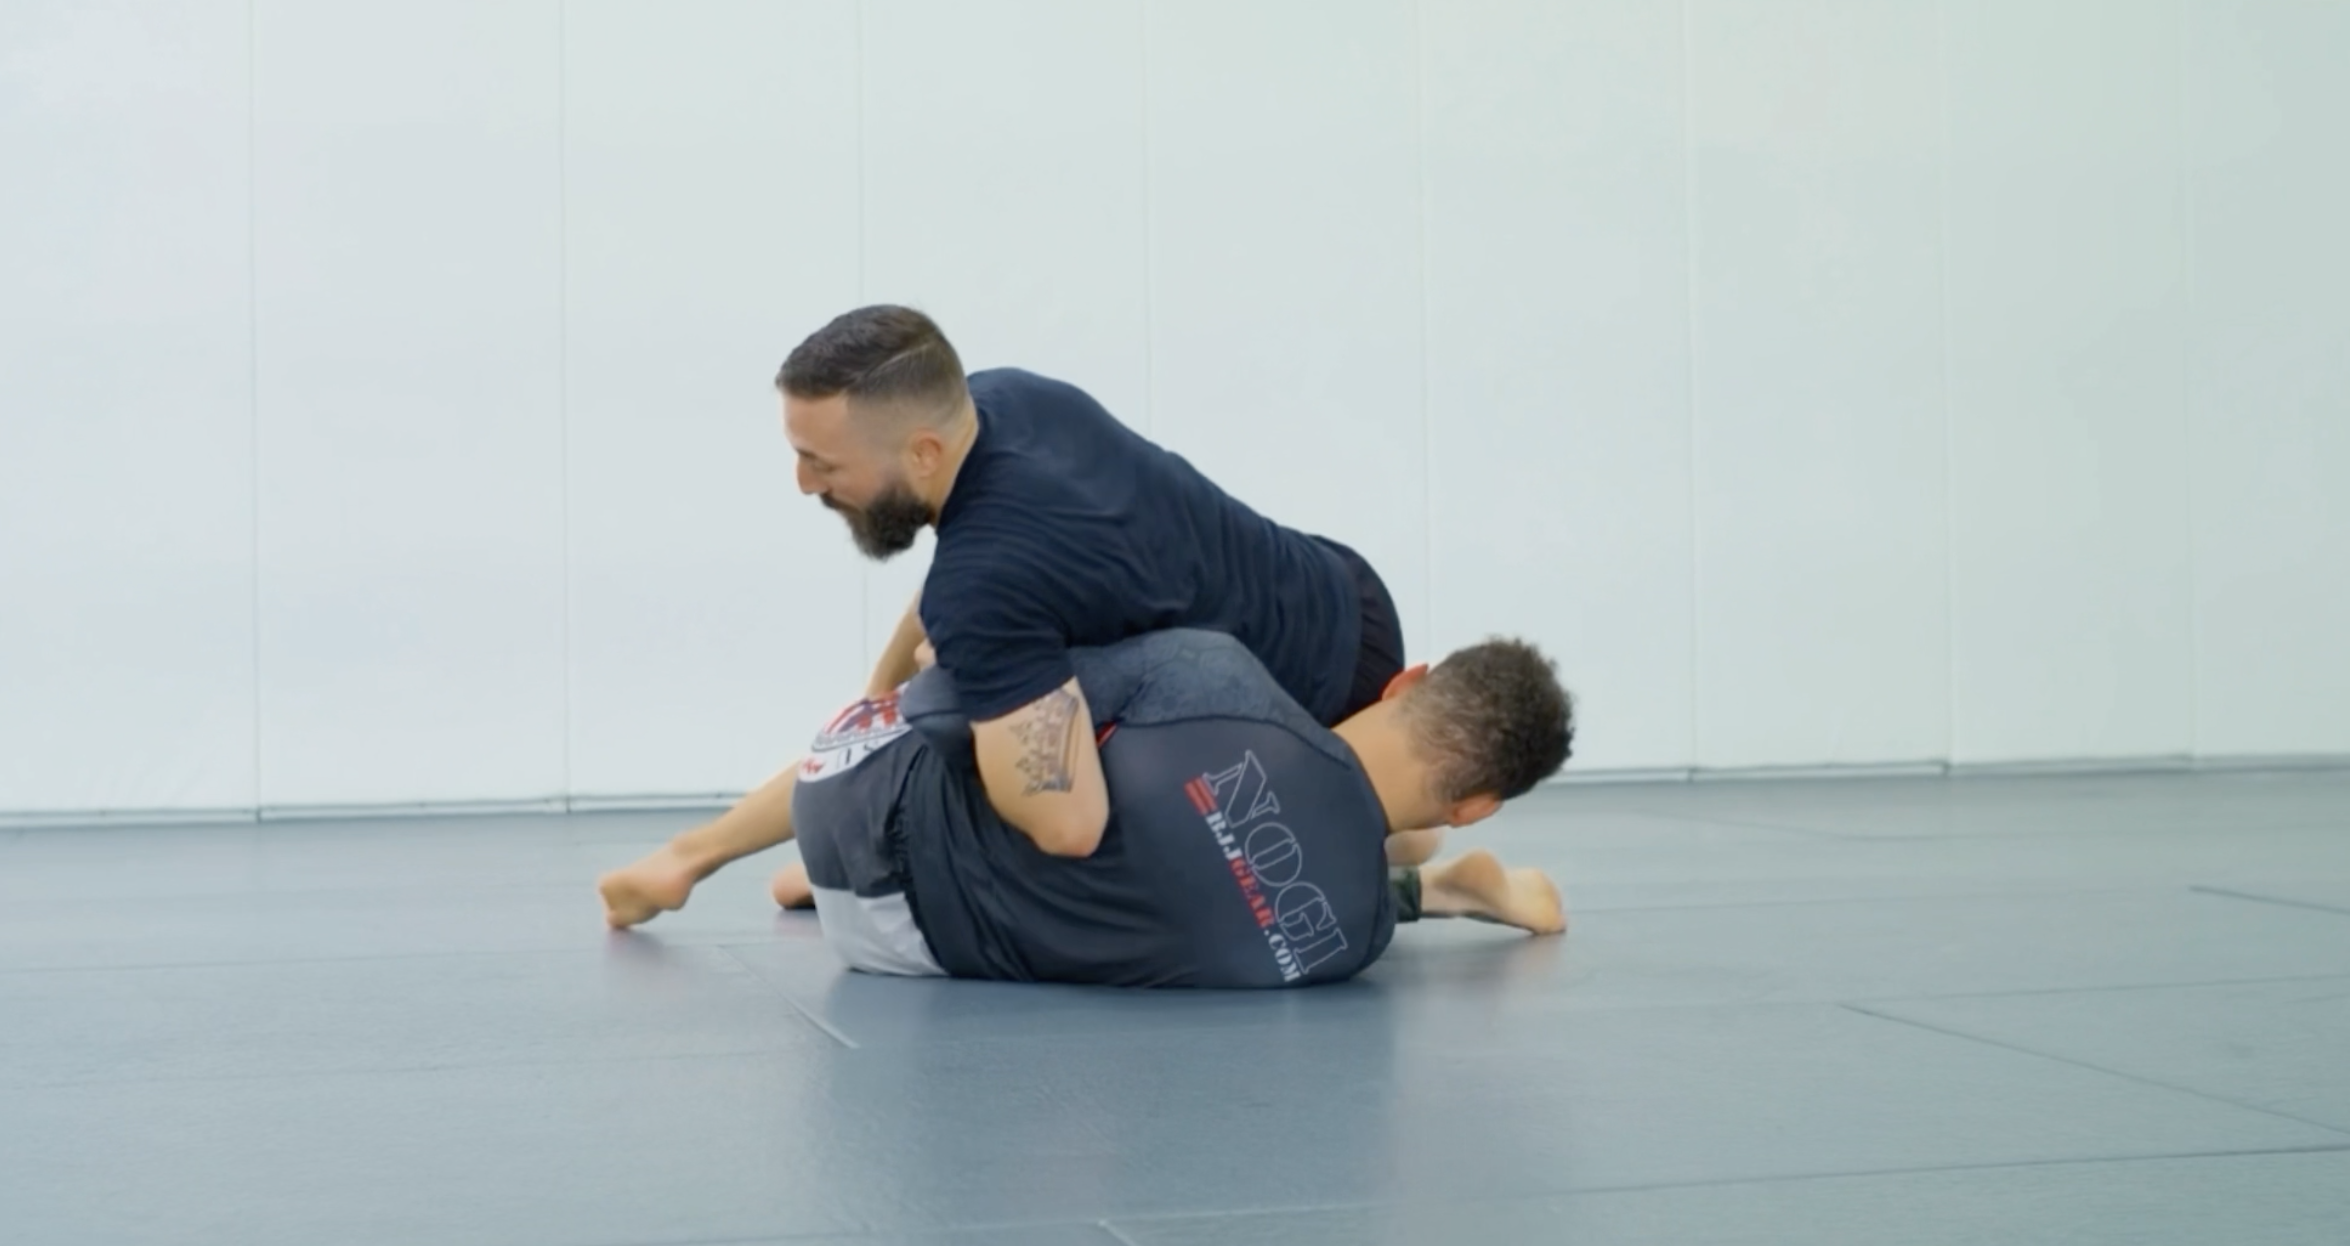
The Sweep to Quarterdeck
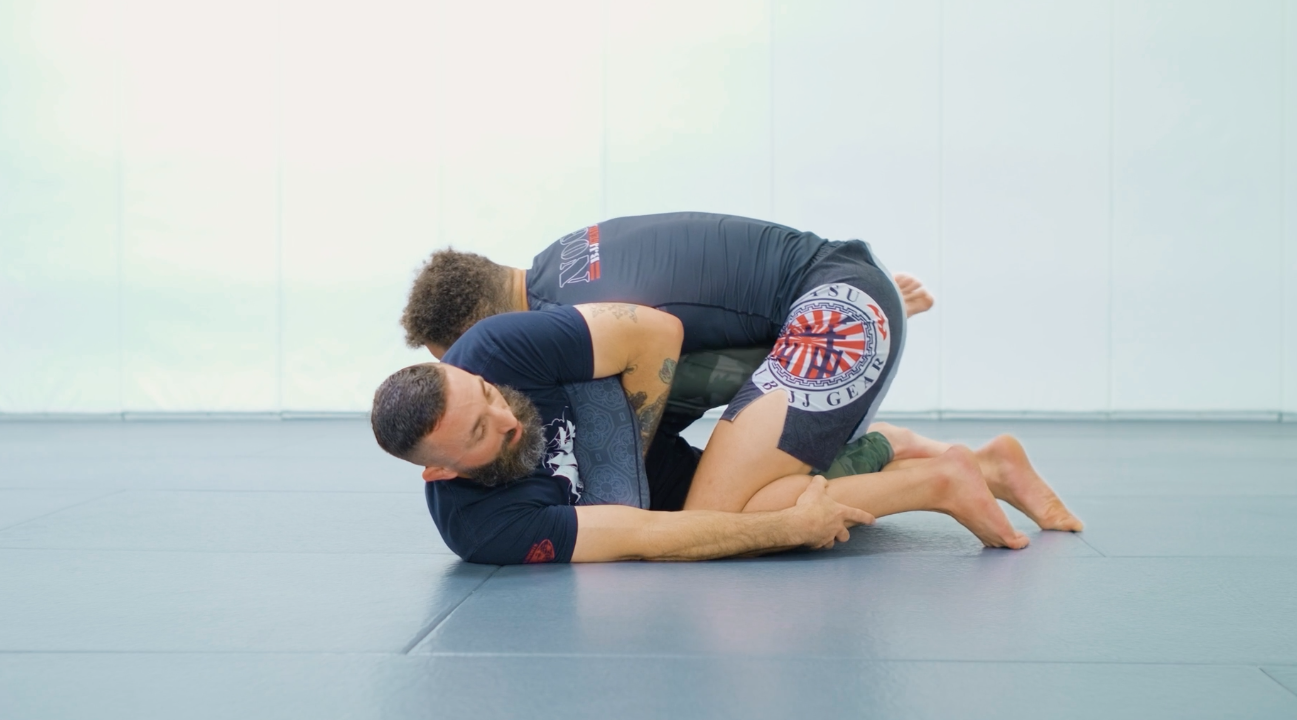
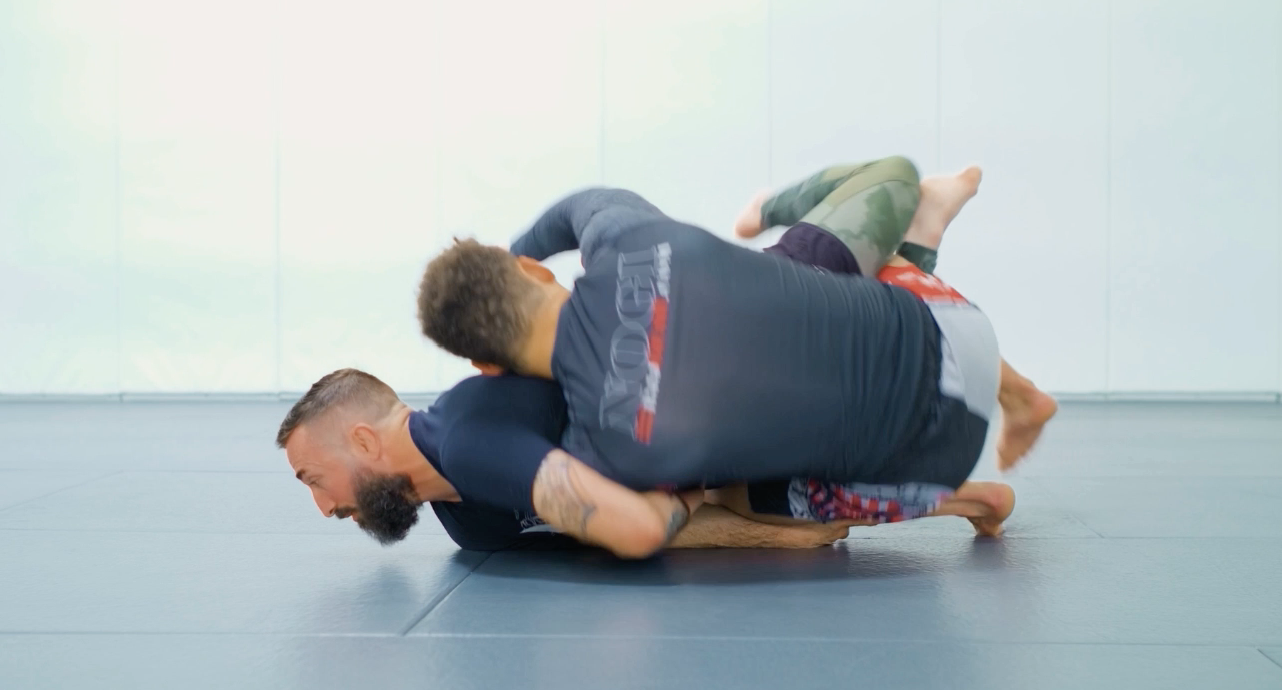
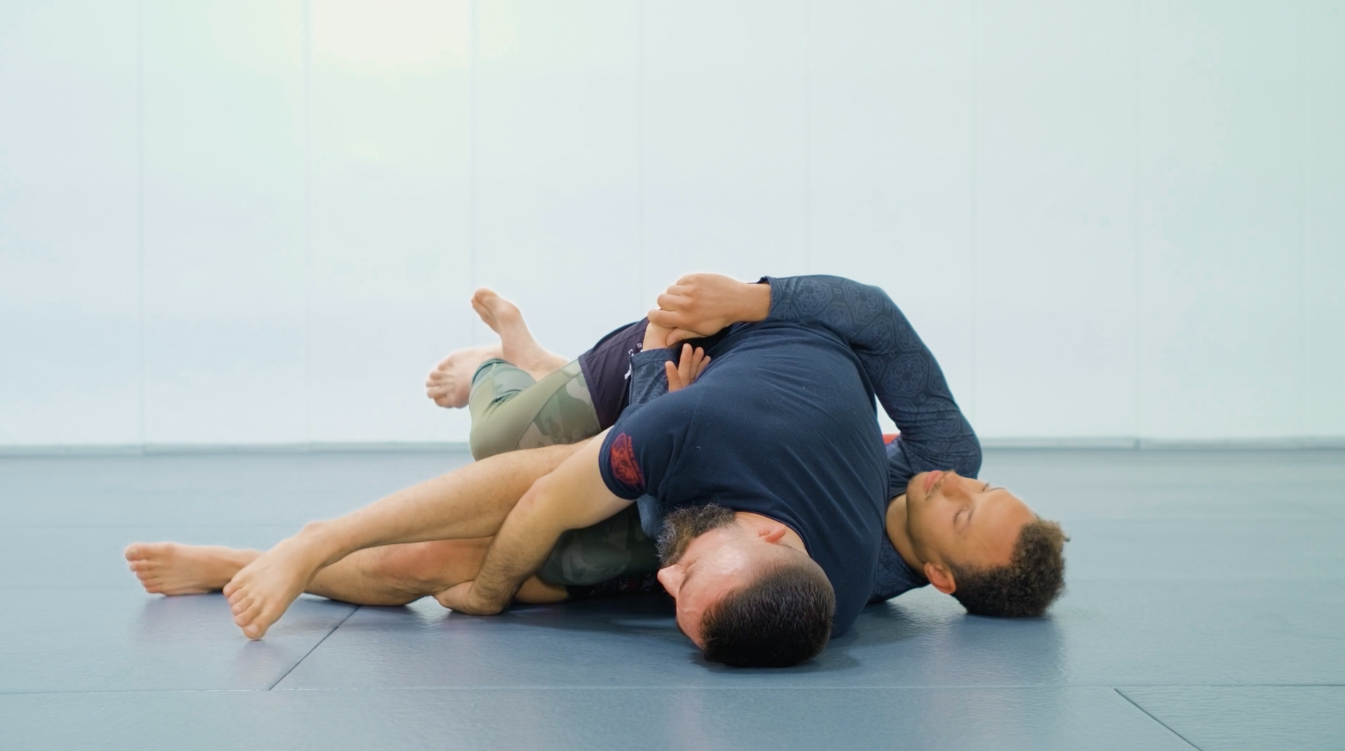
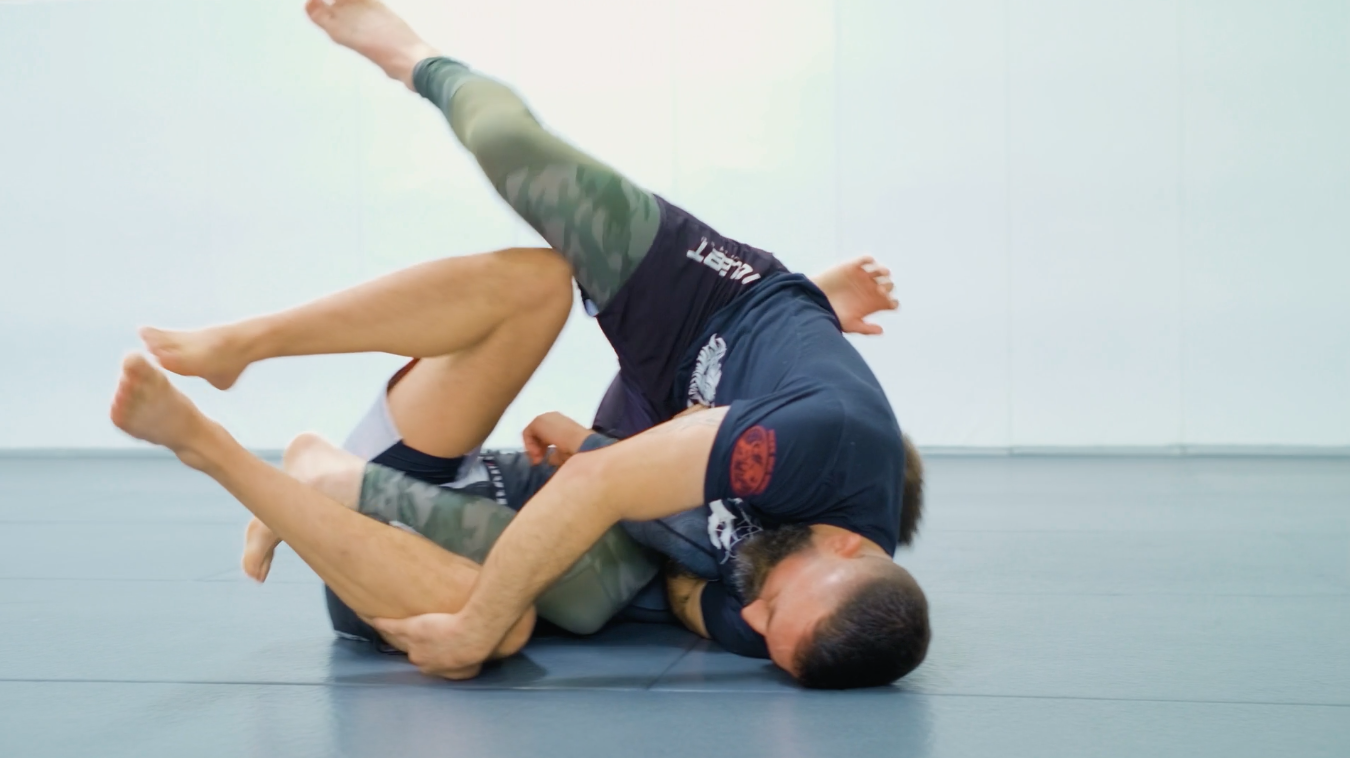
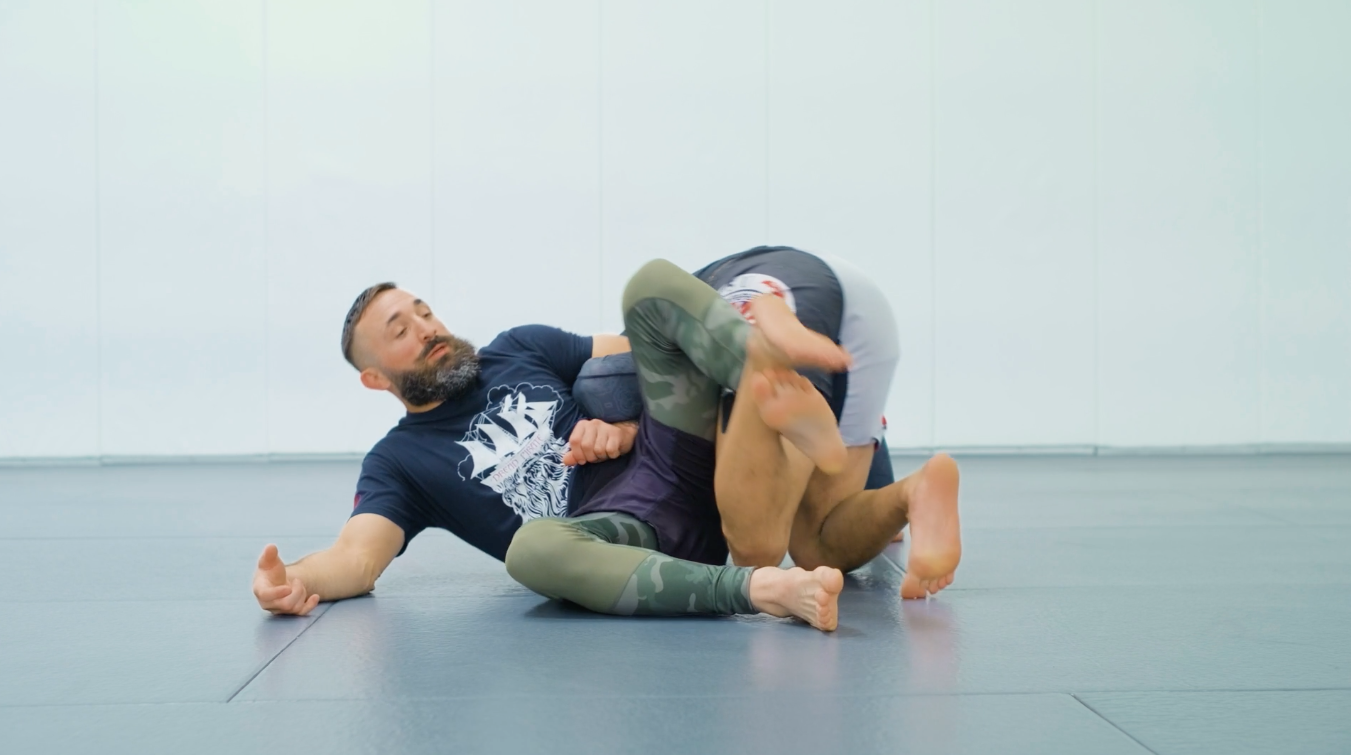
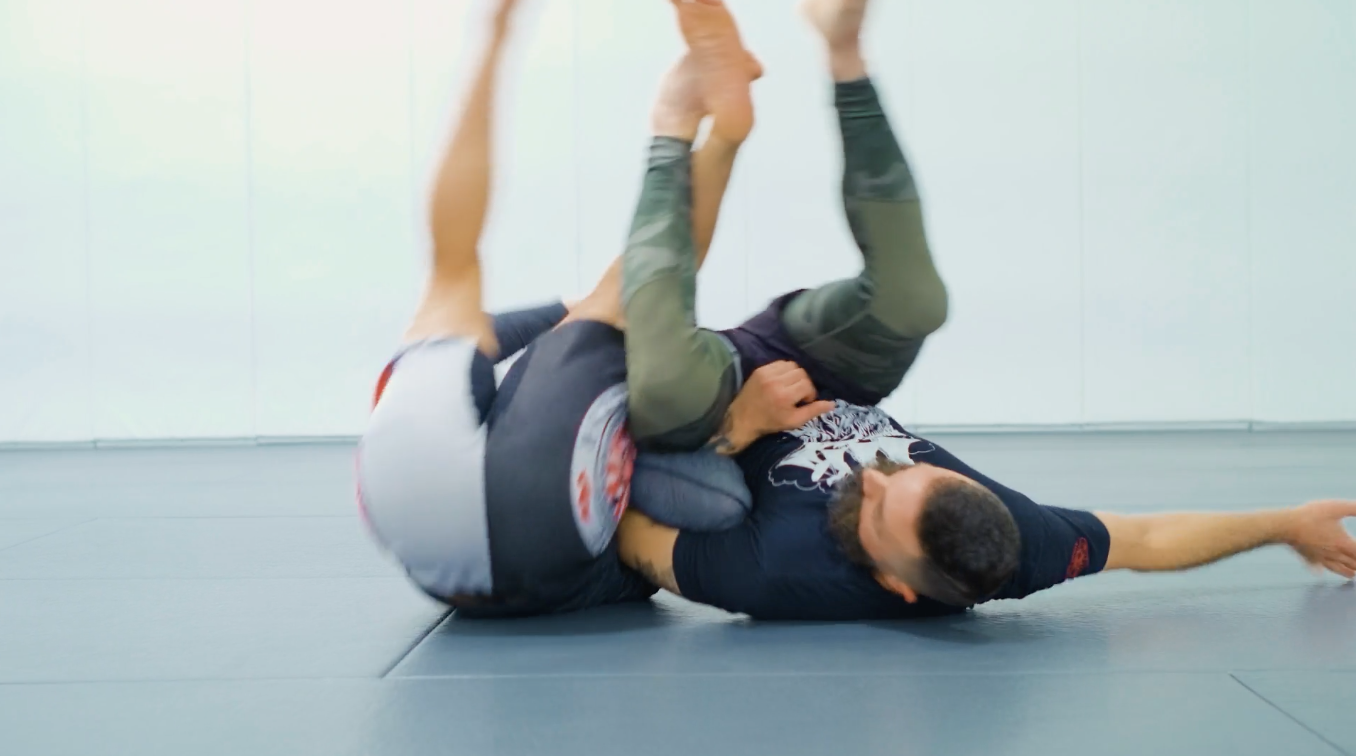
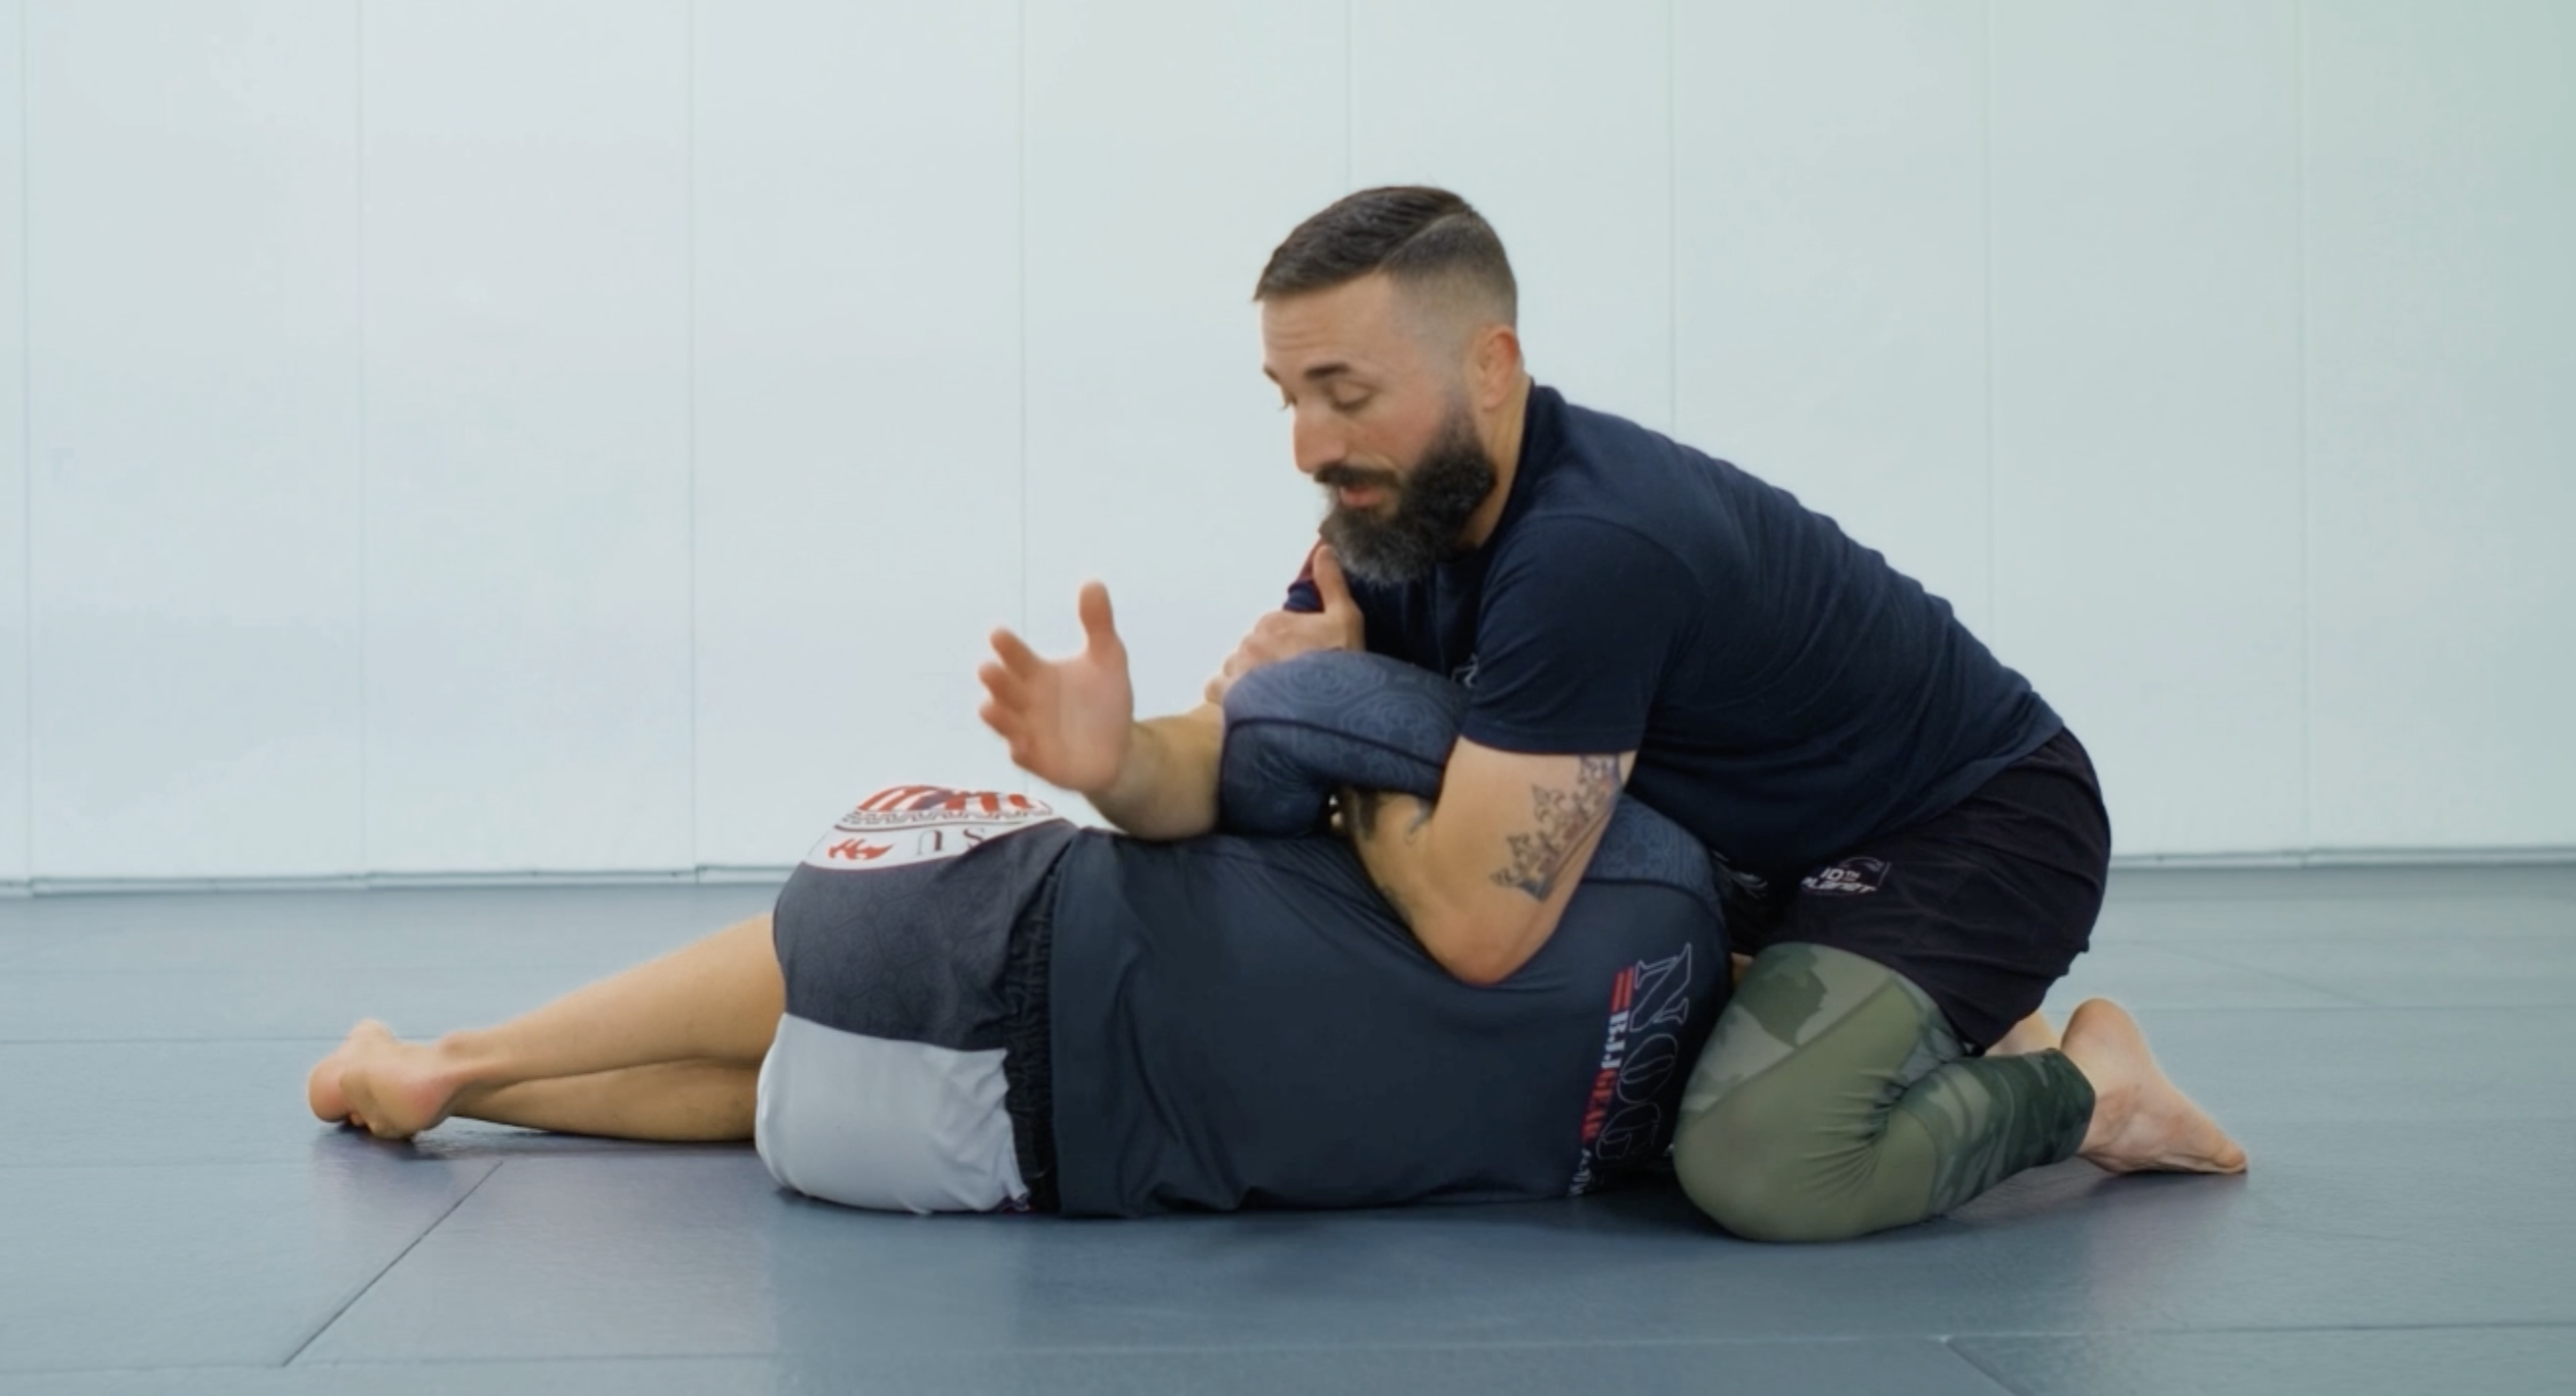
With the arm trapped, extend your top leg to the outside. This is not a hip bump sweep — do not try to force your opponent with strength. Instead, spin your body by rolling to your chest and driving your head and hips upward off the mat, arching your back. That arch creates the torque that rolls them. Once they go over, switch the hand that was blocking their knee to grabbing behind it — this is your anchor. Then bring your extended leg back across their hip line until your foot is planted against their hips.
- Pull your knee close to your chest in the Z guard configuration. You want them close so you can lock the arm trap.
- Near-side arm trapped — elbow pinched tightly to your body, locking their arm in your control.
- With the arm trapped, block their outside leg and extend your Z guard leg to the outside and close the space with your hips.
- Roll chest-down, driving your head and hips up off the mat to create the sweep. Once you have the sweep switch hand that was blocking their leg to behind their knee and secure yourself.
- Important: when you finish the sweep bring your z guard leg you extended, back across their hip, so that the instep of your foot connects to their hips.
Do not let go of the arm. Reverse your direction immediately and use their posted weight to sweep the other way (see Inside Anchor). Every failed sweep sets up the next one.
Watch: Z Guard to Quarterdeck
Arm trap, sweep entry, and landing
▾
The arm trap is everything. Pinch your elbow tight to your body and do not let it open. This controls their shoulder rotation. If you cannot establish the trap, reset and find the arm first — never force the sweep without it.
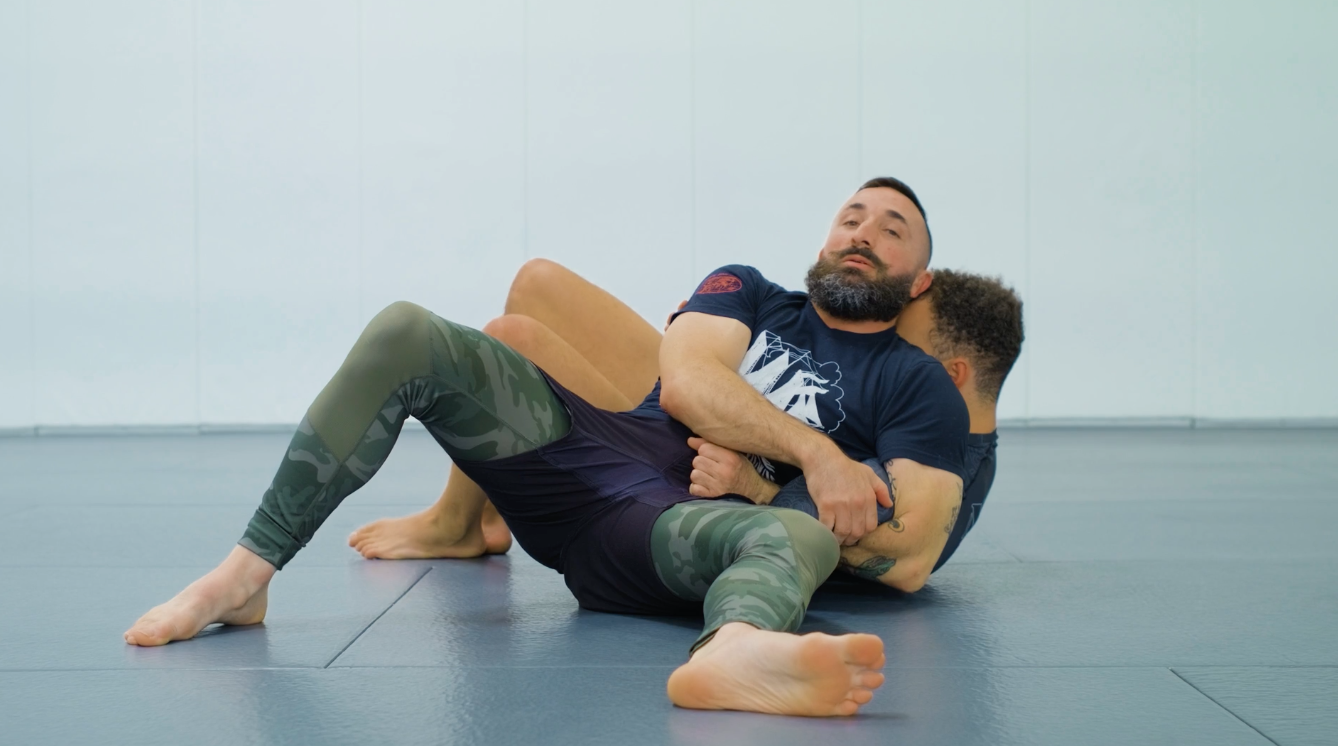
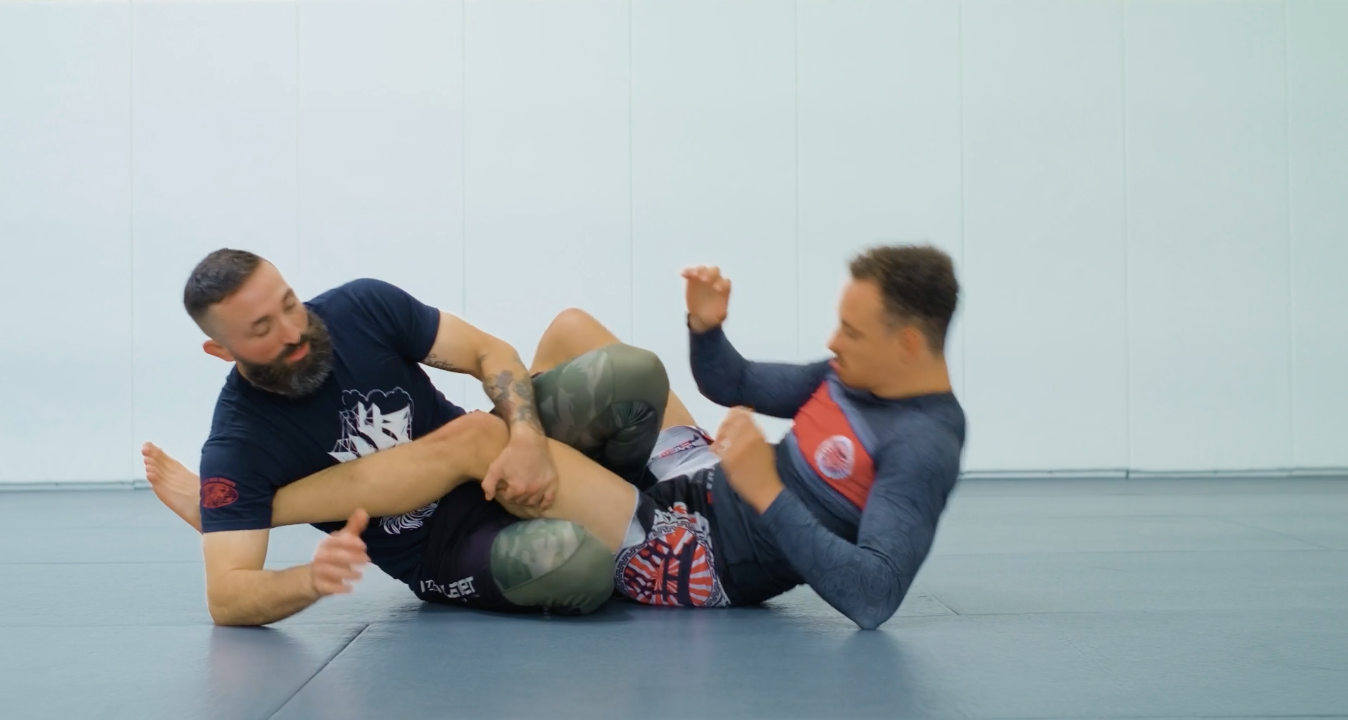
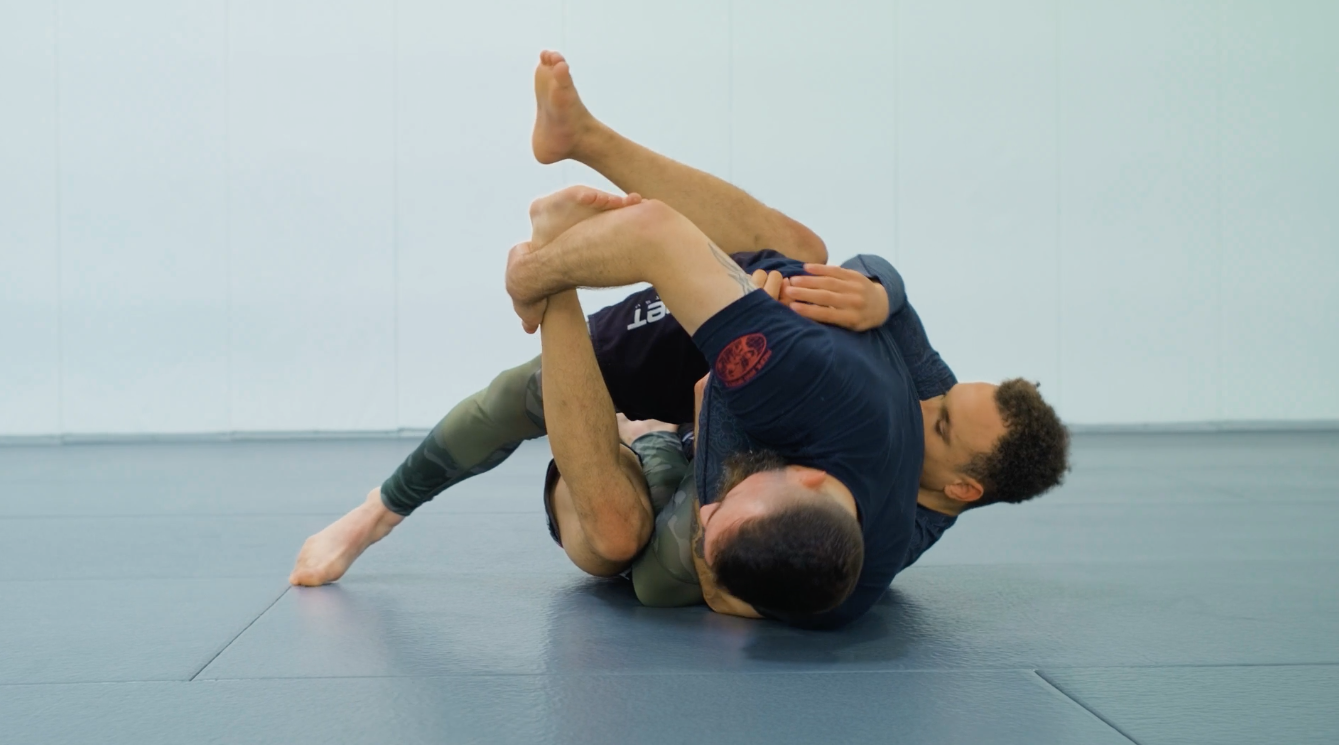
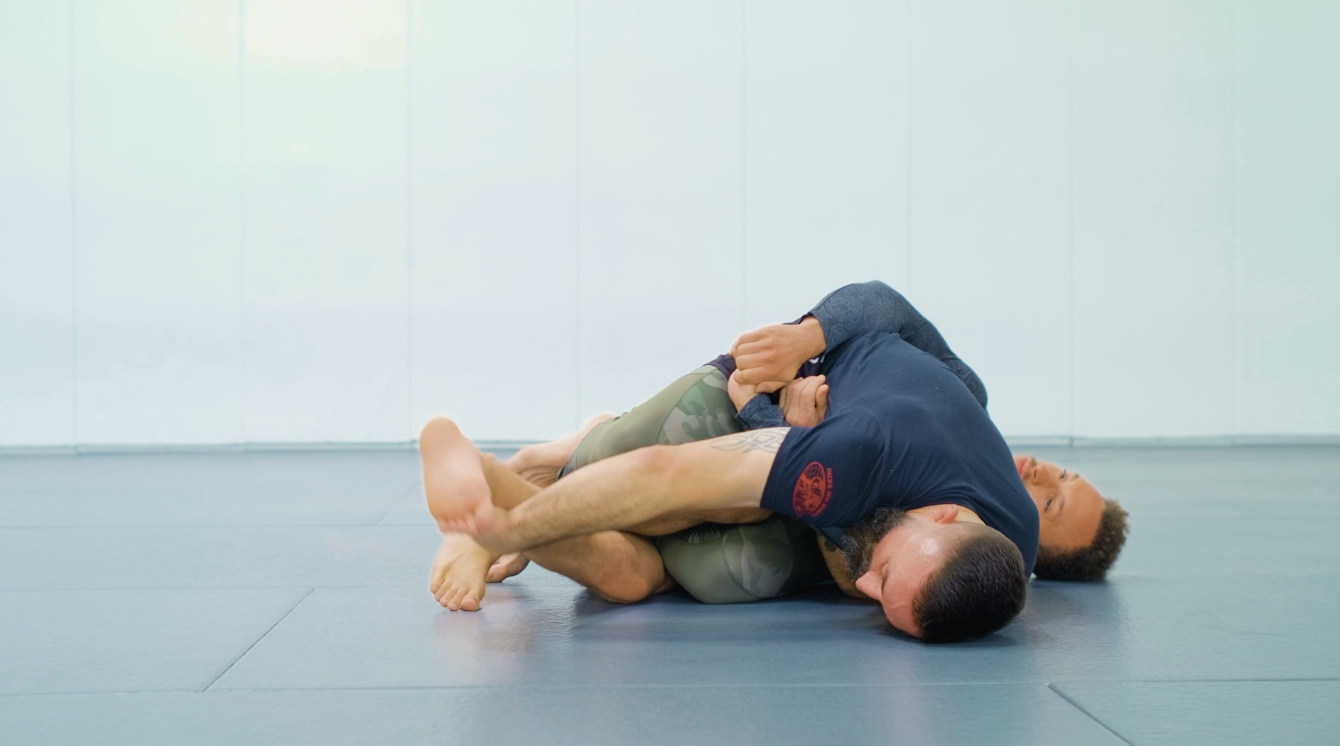
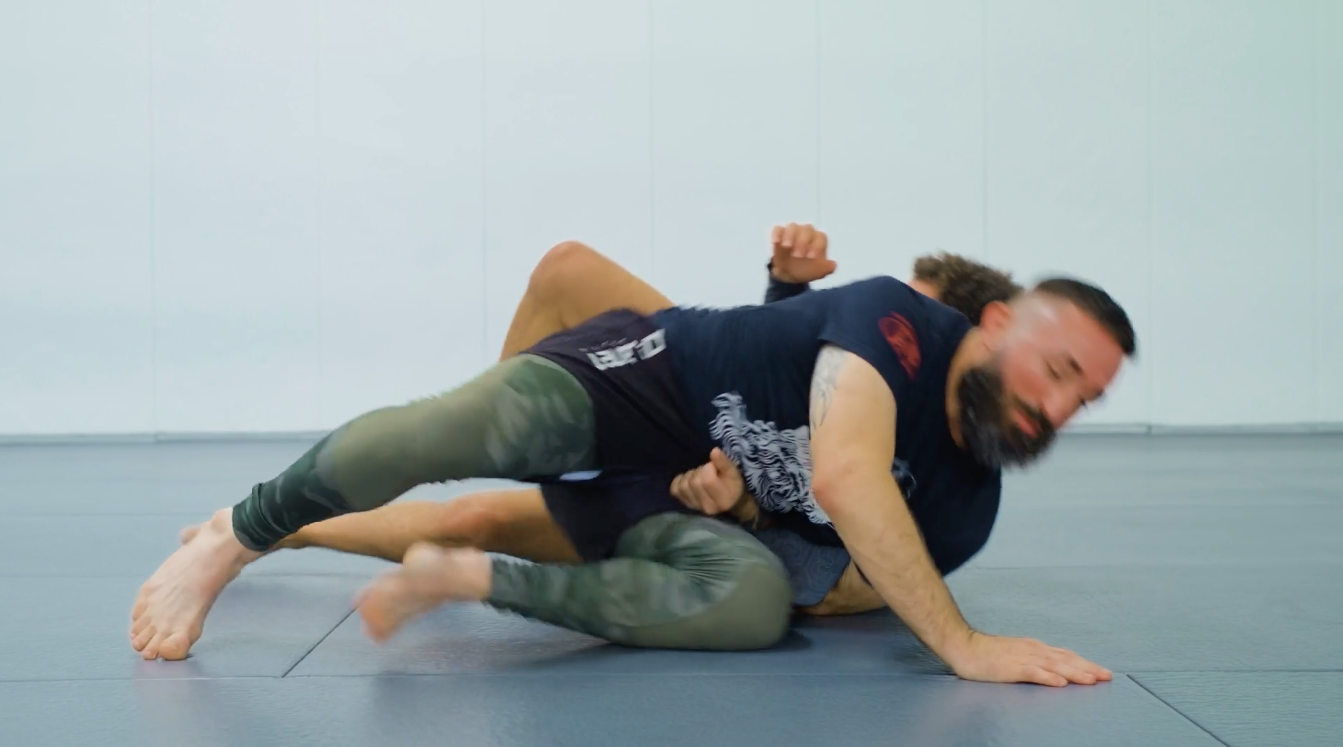
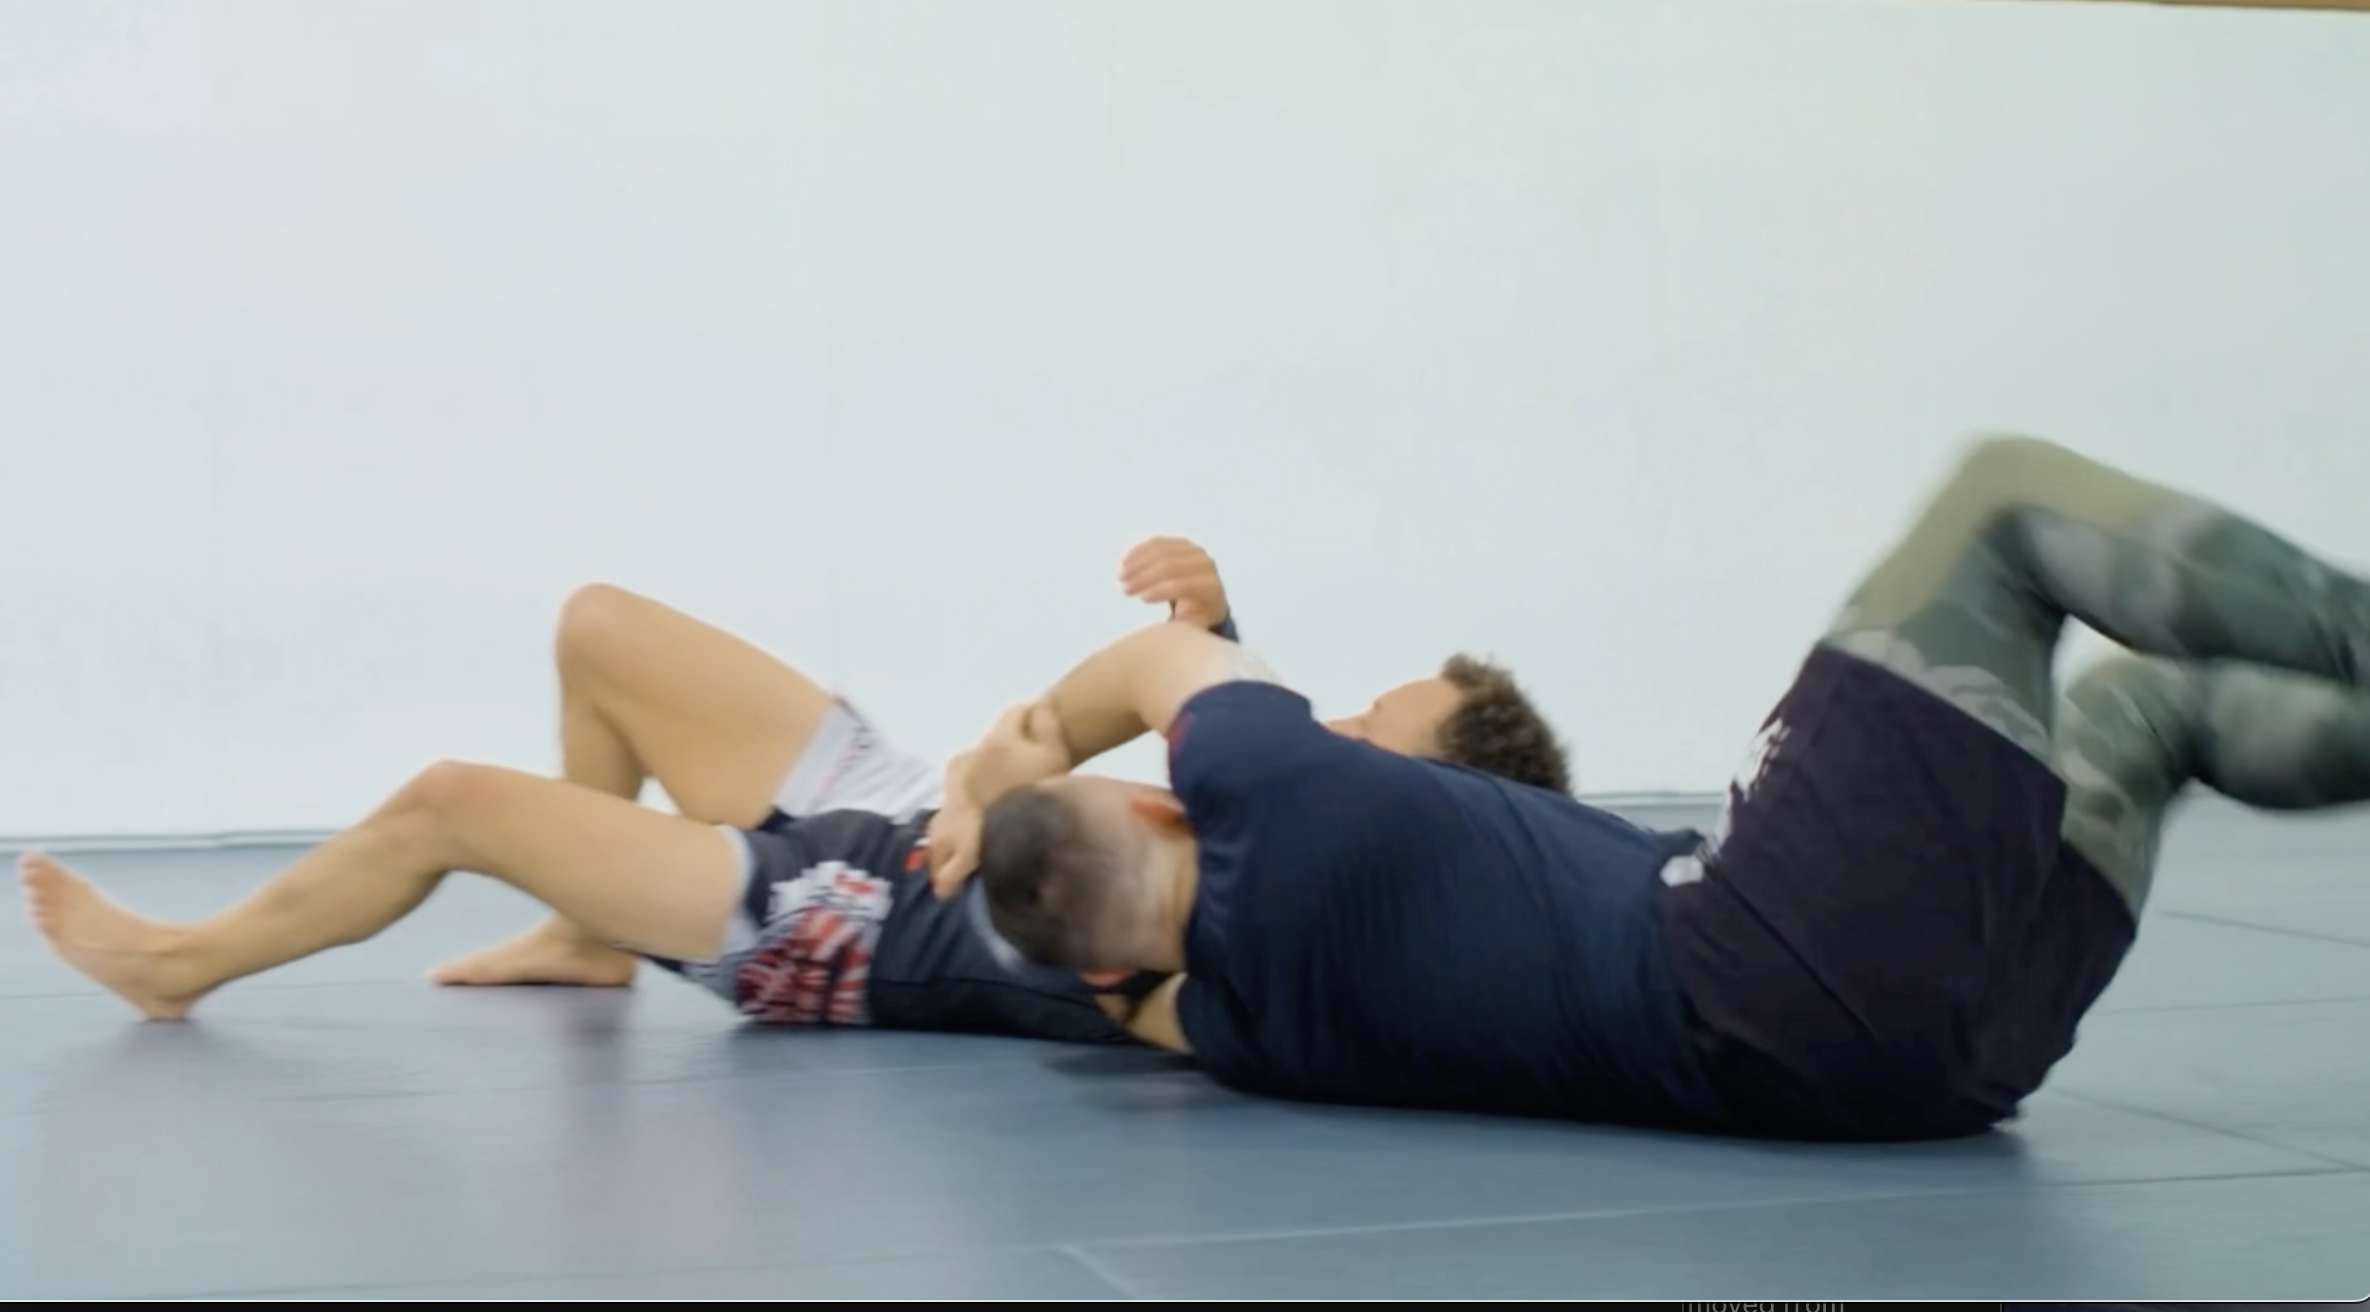
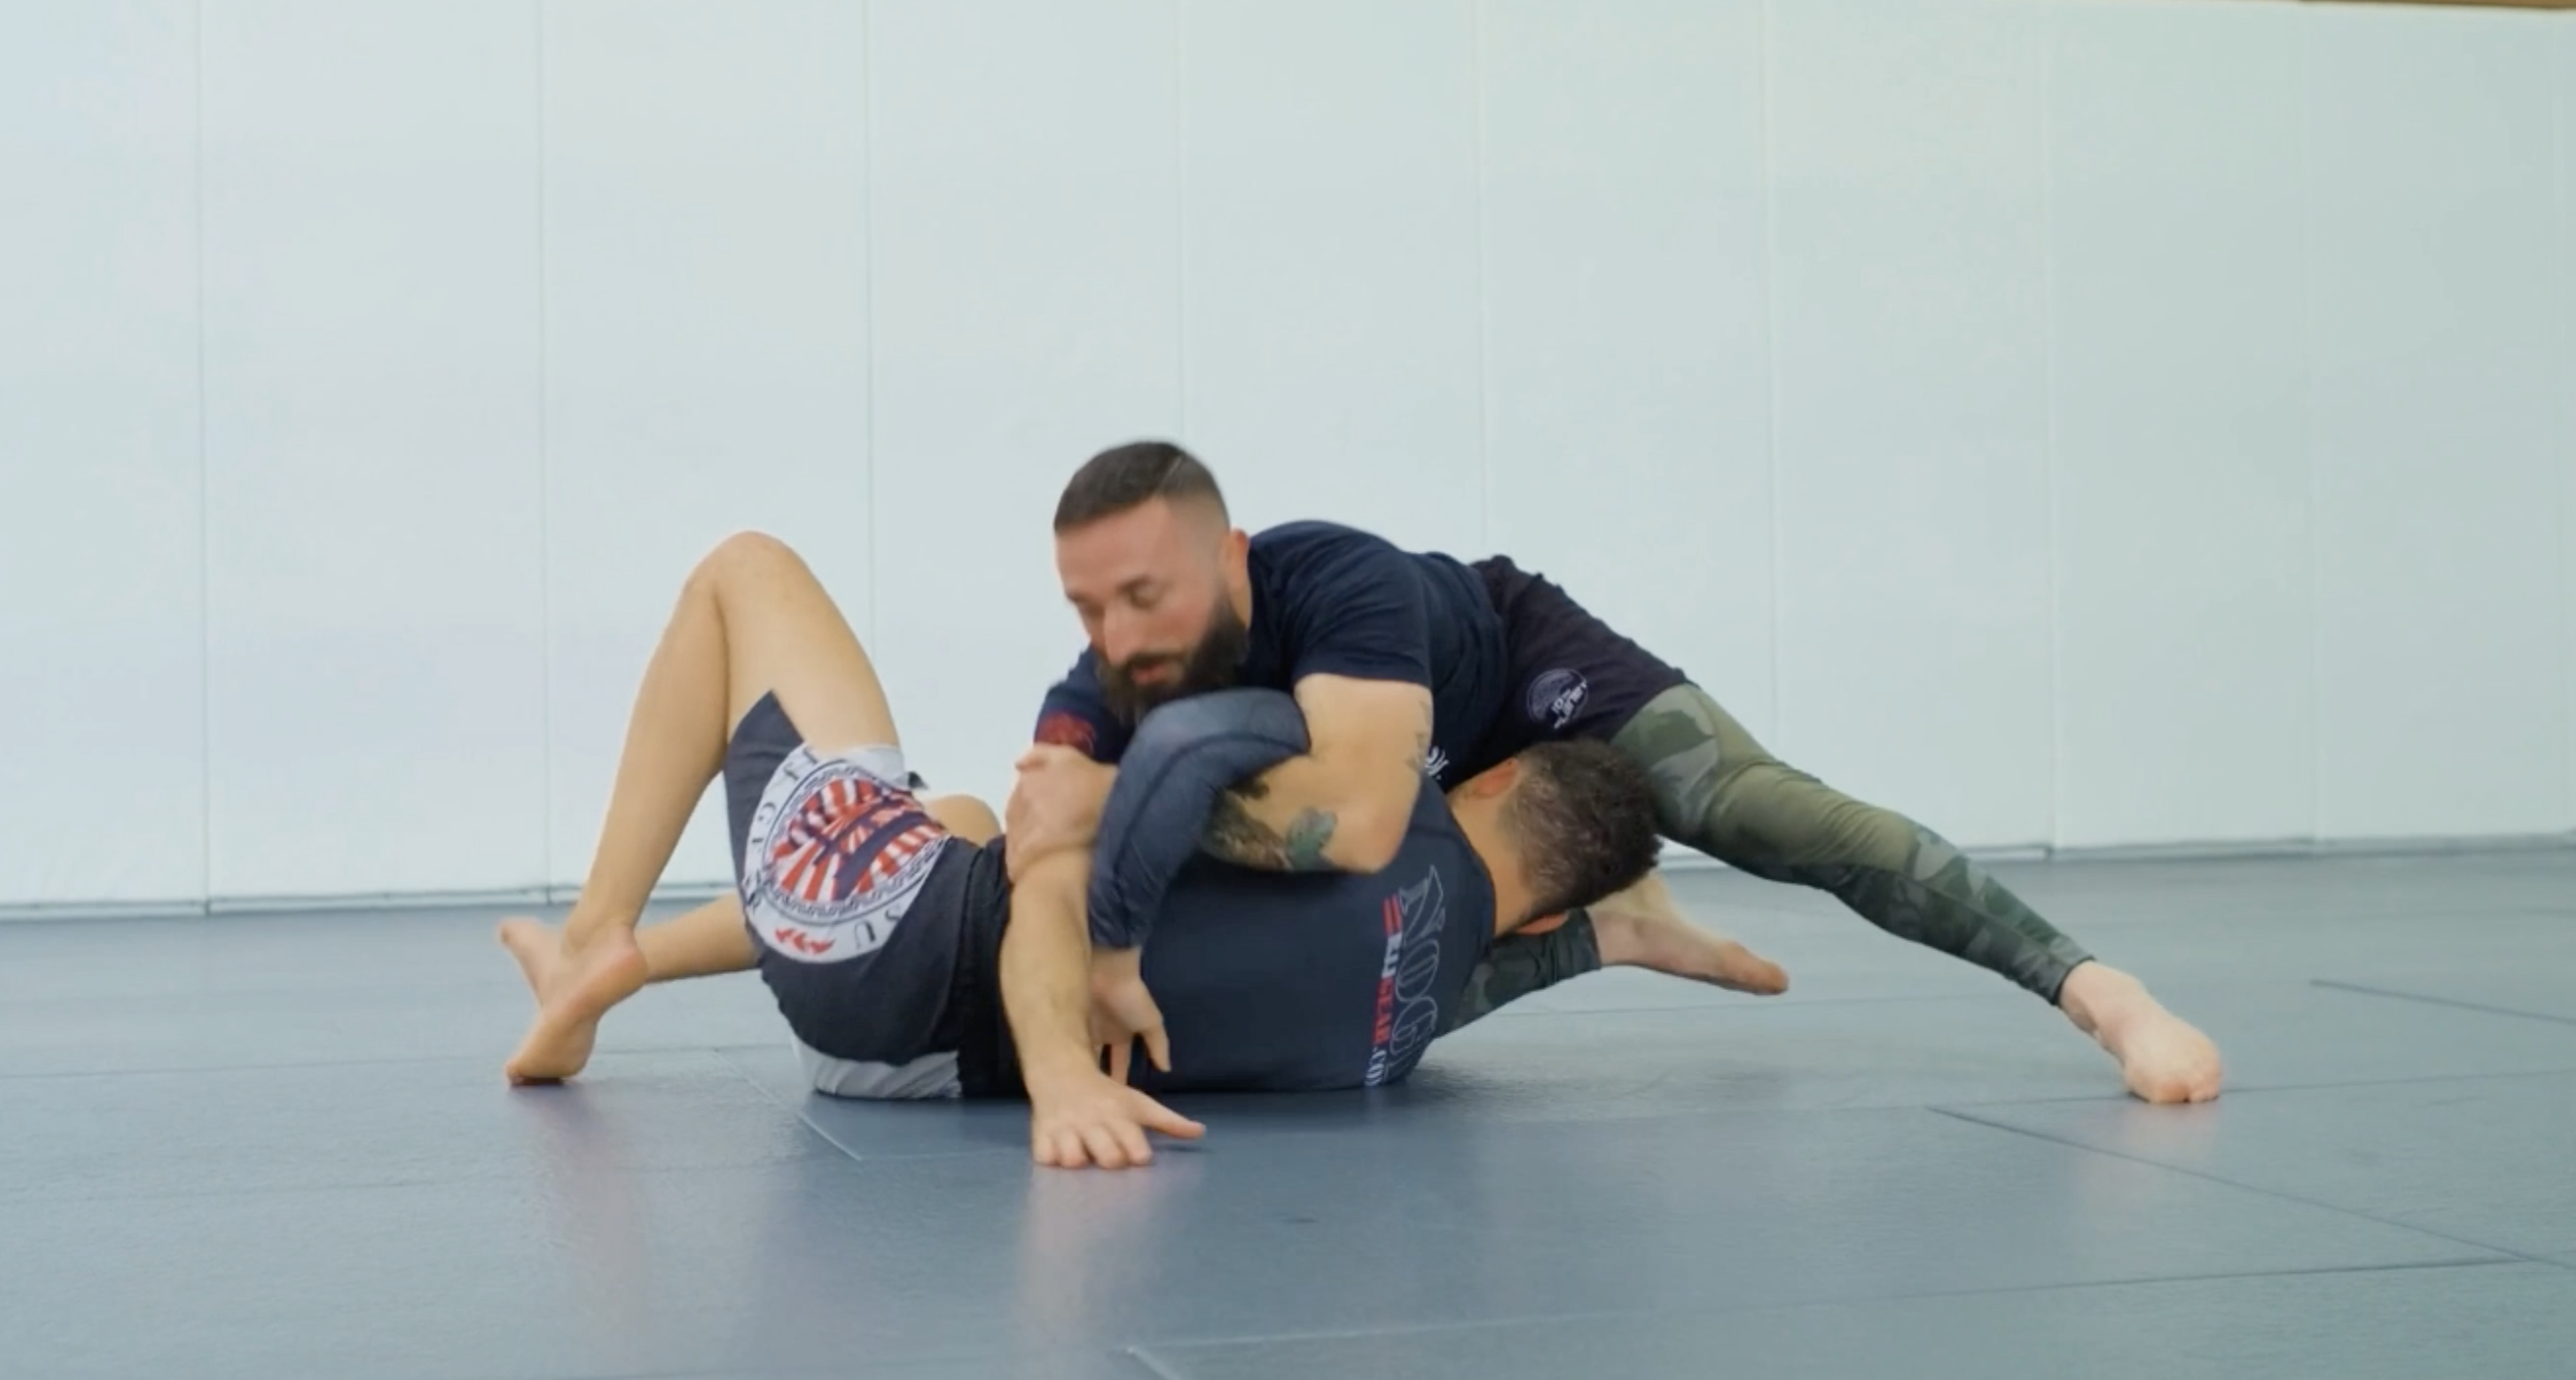
Quarterdeck Options
Your command center. You control the engagement — now choose your weapon.
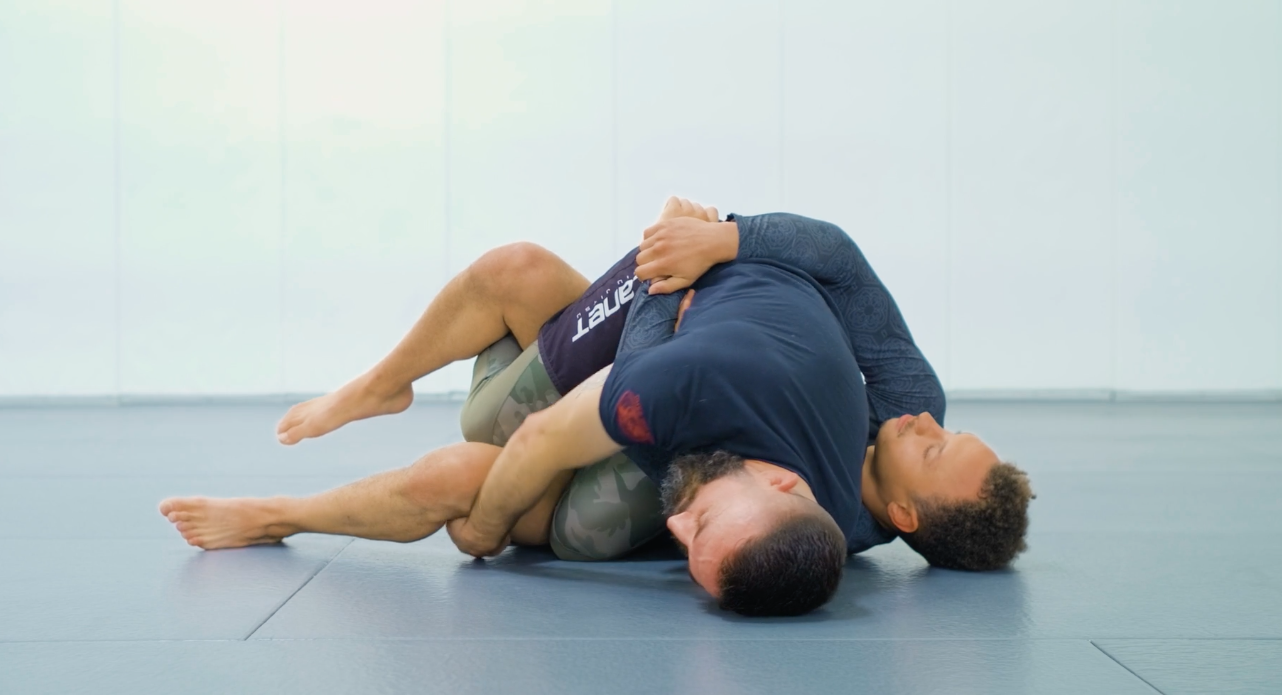
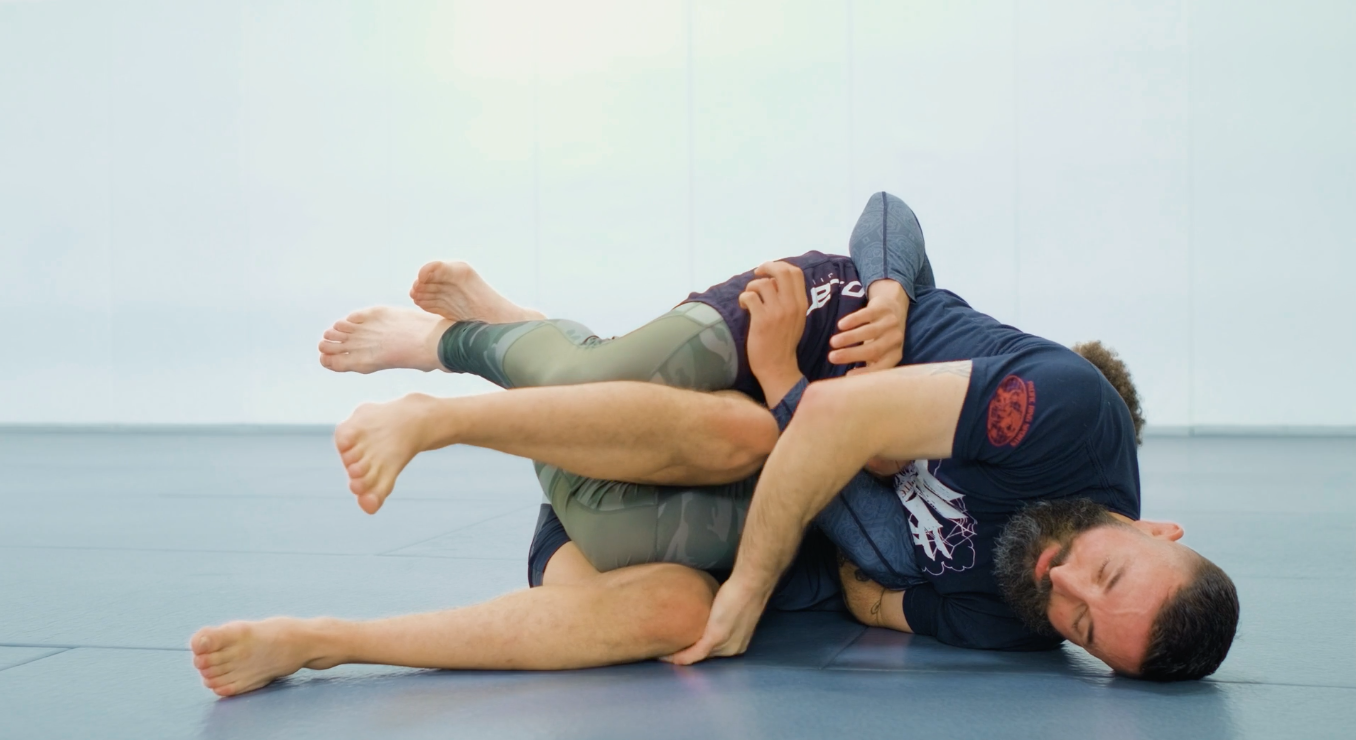
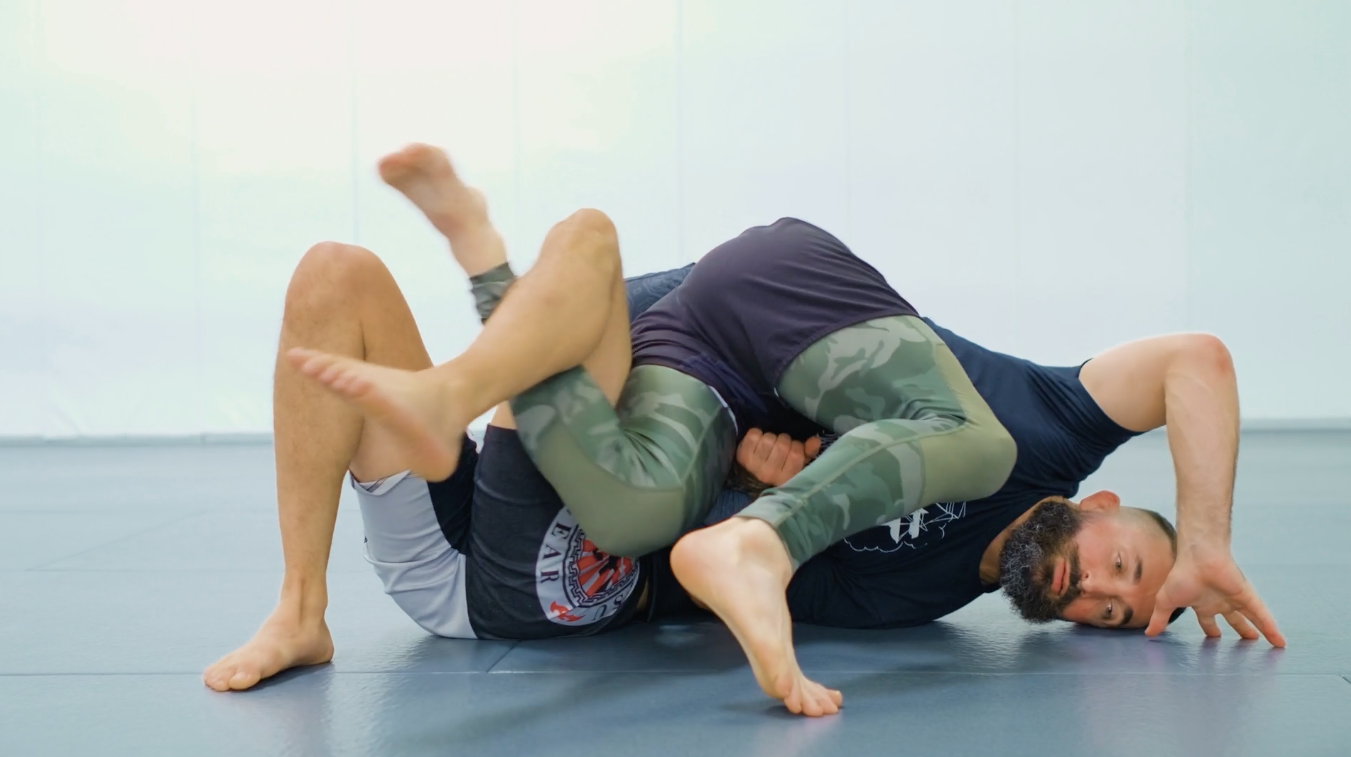
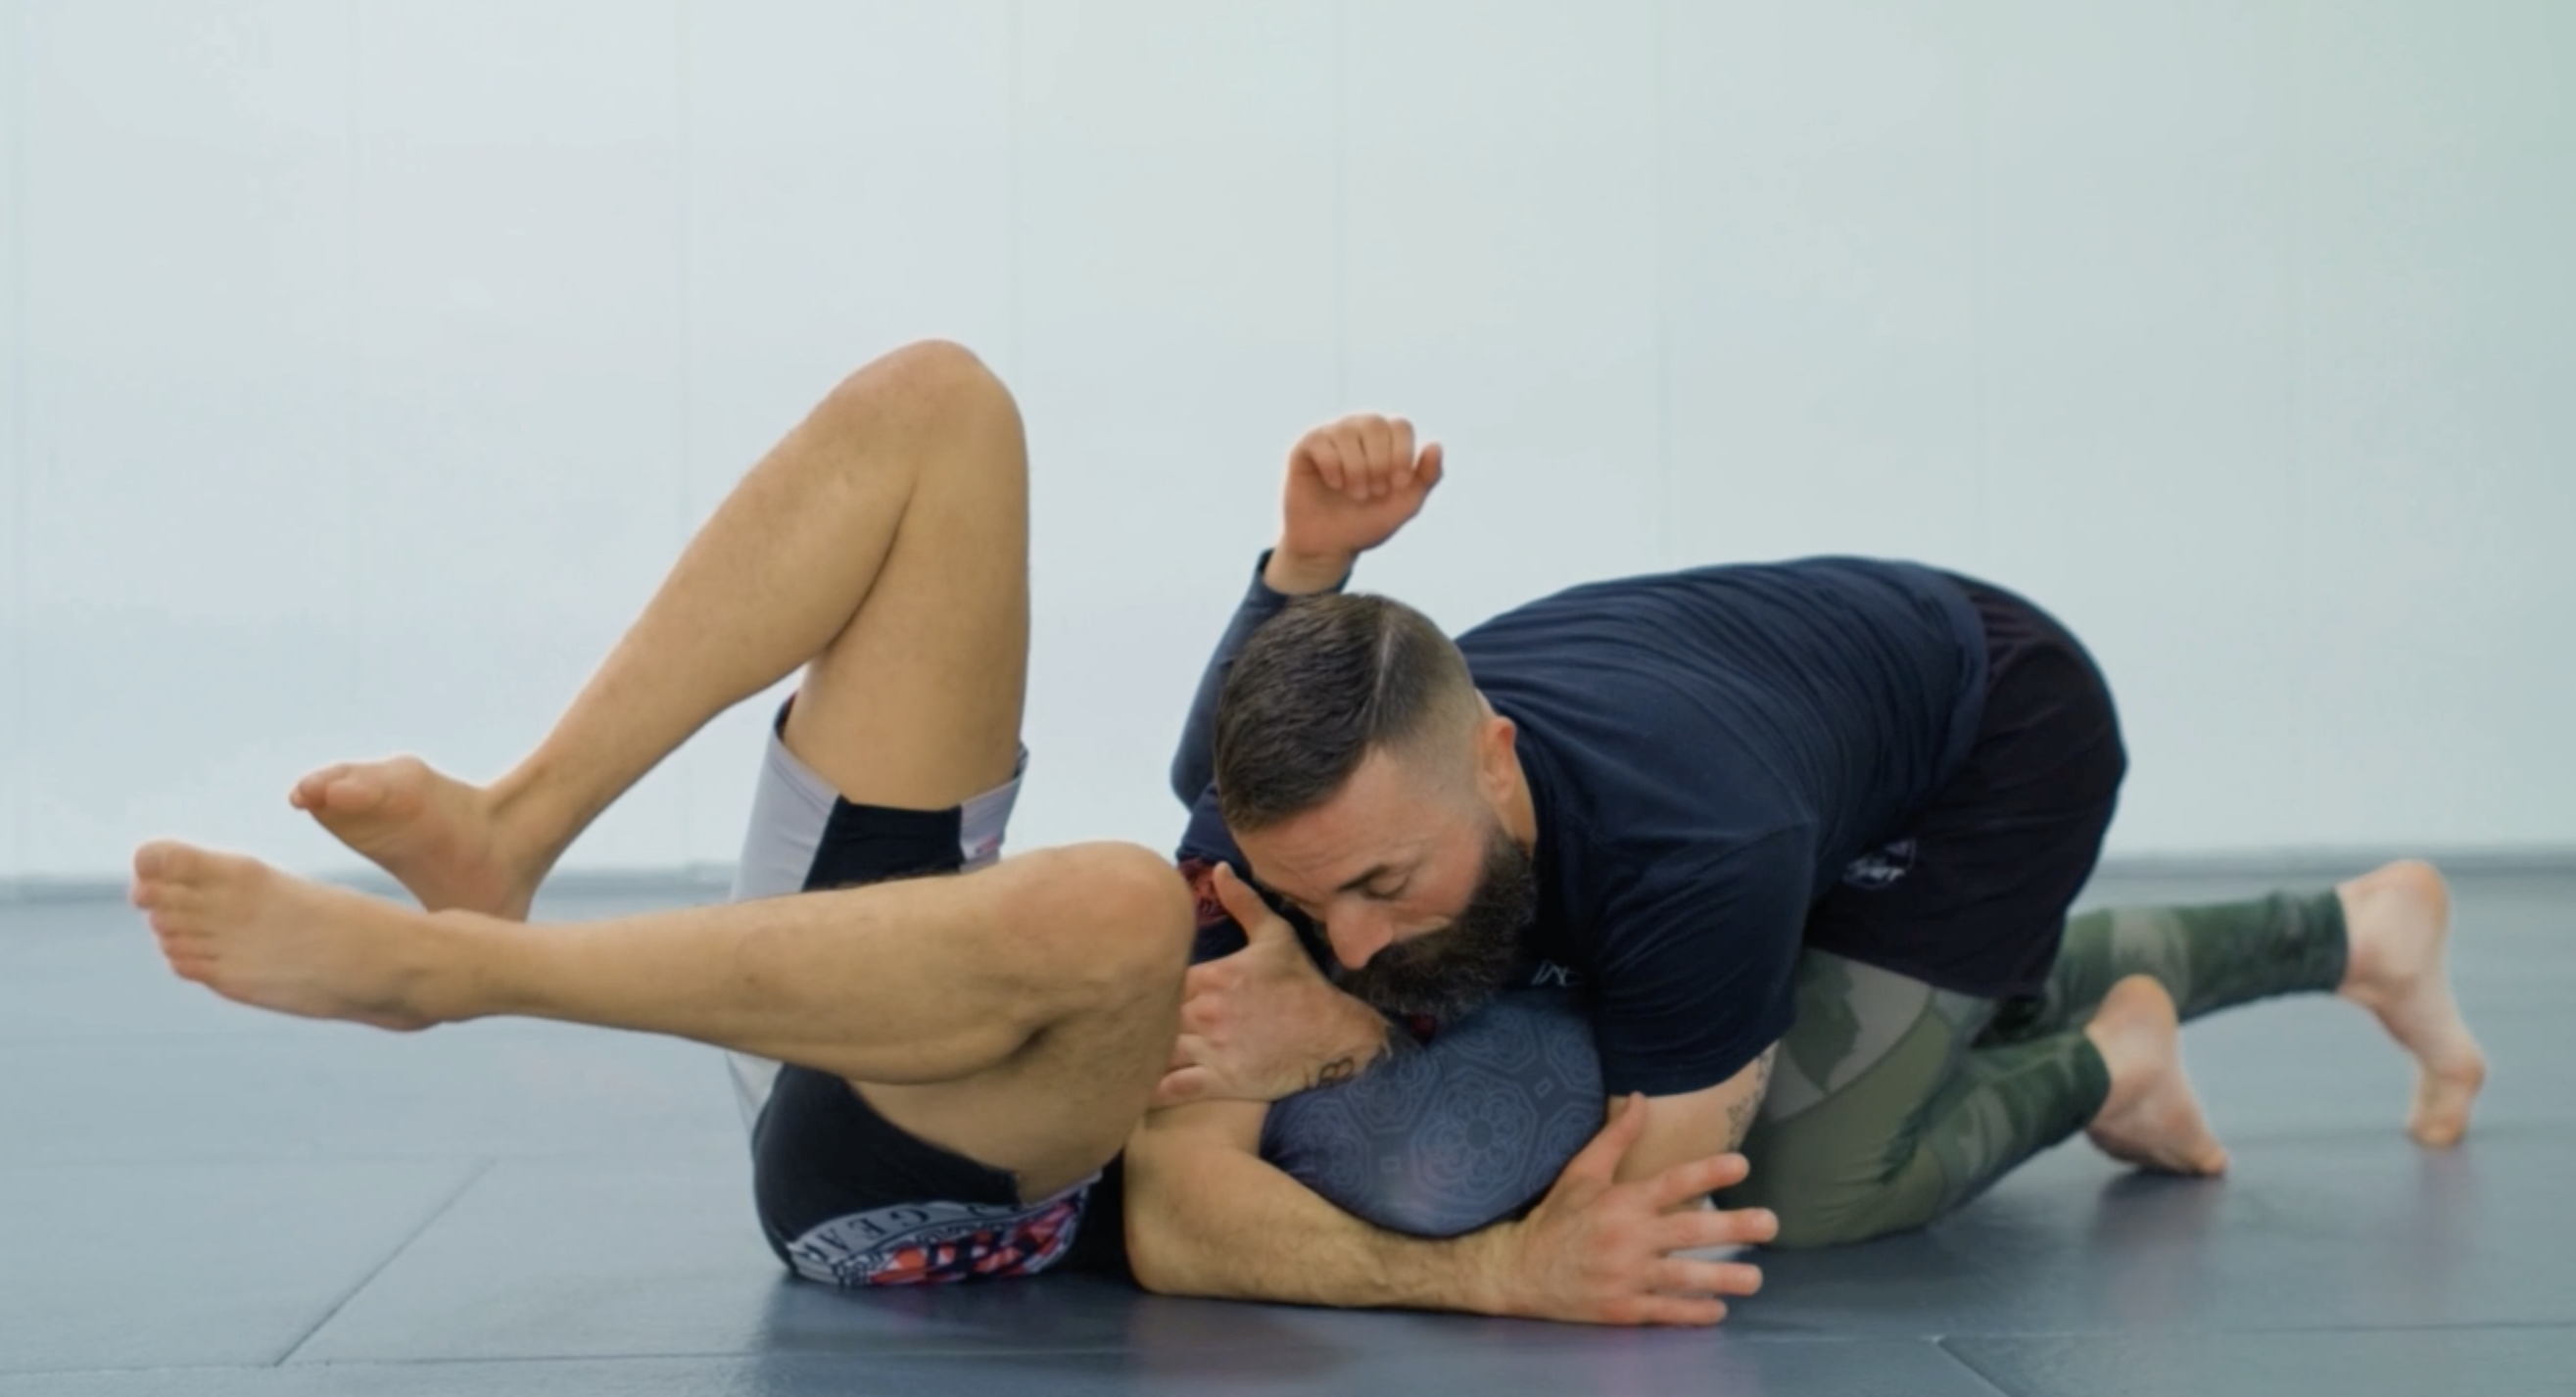
Quarterdeck is the central hub. You arrive here from the sweep, and from here you direct the entire attack. The arm is still under your control and your hips can threaten multiple submissions at once. Even as your opponent grabs and squeezes, keep the arm trapped and your grip behind the knee — do that and you are safe. Don't panic.
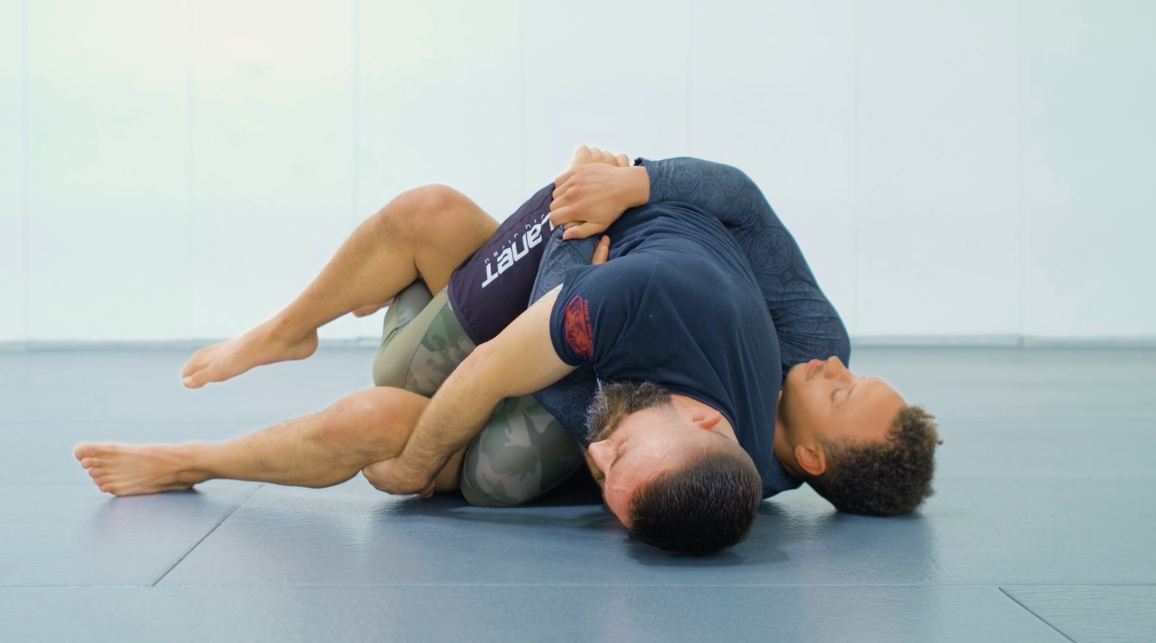
Key Control Points
- The trapped arm stays under your control — do not lose this.
- Your hips are positioned to threaten multiple attacks simultaneously.
- Your weight is distributed to prevent your opponent from recovering guard.
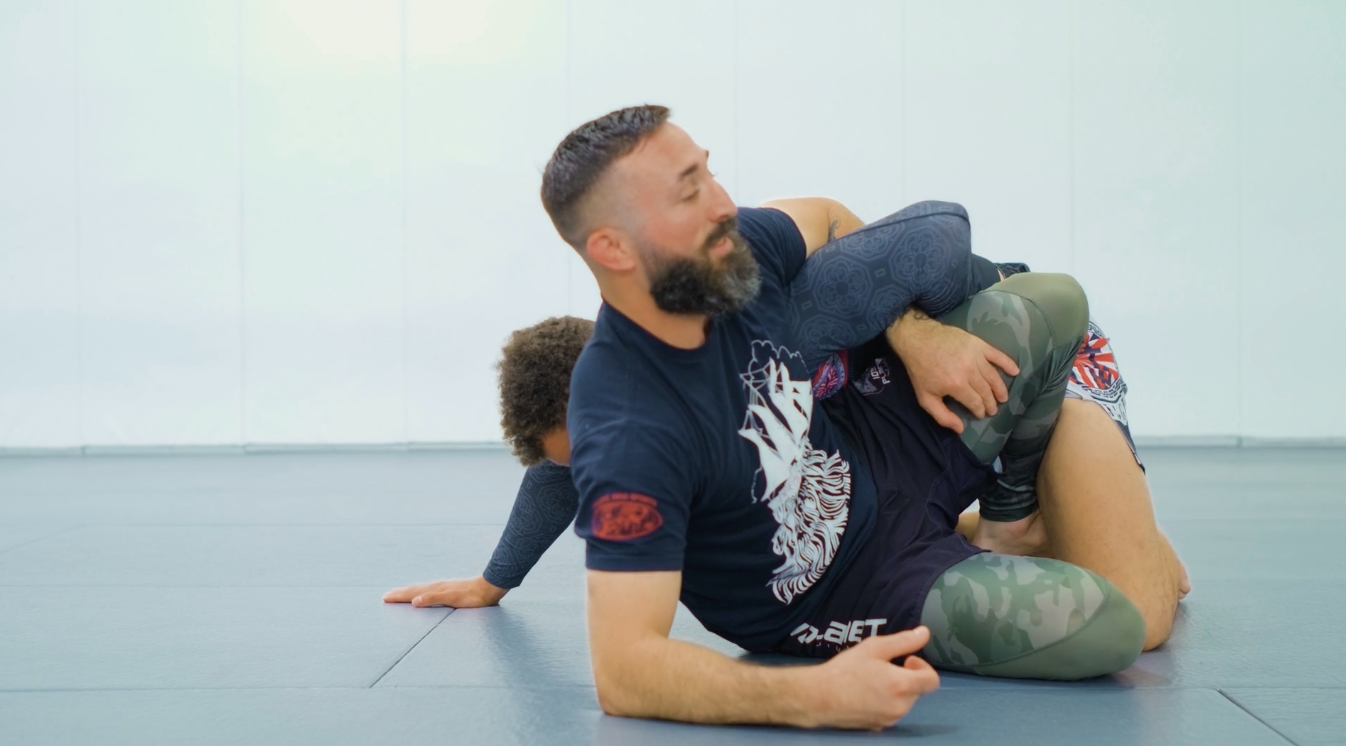
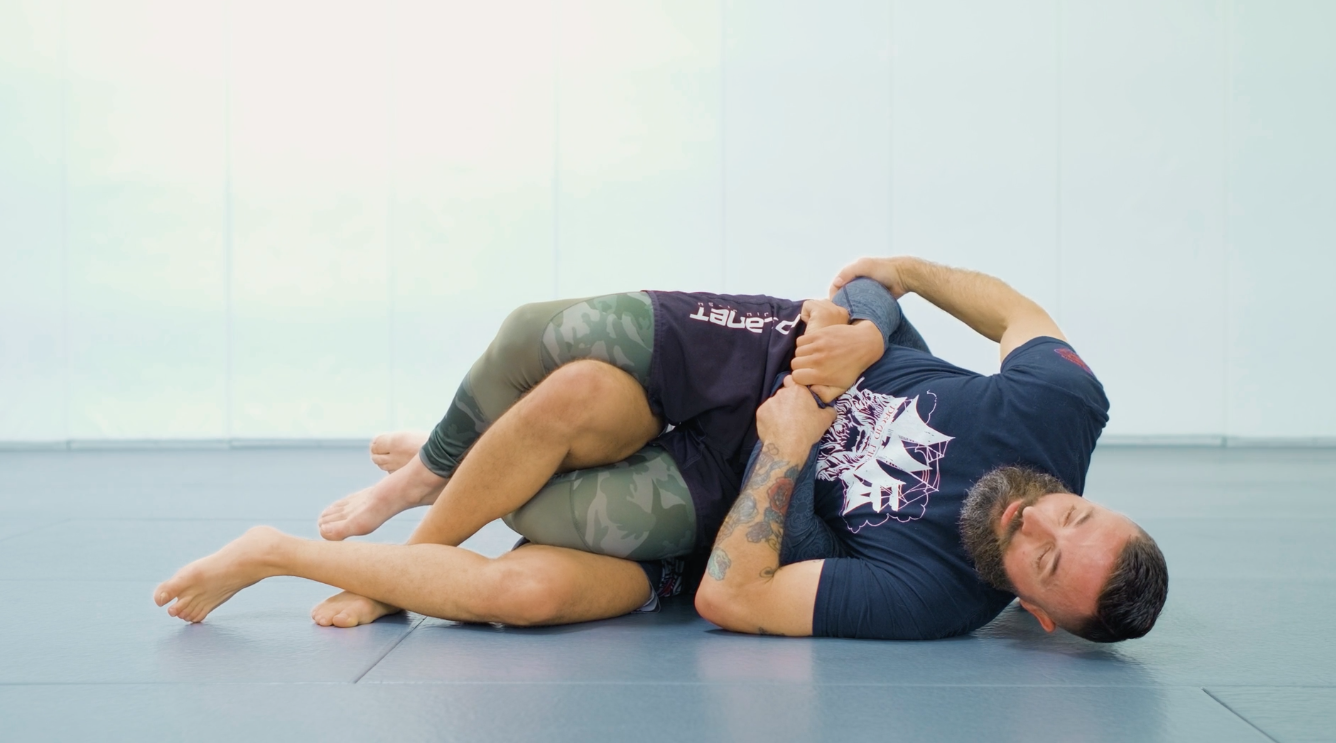
Option 1 — Straight Arm Lock / Wrist Lock
When your opponent straightens their arm to resist or escape the arm trap, they hand you the lock. Use their own tension against them.
- Feel your opponent extend their arm to escape.
- Control the wrist and straighten the arm fully.
- Apply forward pressure for the arm lock — or rotate the wrist for the wrist lock.
- Finish with controlled extension.
- Often this attack alone opens the door to the next sequence.
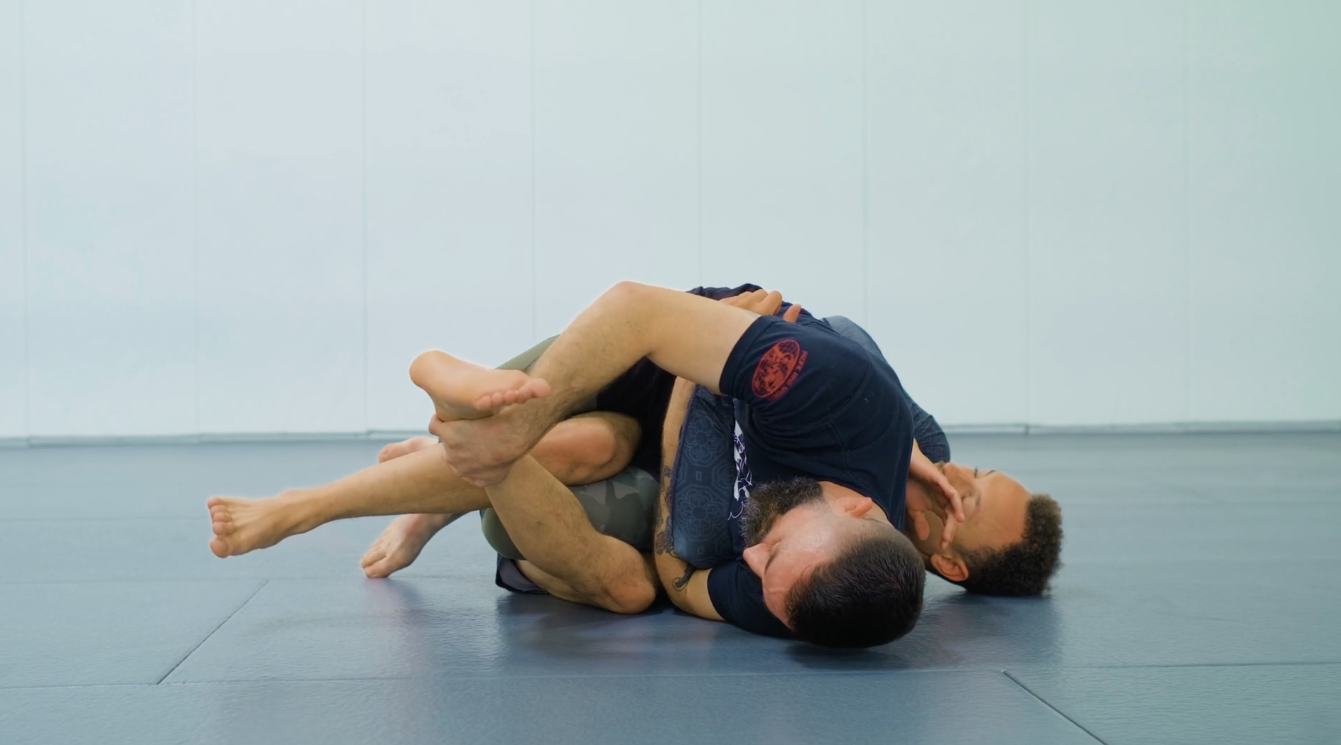
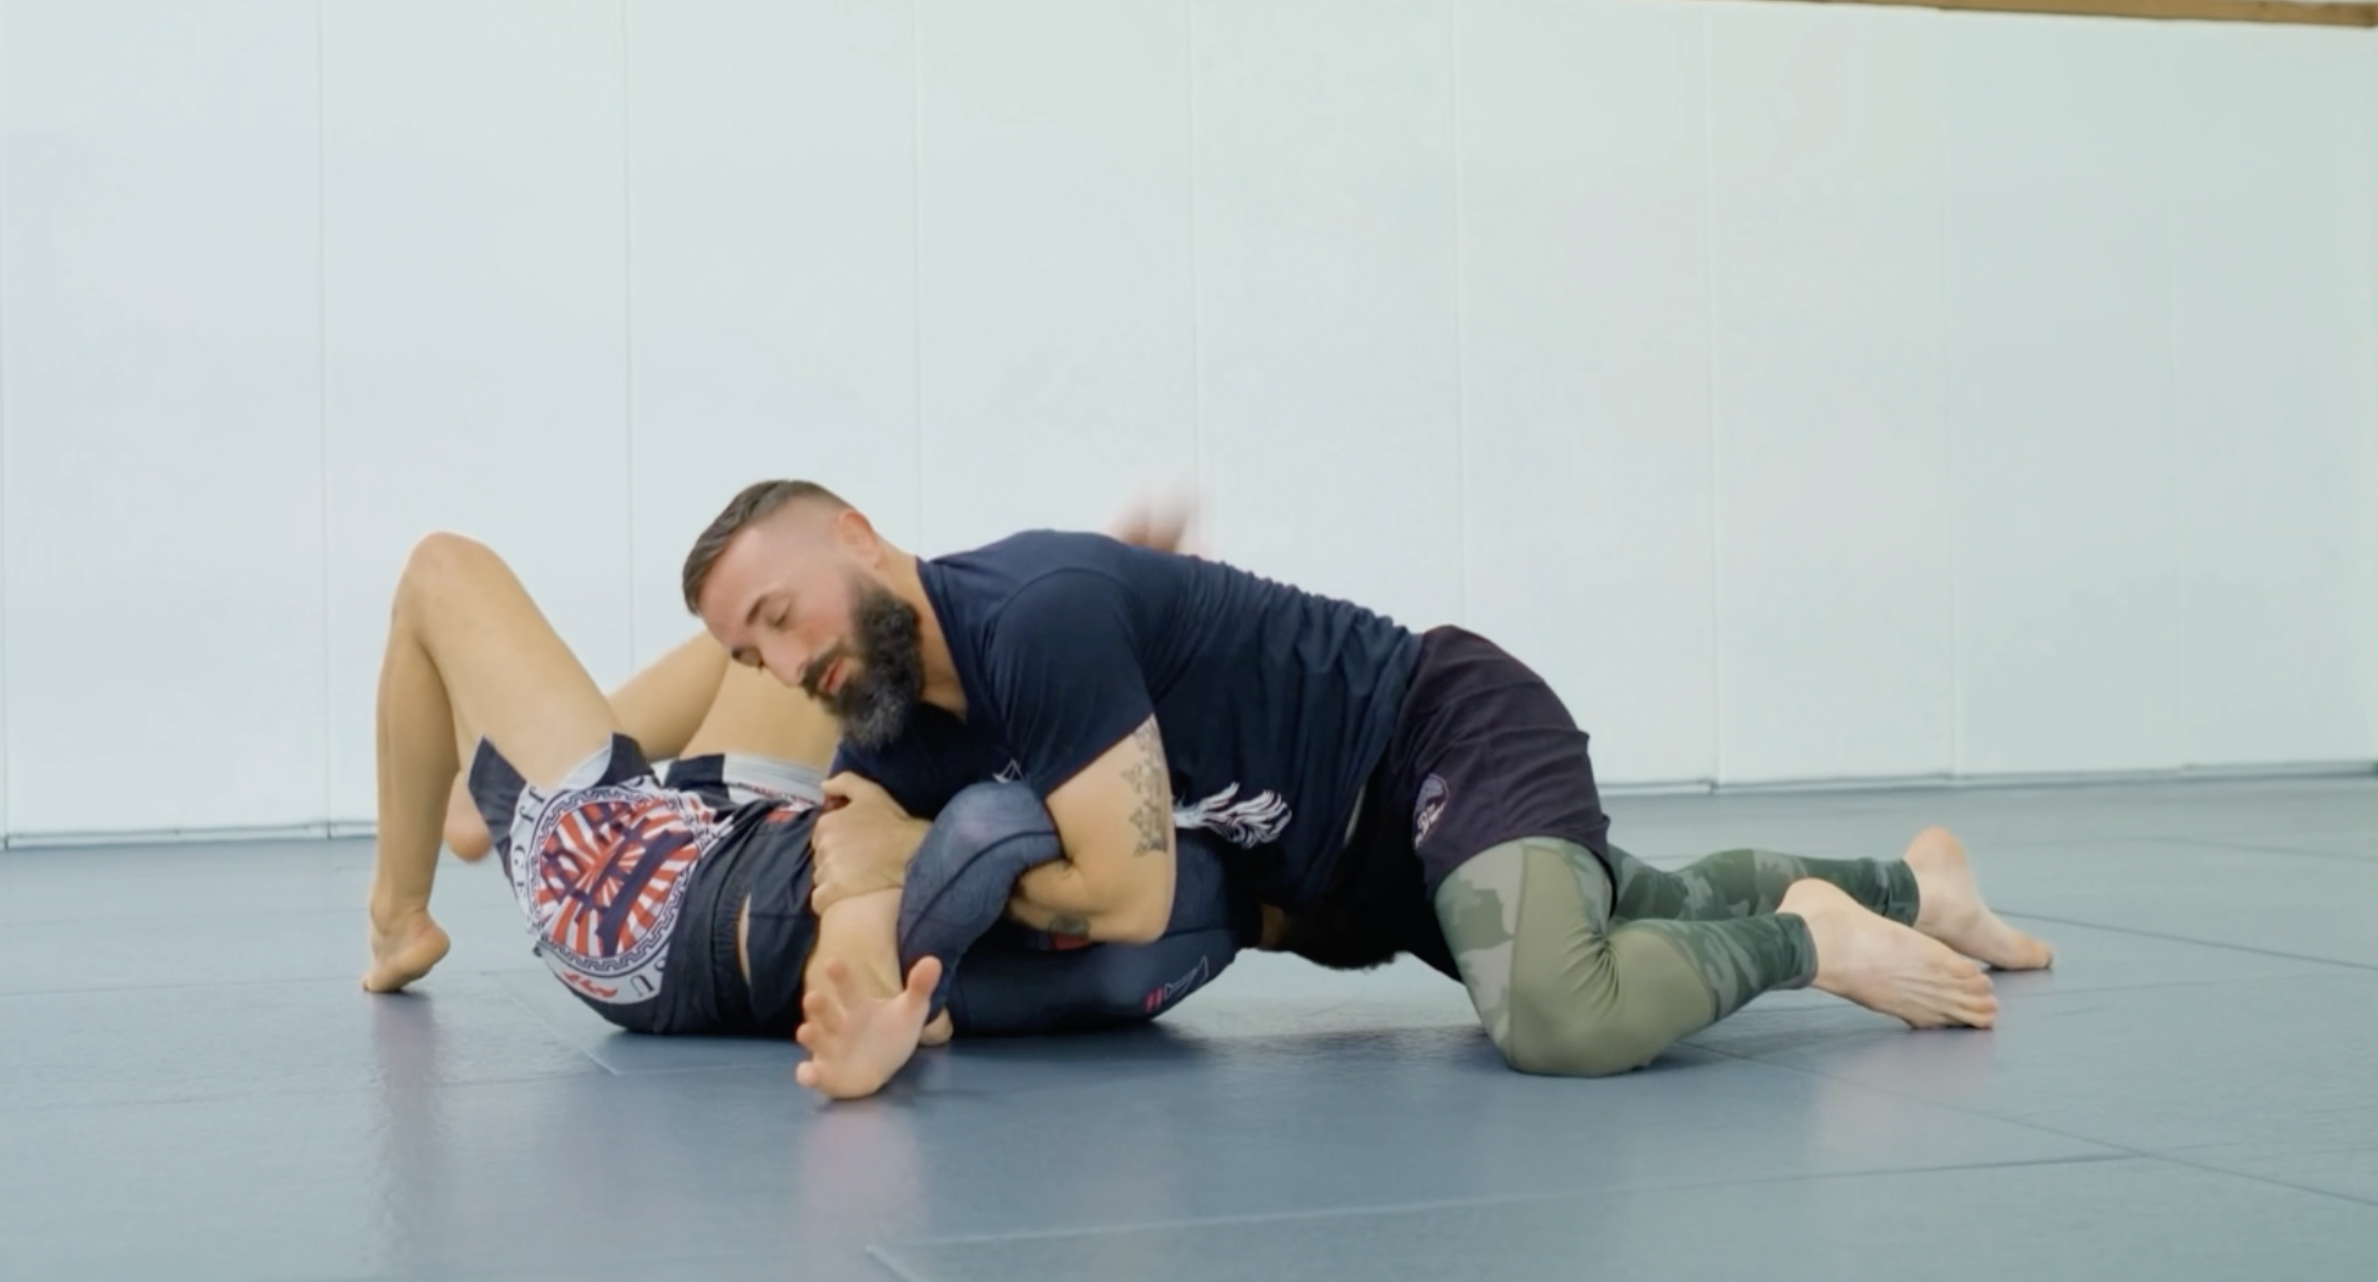
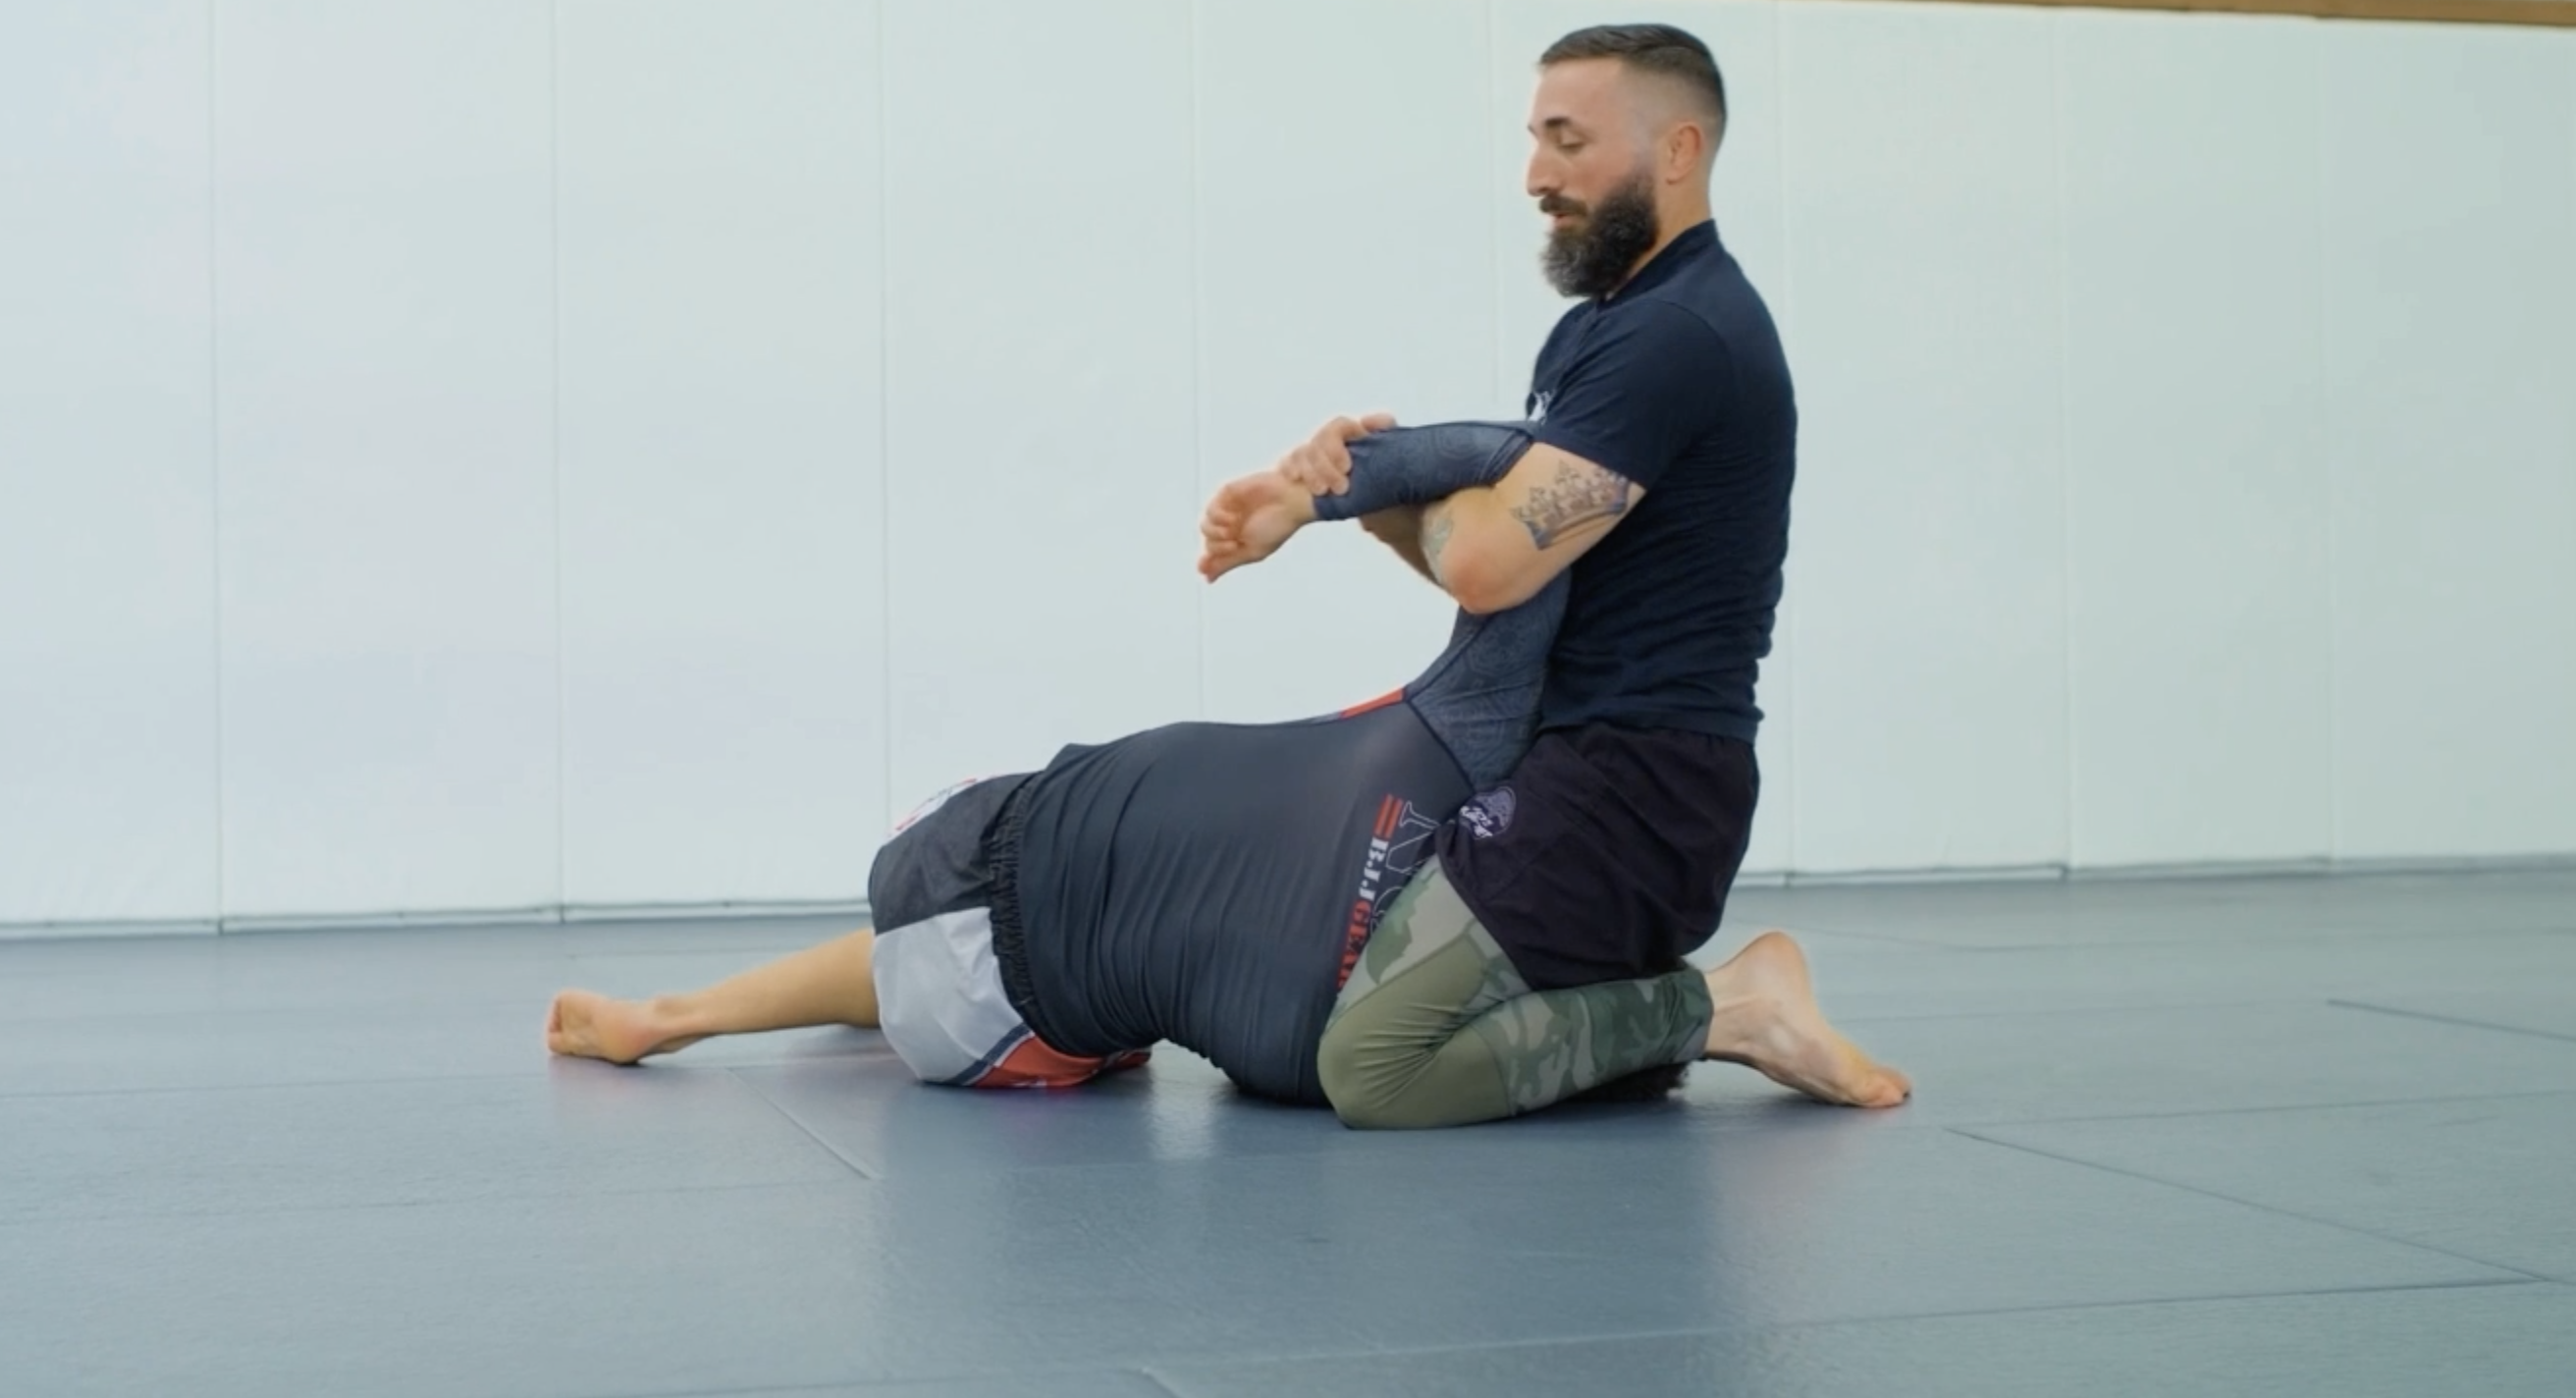
Option 2 — Bastille
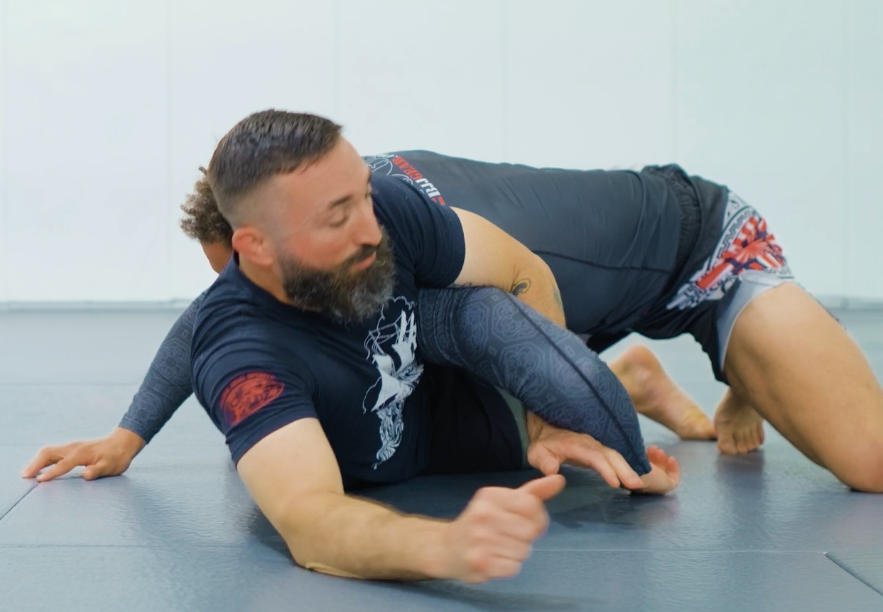
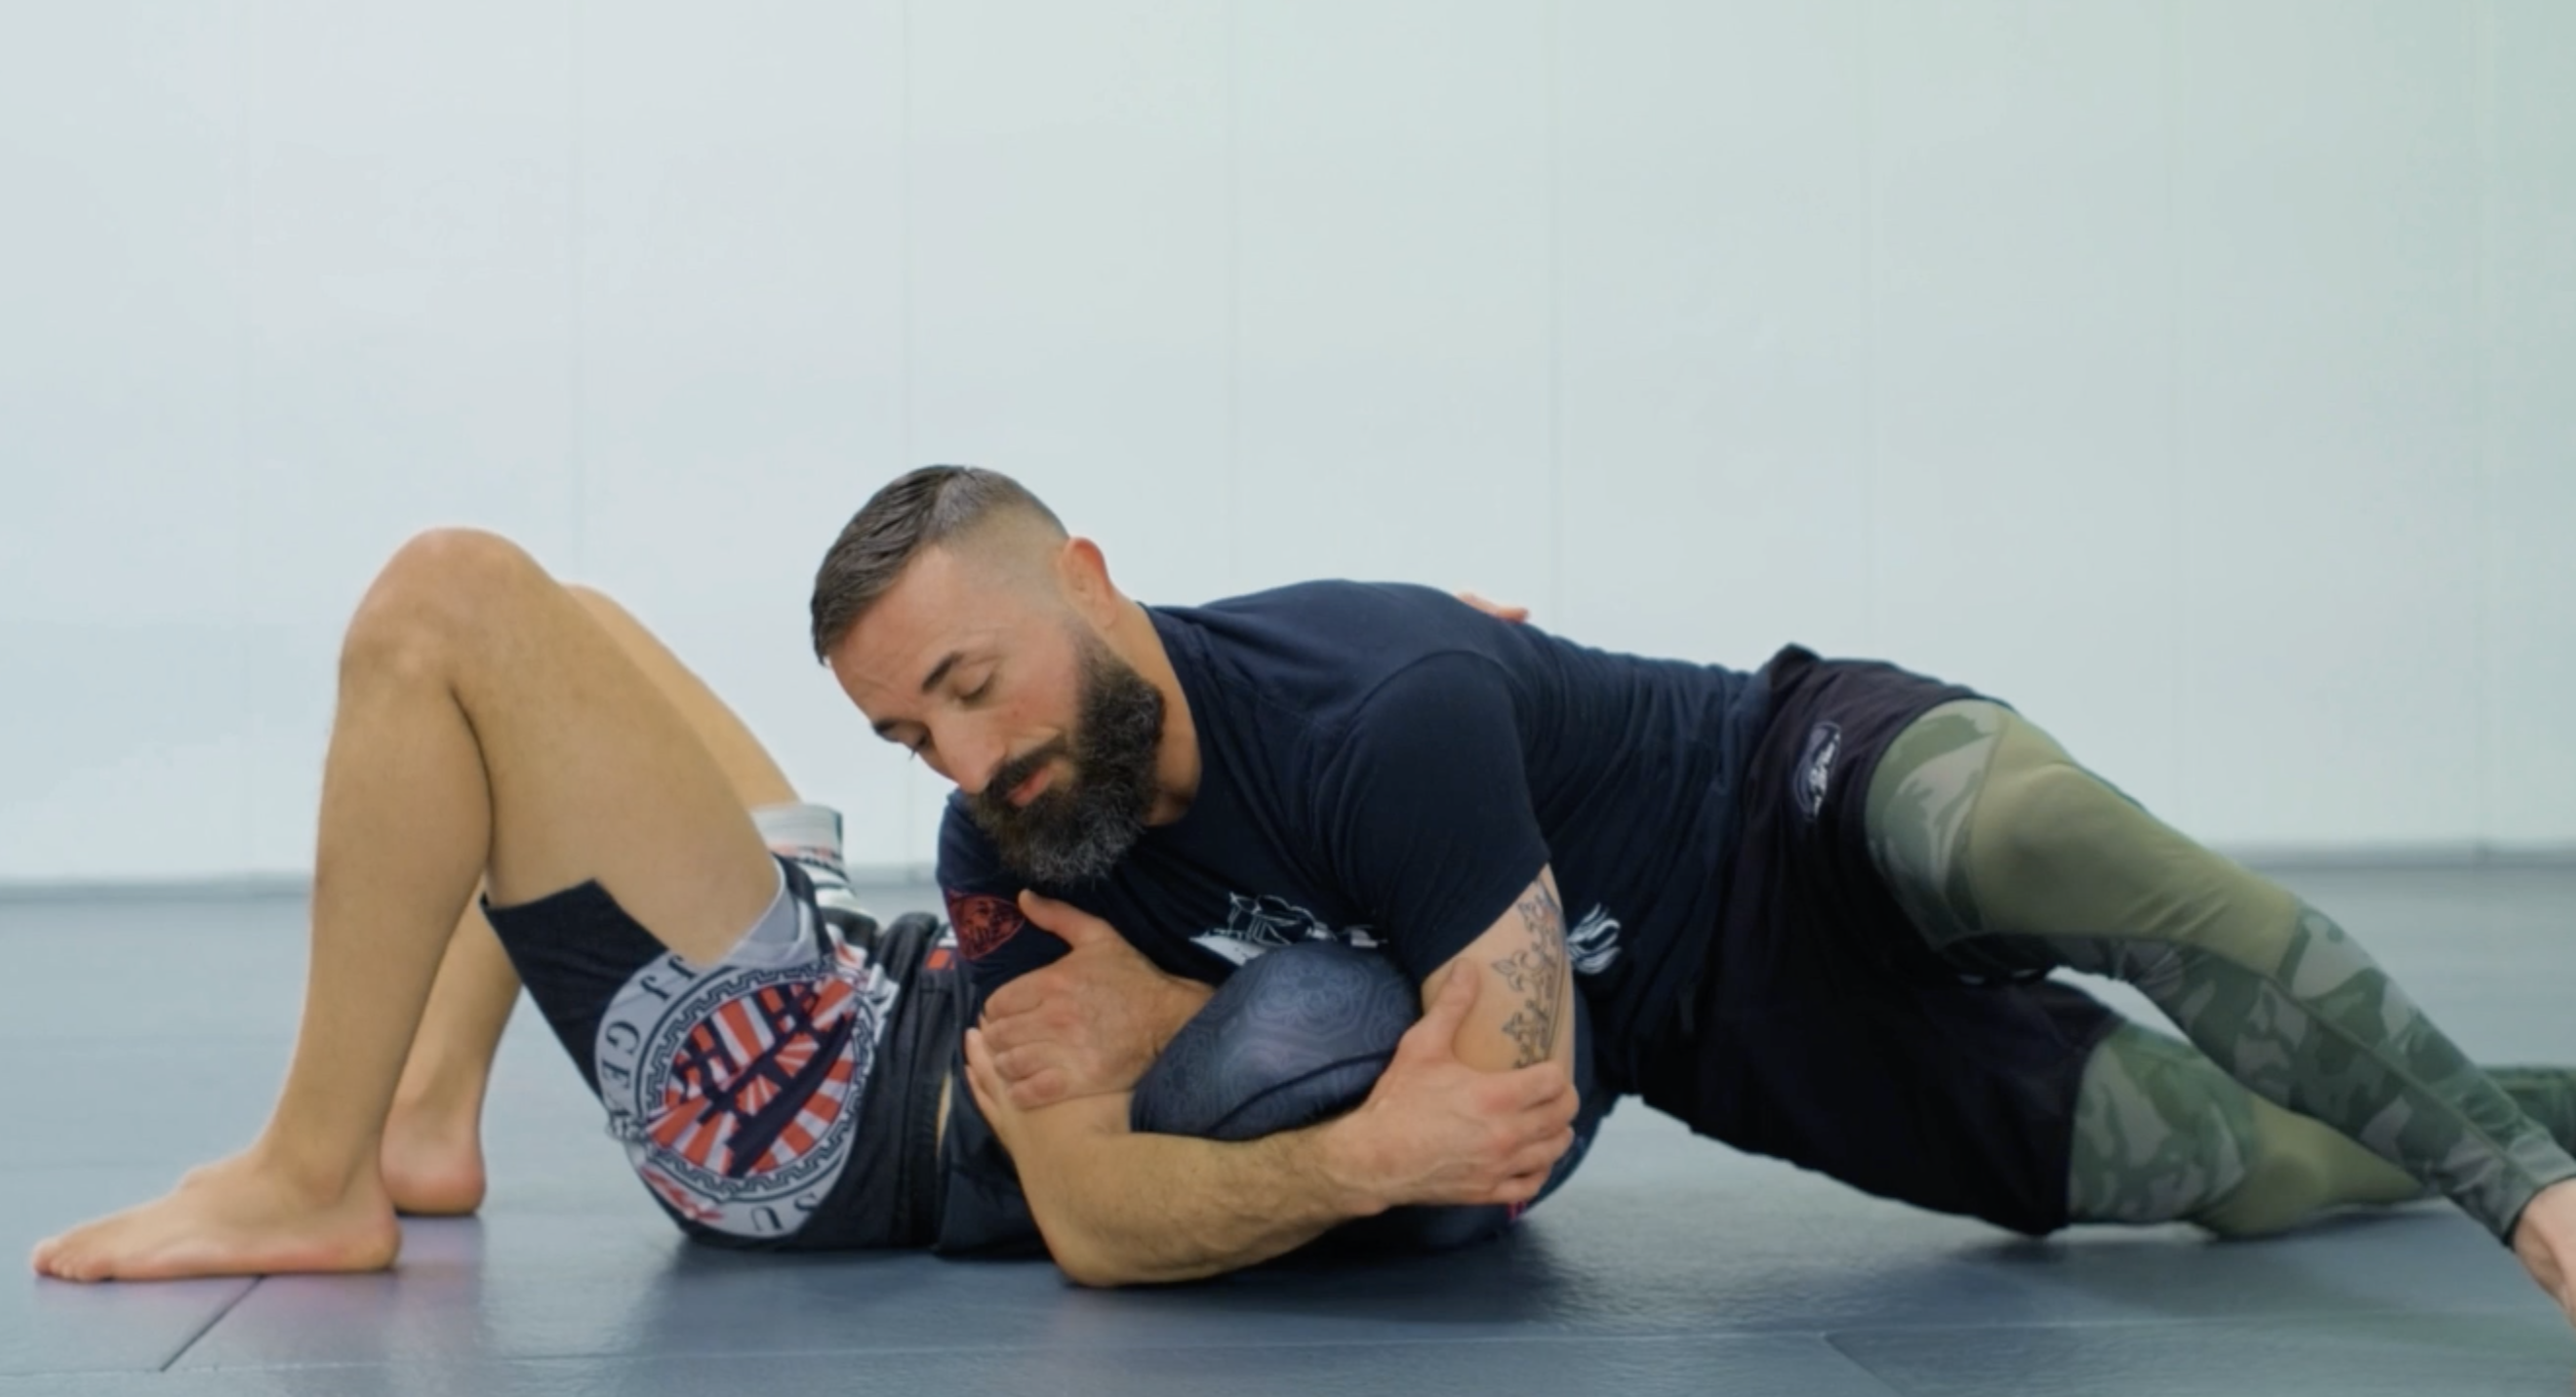
When the angle and control are right from Quarterdeck, Bastille is a direct submission. When the door is open, go straight to the finish.

The Bastille
The Bastille takes its name from the infamous 18th-century French fortress — a place no one escaped. Once this hold is set, the same is true. Master the mechanics and you'll find this submission everywhere.
- Maintain the arm trap and adjust your hip position to isolate the arm under your hips.
- As you slide your hips over their wrist, use your heels to position your legs in front of you, drive your hips tight against their body, and keep your posture upright.
- With your hips locked tight against your opponent, grab the elbow and lift while applying hip pressure and core rotation to finish.
Watch: Bastille from Quarterdeck
Setup, angle, and finish
▾
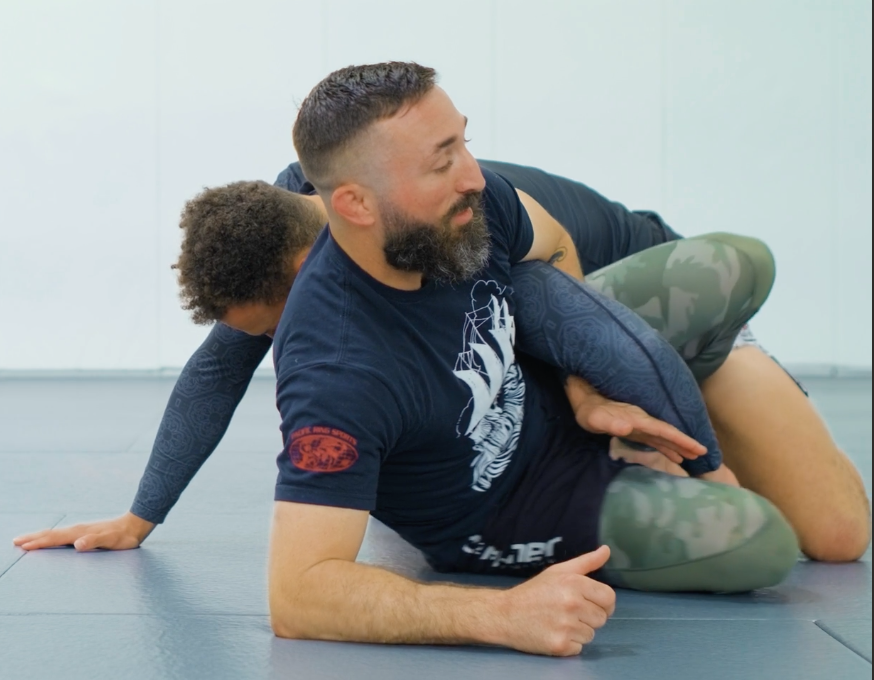
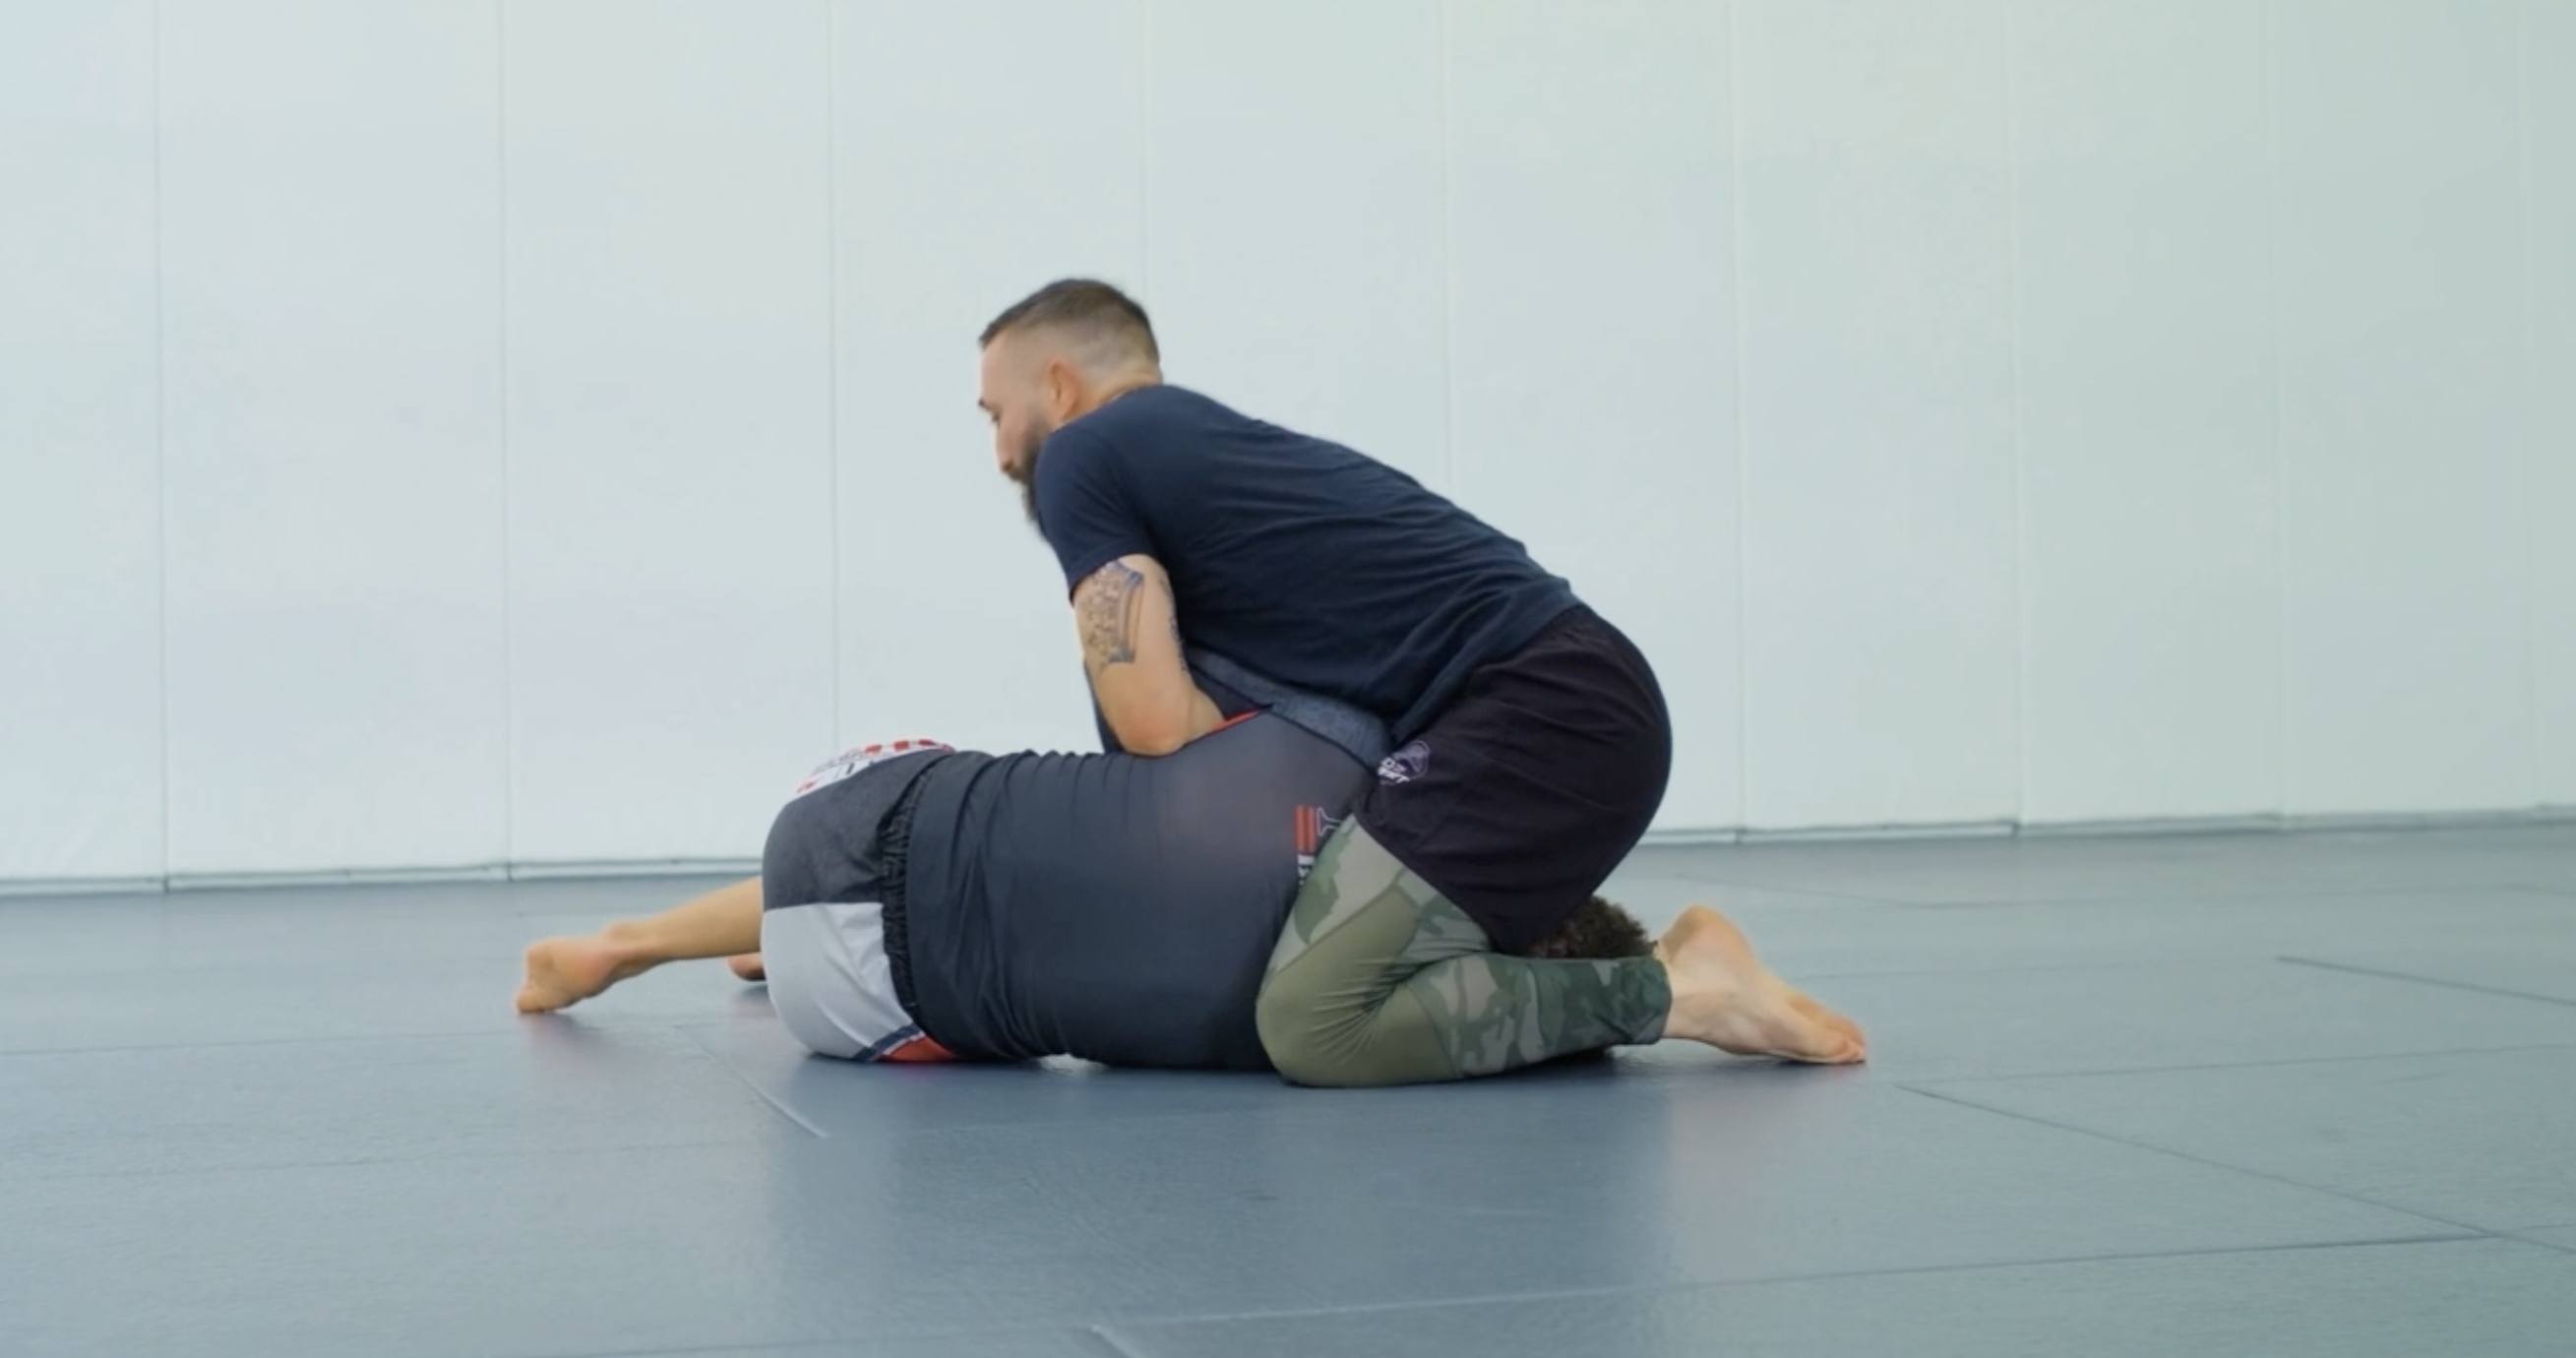
Option 3 — Dismount to Side Control
When the submissions are not immediately there from Quarterdeck, a clean dismount to Side Control keeps you dangerous and opens up the next chain of attacks.

- Maintain the arm trap and adjust your hip position to transition to dismount.
- Keep the grip behind their knee — this is what keeps you attached. Without it, they can move freely and you lose position.
- Dismount to Side Control with the arm trapped and the leg secured. See the Power Kimura section for breaking their clasped grip.
Watch: Dismount to Side Control
Setup, angle, and finish
▾
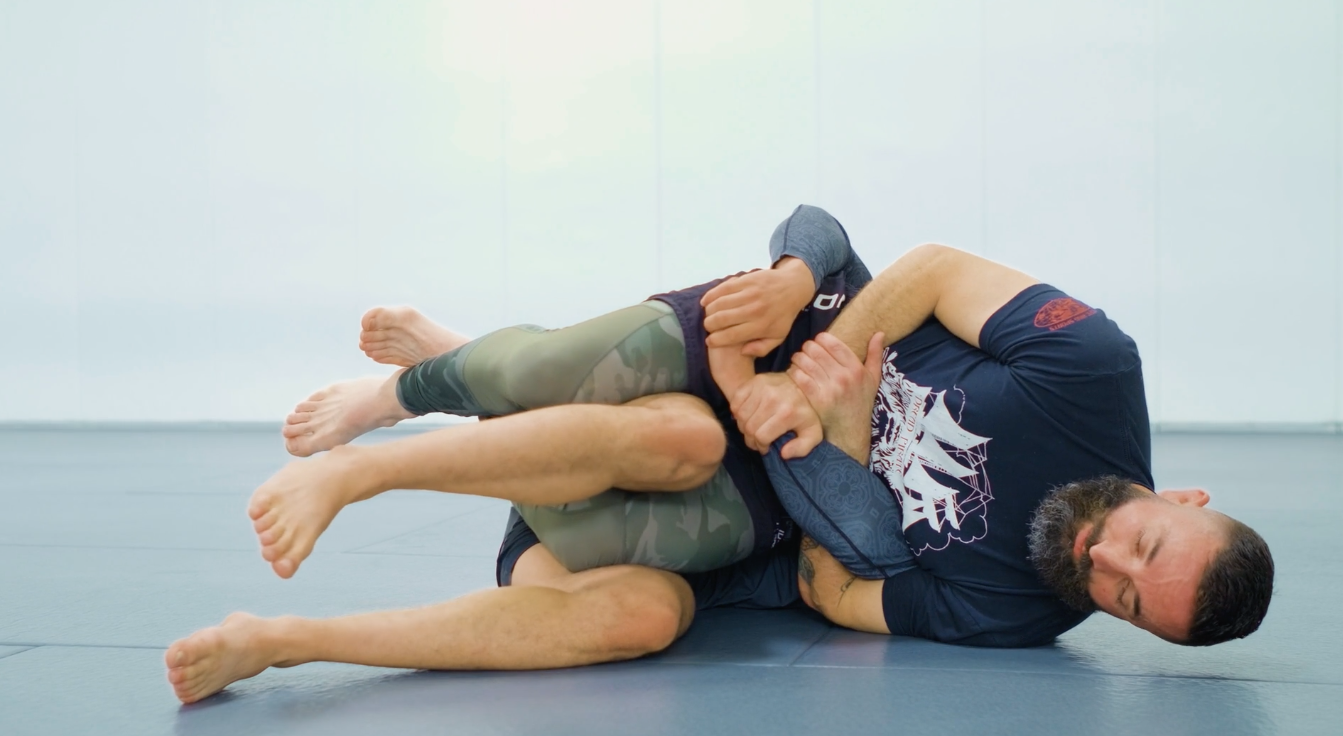
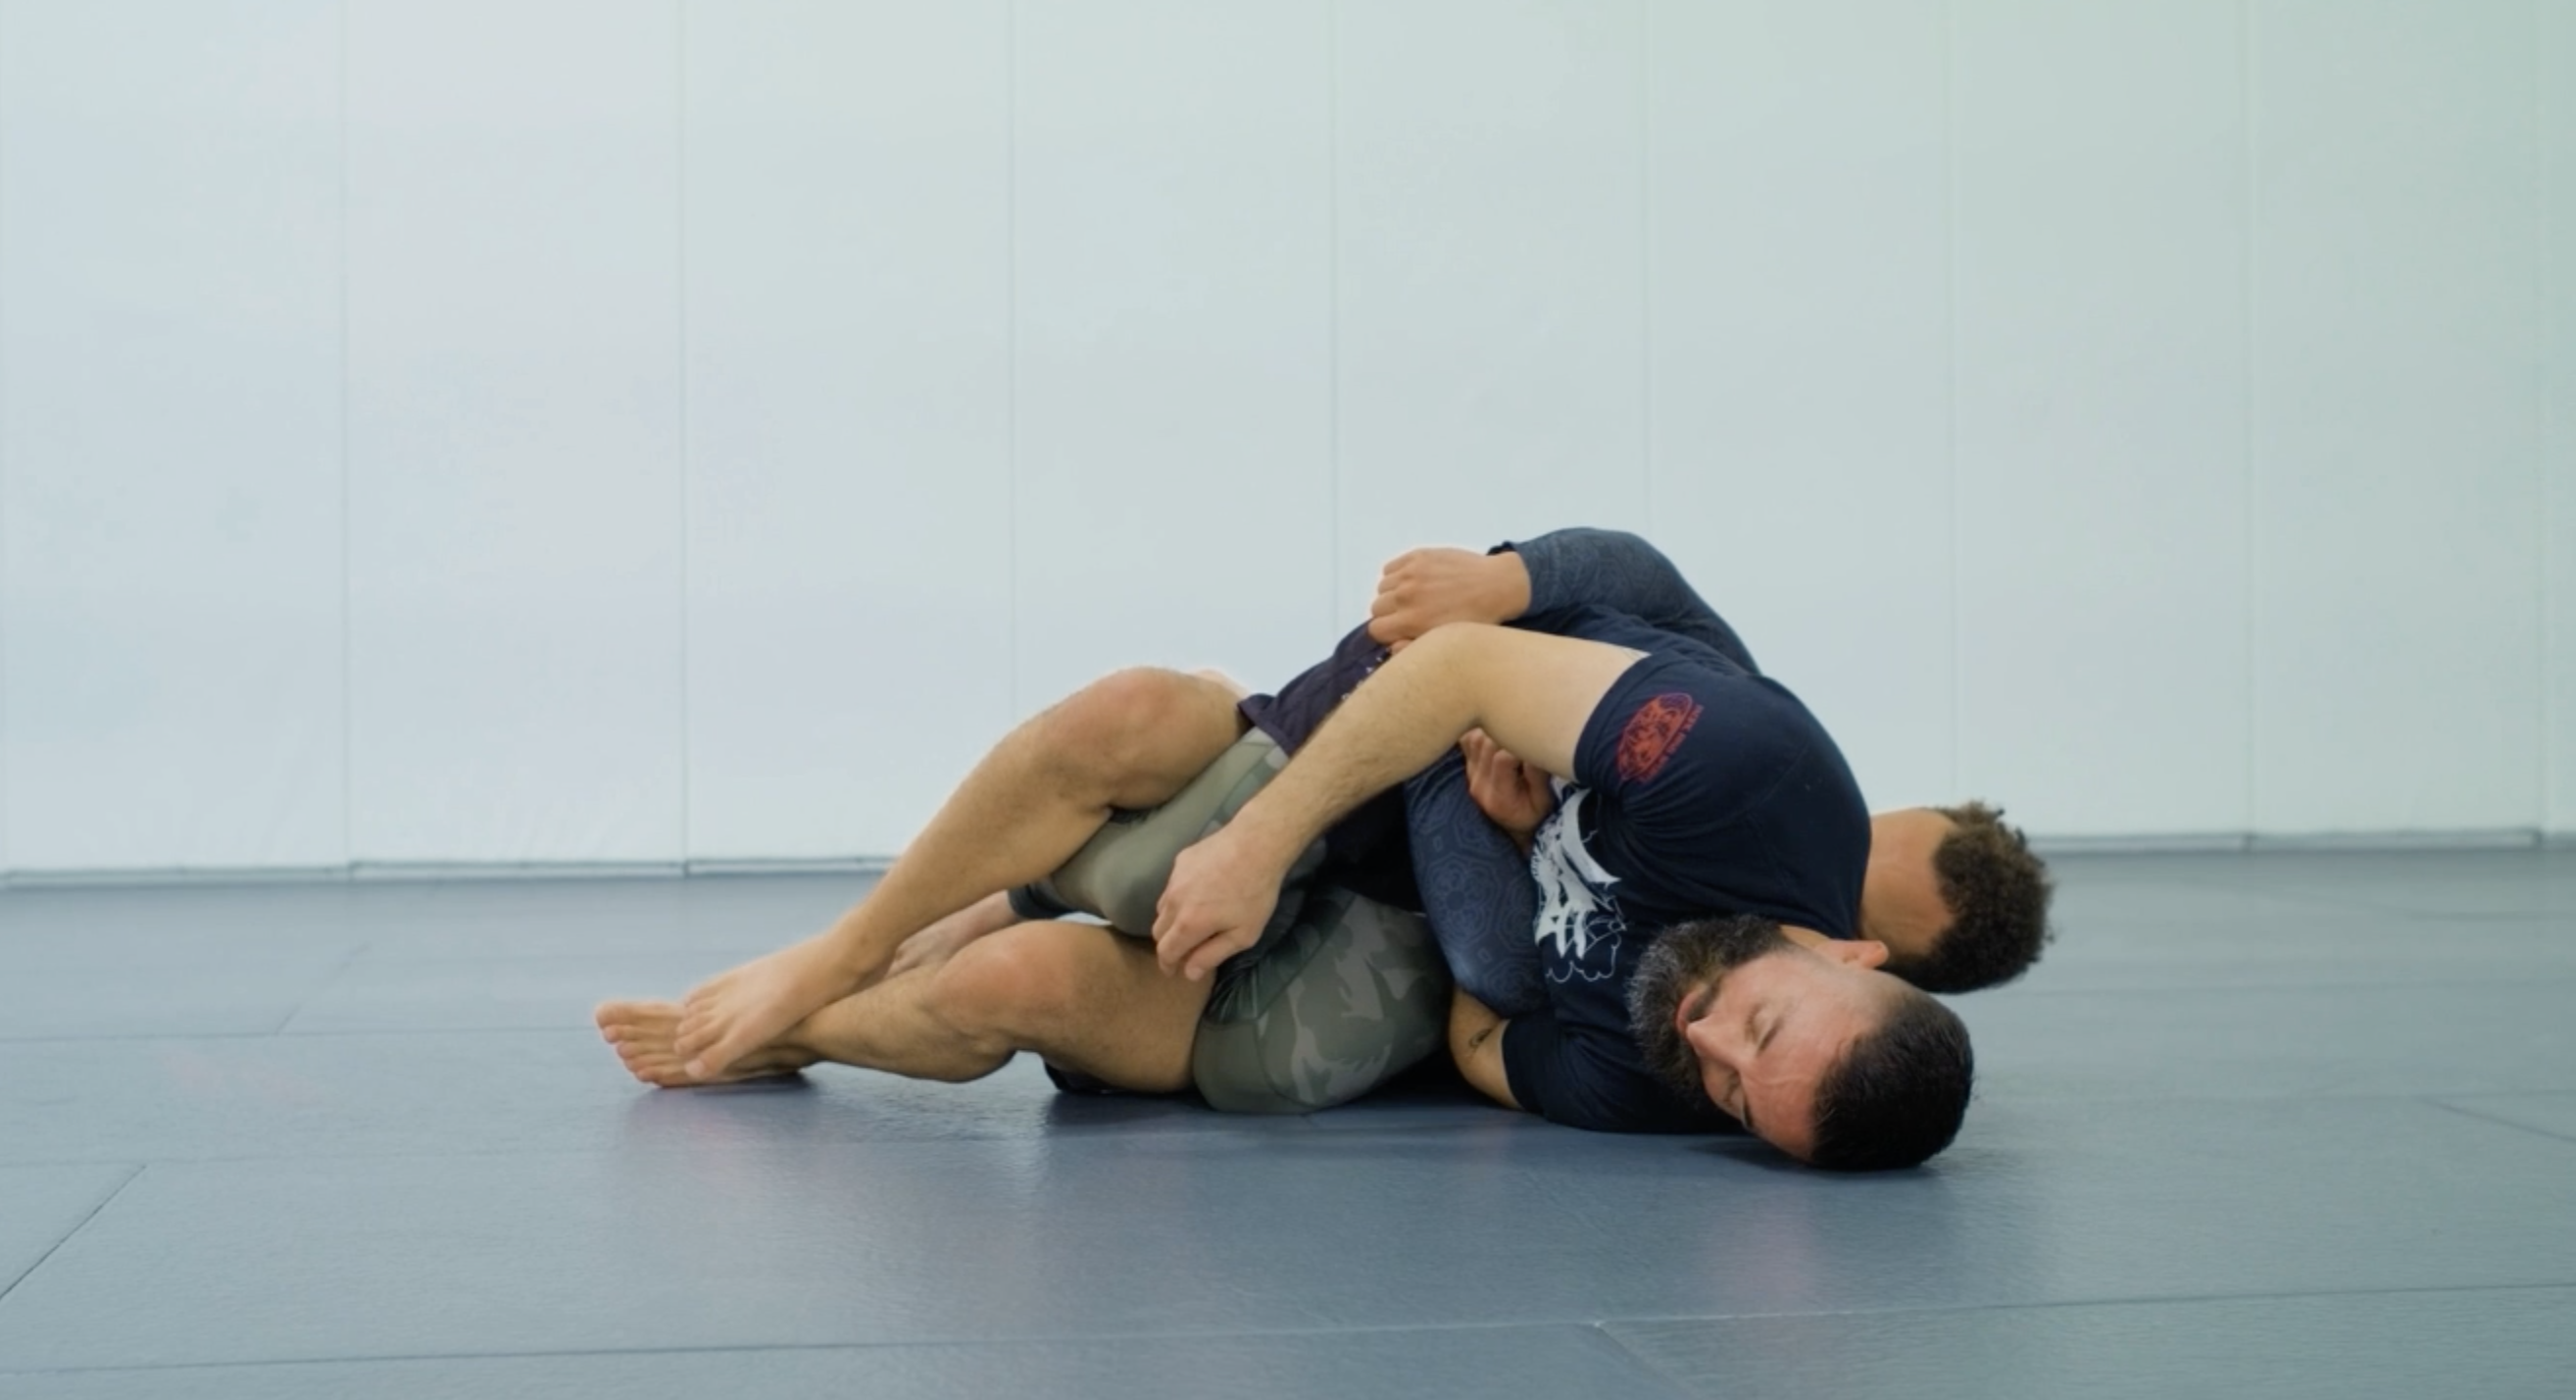
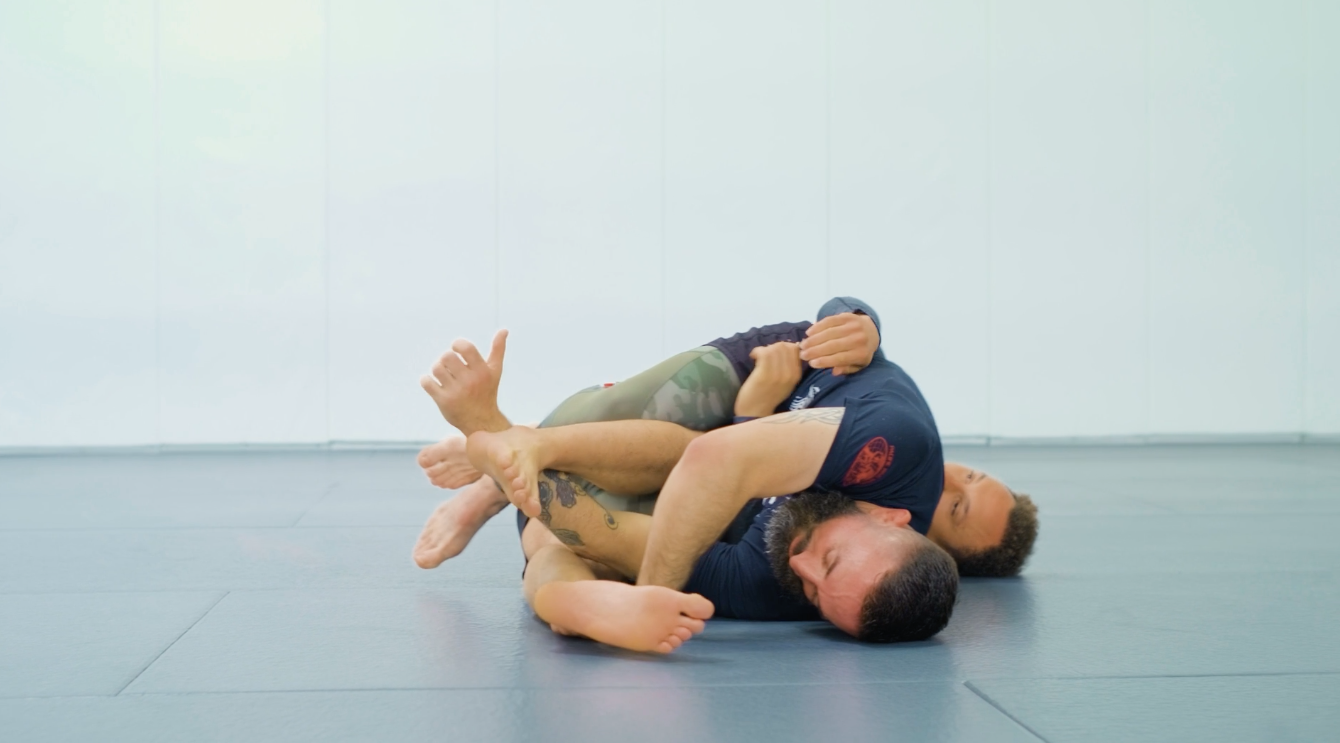
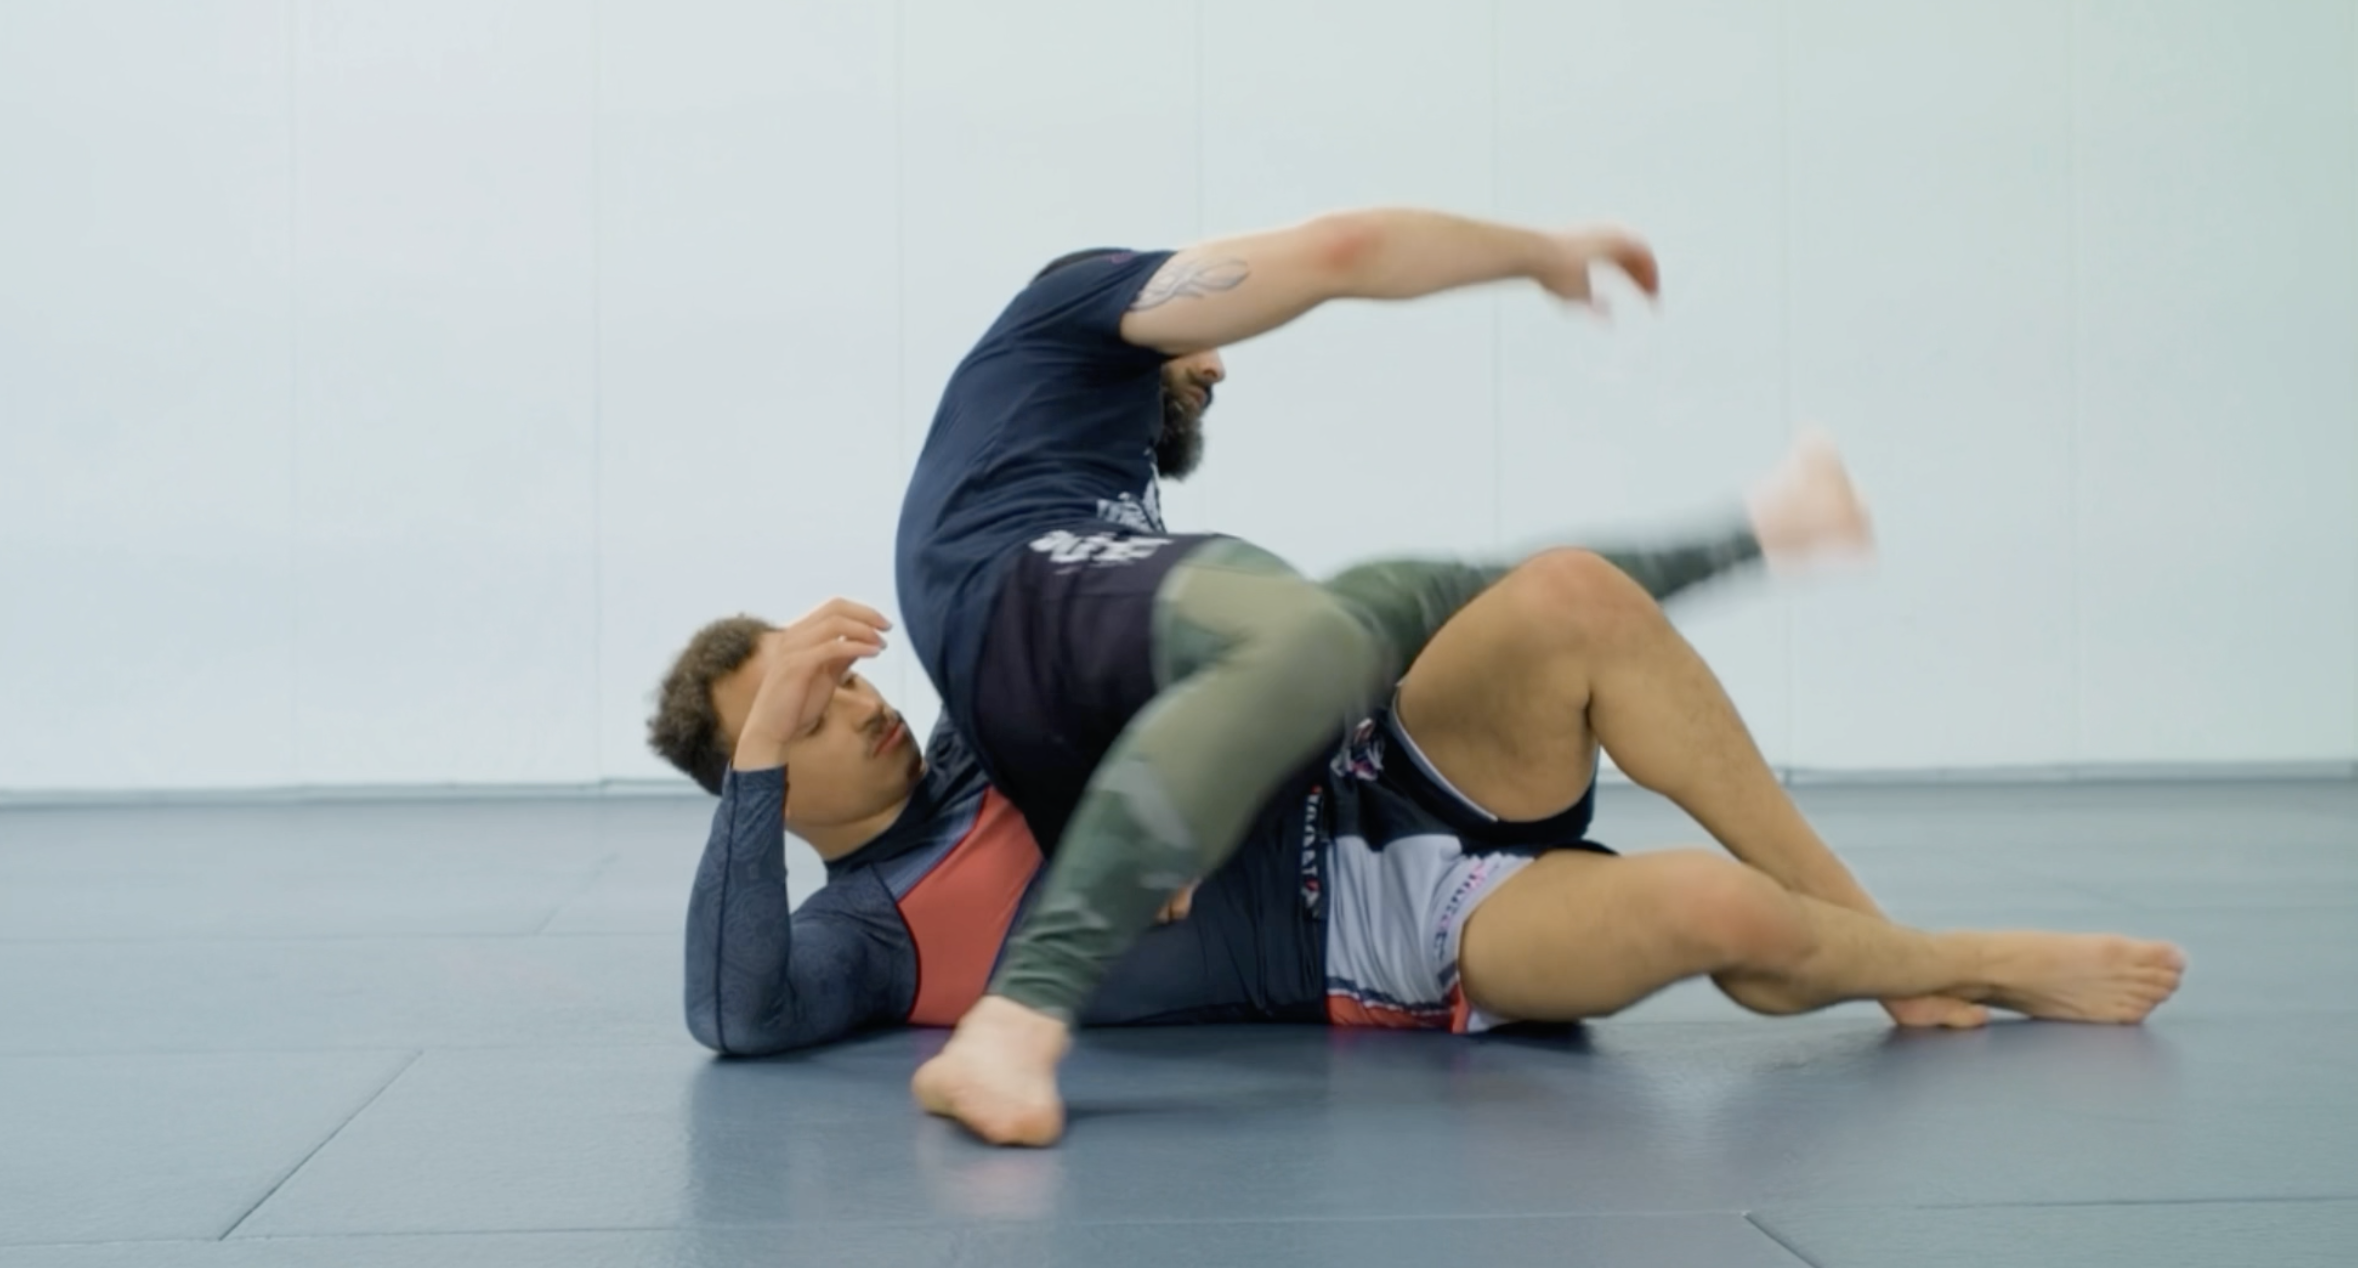
Quarterdeck to Trap Door
When neither submission is immediately available, close the door.
When the arm lock and Bastille are not there yet, add the leg trap. Lock the opposite leg from the trapped arm and you enter the full Trap Door — arm and leg controlled simultaneously. Your opponent cannot defend everything at once.
- Maintain arm control from Quarterdeck.
- Maneuver to isolate the leg opposite from the trapped arm — open the space with your top leg, then slide your bottom leg inside to secure the knee bar setup.
- Lock the leg — both arm and leg are now trapped simultaneously.
- You are in the Trap Door. See Part Two for all submissions from here.
The leg trap is what makes this system unique. With both limbs controlled, your opponent is in a split-attention dilemma — they cannot defend the arm without opening the leg, and vice versa.
Watch: Quarterdeck to Trap Door
Adding the leg trap to close the position
▾
Inside Anchor to Trap Door
Using the inside anchor to enter the Trap Door directly.
The Inside Anchor is a leg entanglement control that gives you a direct path into the Trap Door position. From the inside anchor, you have the leverage to trap both the arm and leg and close the position.
- When opponent bases out to prevent the first sweep, use this opportunity to post on your elbow and free your bottom leg.
- Establish the inside anchor on your opponent's leg while maintaining the arm trap.
- Use the threat of the Kimura to keep them locked in defense — now lift with your anchor and back roll. As you roll, grab behind their knee for your grip.
- When you land, shoot your hips down to lock their leg. You are now in the full Trap Door position.
The threat of the Kimura keeps them defending by locking their arm in, giving you the security you need to move about and set things up.
Watch: Inside Anchor to Trap Door
Entry mechanics and arm trap
▾
Outside Anchor to Bastille
The outside anchor creates a direct line to Bastille.
When the outside anchor is established, your opponent's arm becomes isolated and vulnerable. This is a direct submission path — when they resist by hiding their hand to avoid the Kimura, use that tension to set up the Dragon Sweep into Bastille.
- Establish the outside anchor on their leg, hooking the instep of their foot.
- Use the hook, shoulder pressure, and your hip movement to control their base.
- To avoid the pressure, they are forced to roll — follow their roll, keeping your hook connected and their arm trapped behind your hips.
- Transition to Bastille — finish with smooth steady extension.
The outside anchor works because your opponent is focused on protecting their arm from the Kimura. Use that tension against them — the harder they resist, the easier the sweep becomes.
Watch: Outside Anchor to Bastille
Full sequence from anchor to submission
▾
Ghost Saddle to Knee Bar
When the knee bar is available directly — take it.
Entering from top side or playing into their guard, you land in Ghost Saddle. This is where the two-way dilemma begins — you're threatening the leg and waiting for them to expose the arm. But when the knee bar angle opens before they react, take it directly. No need to trap the arm first.
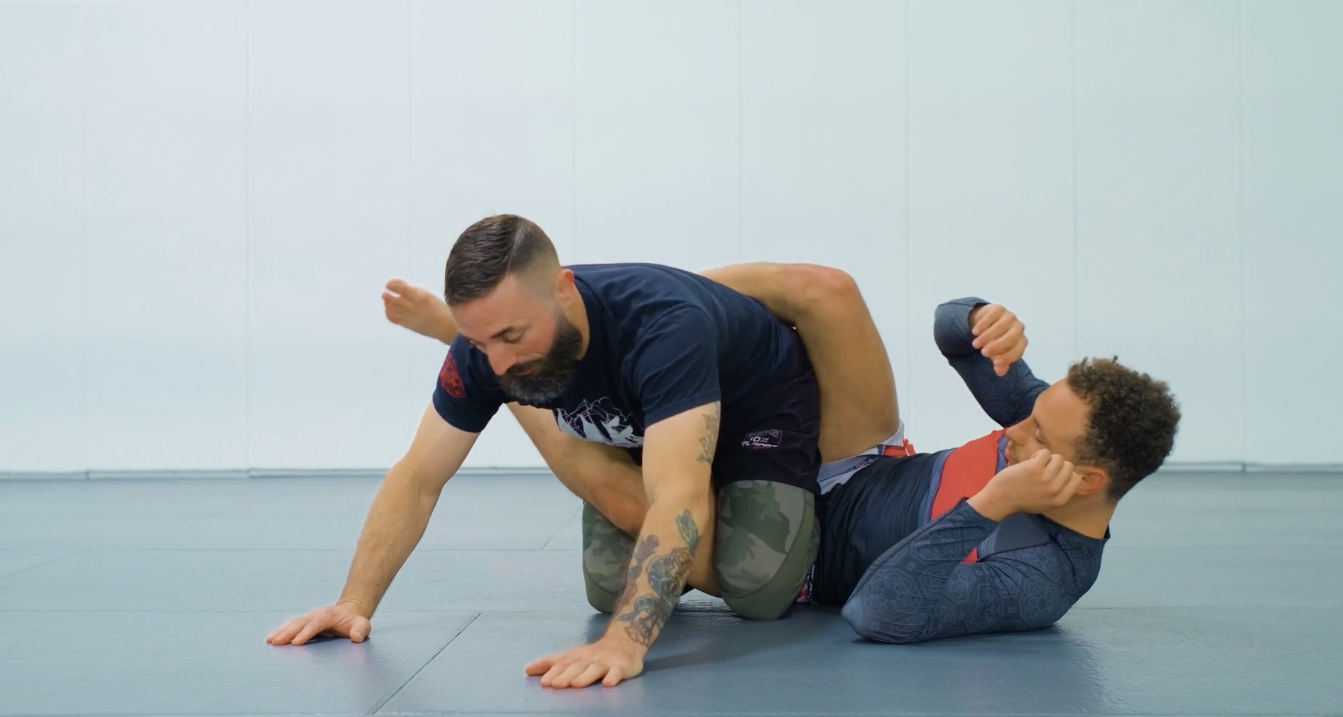
- Sit in for Ashi but keep your feet hidden, pinching their leg with your elbow and using the grip on the knee to pull yourself up and place your knees and hands on the mat, building a strong base.
- From Ghost Saddle, you are threatening the leg attack by applying a pinch with your elbow near the ankle.
- This forces them to extend their arm, but if they do not react, you can lock their leg and rotate your hips to apply the Knee Bar.
- Apply the knee bar with smooth, controlled extension. If it does not finish, transition cleanly to maintain your top position.
The knee bar can come on fast. Apply it with awareness — give your partner time to tap.
Watch: Ghost Saddle to Knee Bar
Direct knee bar finish from Ghost Saddle
▾
Ghost Saddle to Trap Door
The top-side entry. From Ghost Saddle into the same Trap Door position.
The Trap Door is not only available from the bottom. Starting from Top Side Control, you enter via Ashi into Ghost Saddle. When your opponent defends the knee bar threat, their same-side arm comes into range — trap it and the Trap Door is closed from the top.
- Once in Ghost Saddle, aggressively threaten the leg attack — force them to expose the arm.
- Trap arm with a deep pinch and roll into position while controlling the ankle so you remain secure in your base.
- With arm trapped and leg secure, back step into Trap Door position and secure your hips tightly on the leg opposite from the arm you have trapped.
- You are now in the Trap Door — threatening both the arm lock and the knee bar simultaneously. See Part Two.
Whether you enter from the bottom through Z Guard or from the top through Ghost Saddle, you arrive at the same Trap Door position with the same submission options.
Watch: Ghost Saddle to Trap Door
Ashi → Ghost Saddle → arm trap → Trap Door
▾
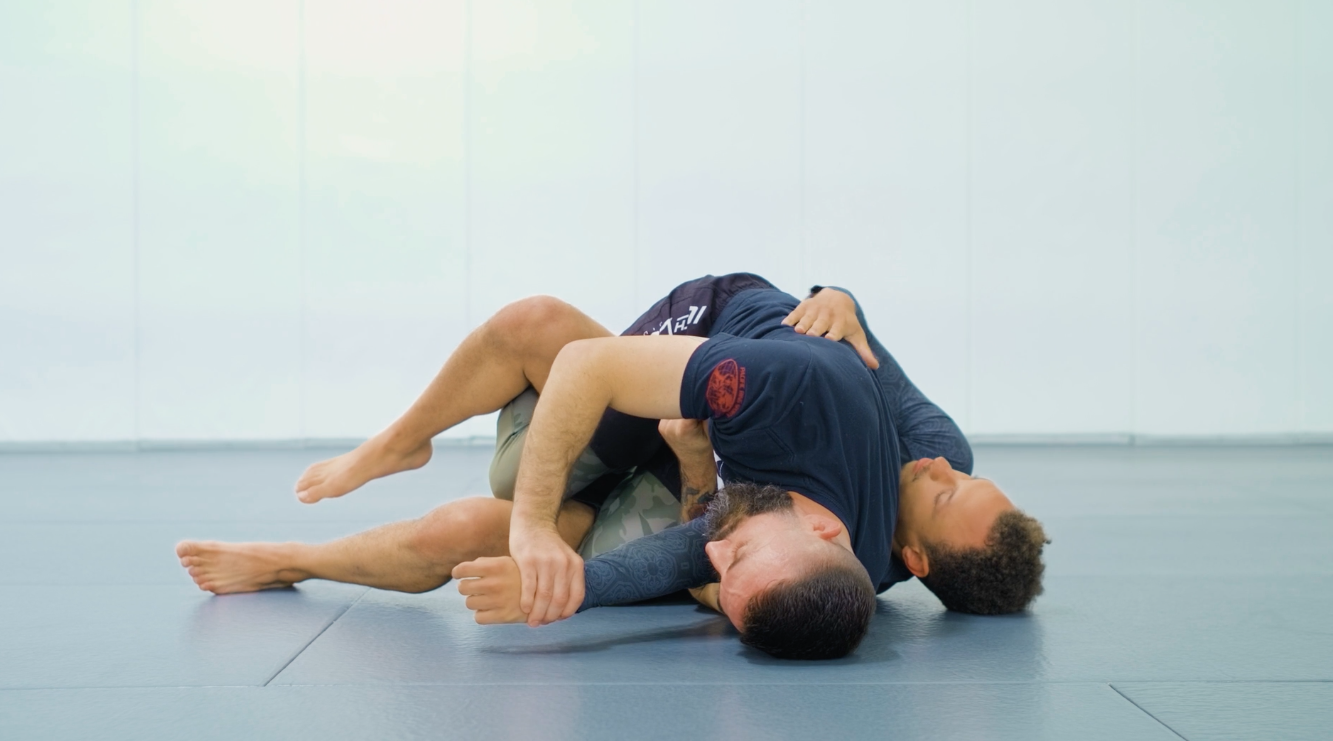
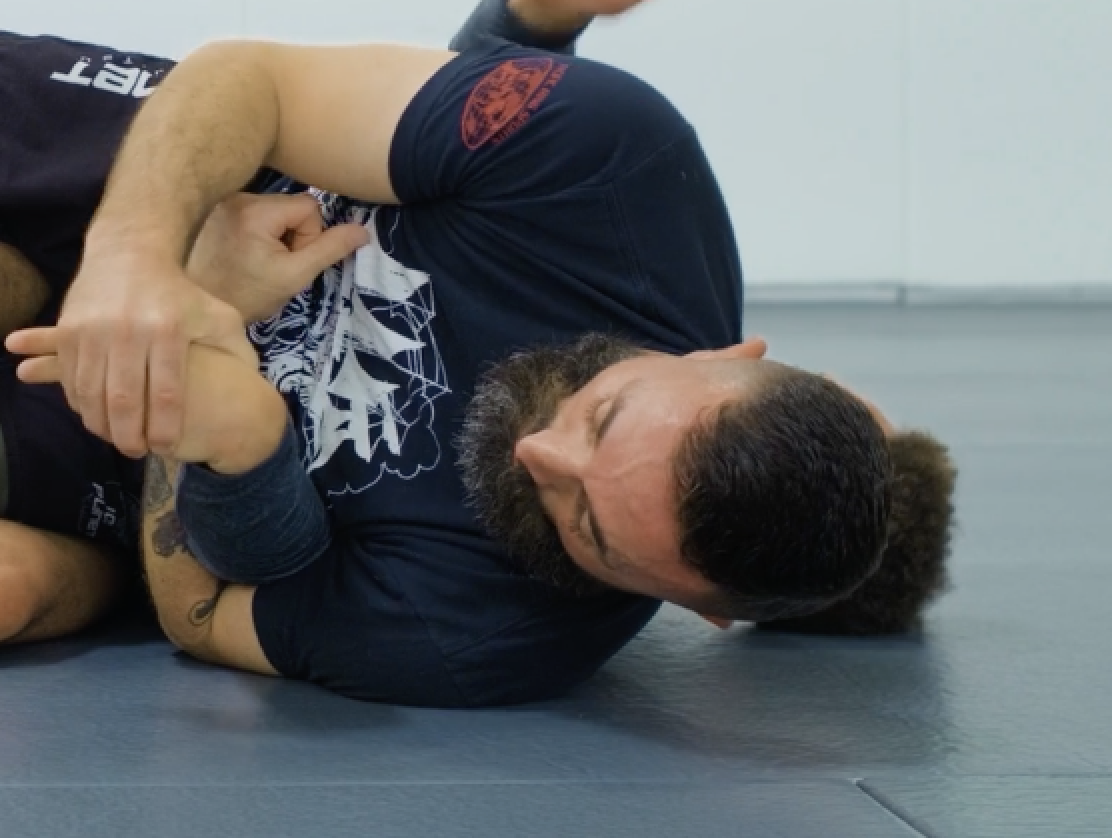
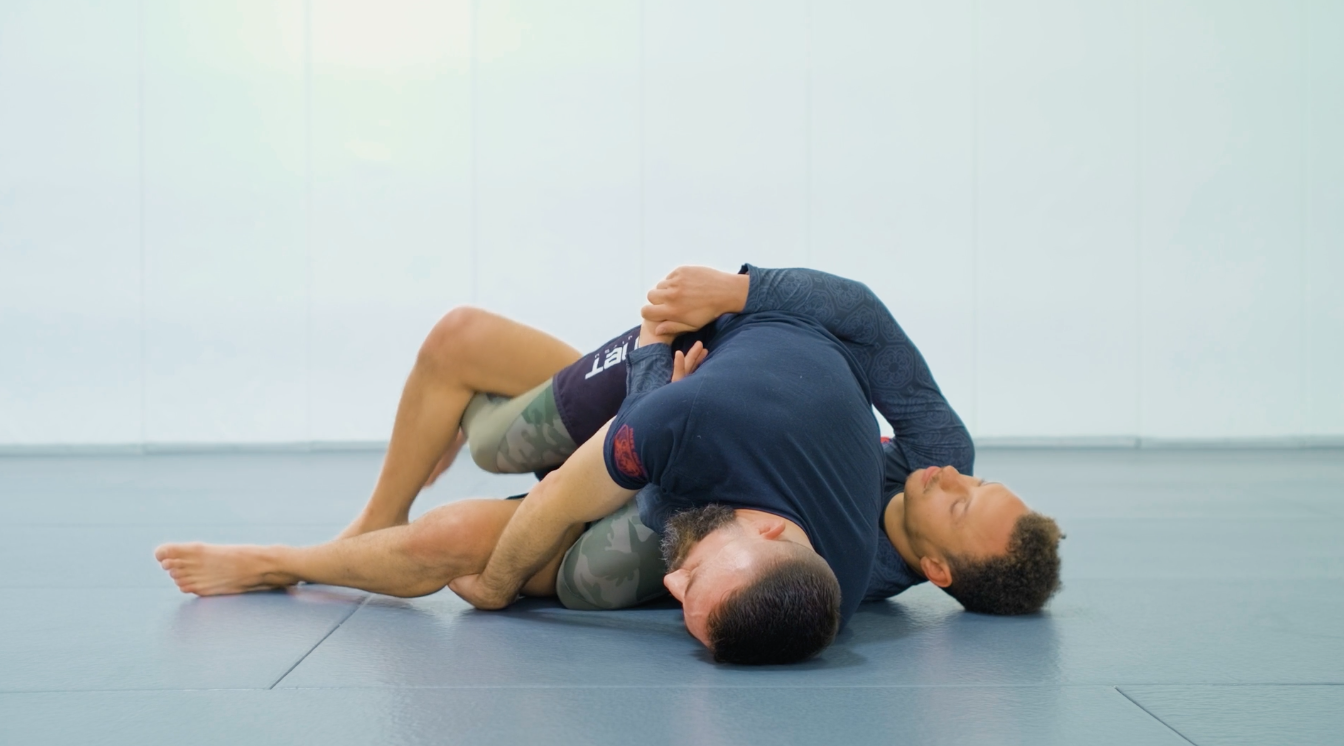
Arm Lock / Wrist Lock
Primary threat. When they move to free the leg, the arm opens.
With the arm isolated in the Trap Door, the arm lock is your primary attack. When your opponent tries to pull the leg free, their arm straightens — that's when you take it. The wrist lock is available any time the hand is free.
- Keep the arm controlled at the wrist.
- Keep your elbow pinched tight to your body — do not let their elbow slip free.
- Apply smooth extension pressure — do not jerk.
- For the wrist lock: rotate the wrist against the joint while maintaining arm control.
Watch: Arm Lock / Wrist Lock from the Trap Door
▾
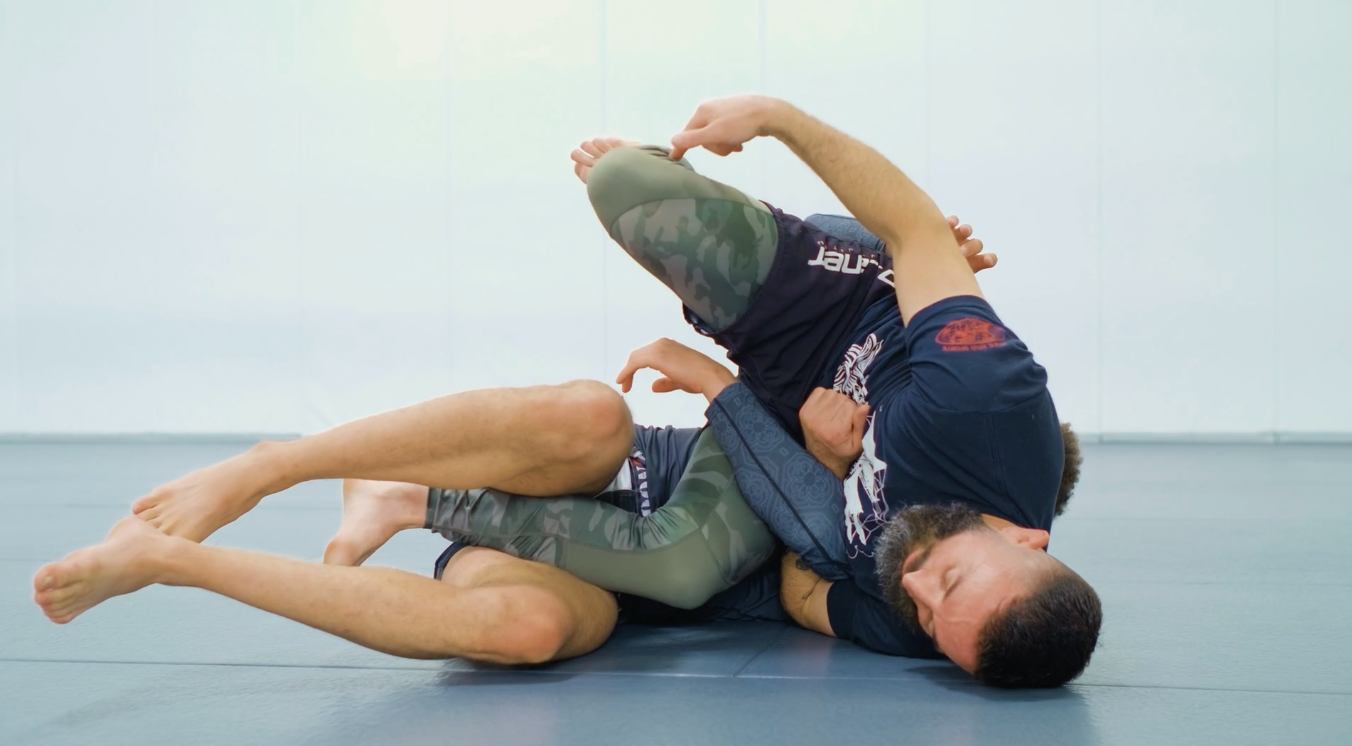
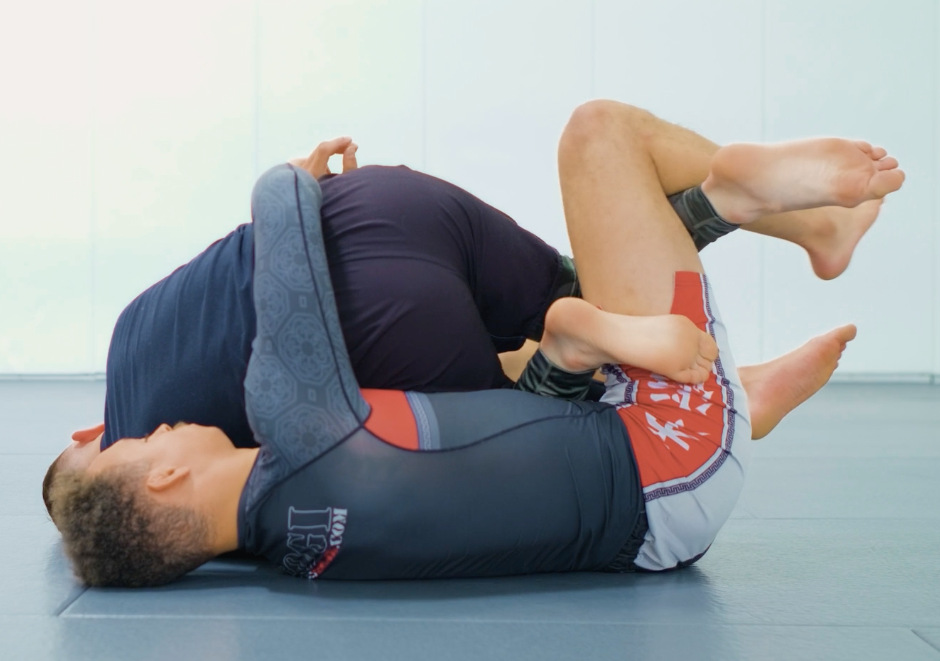
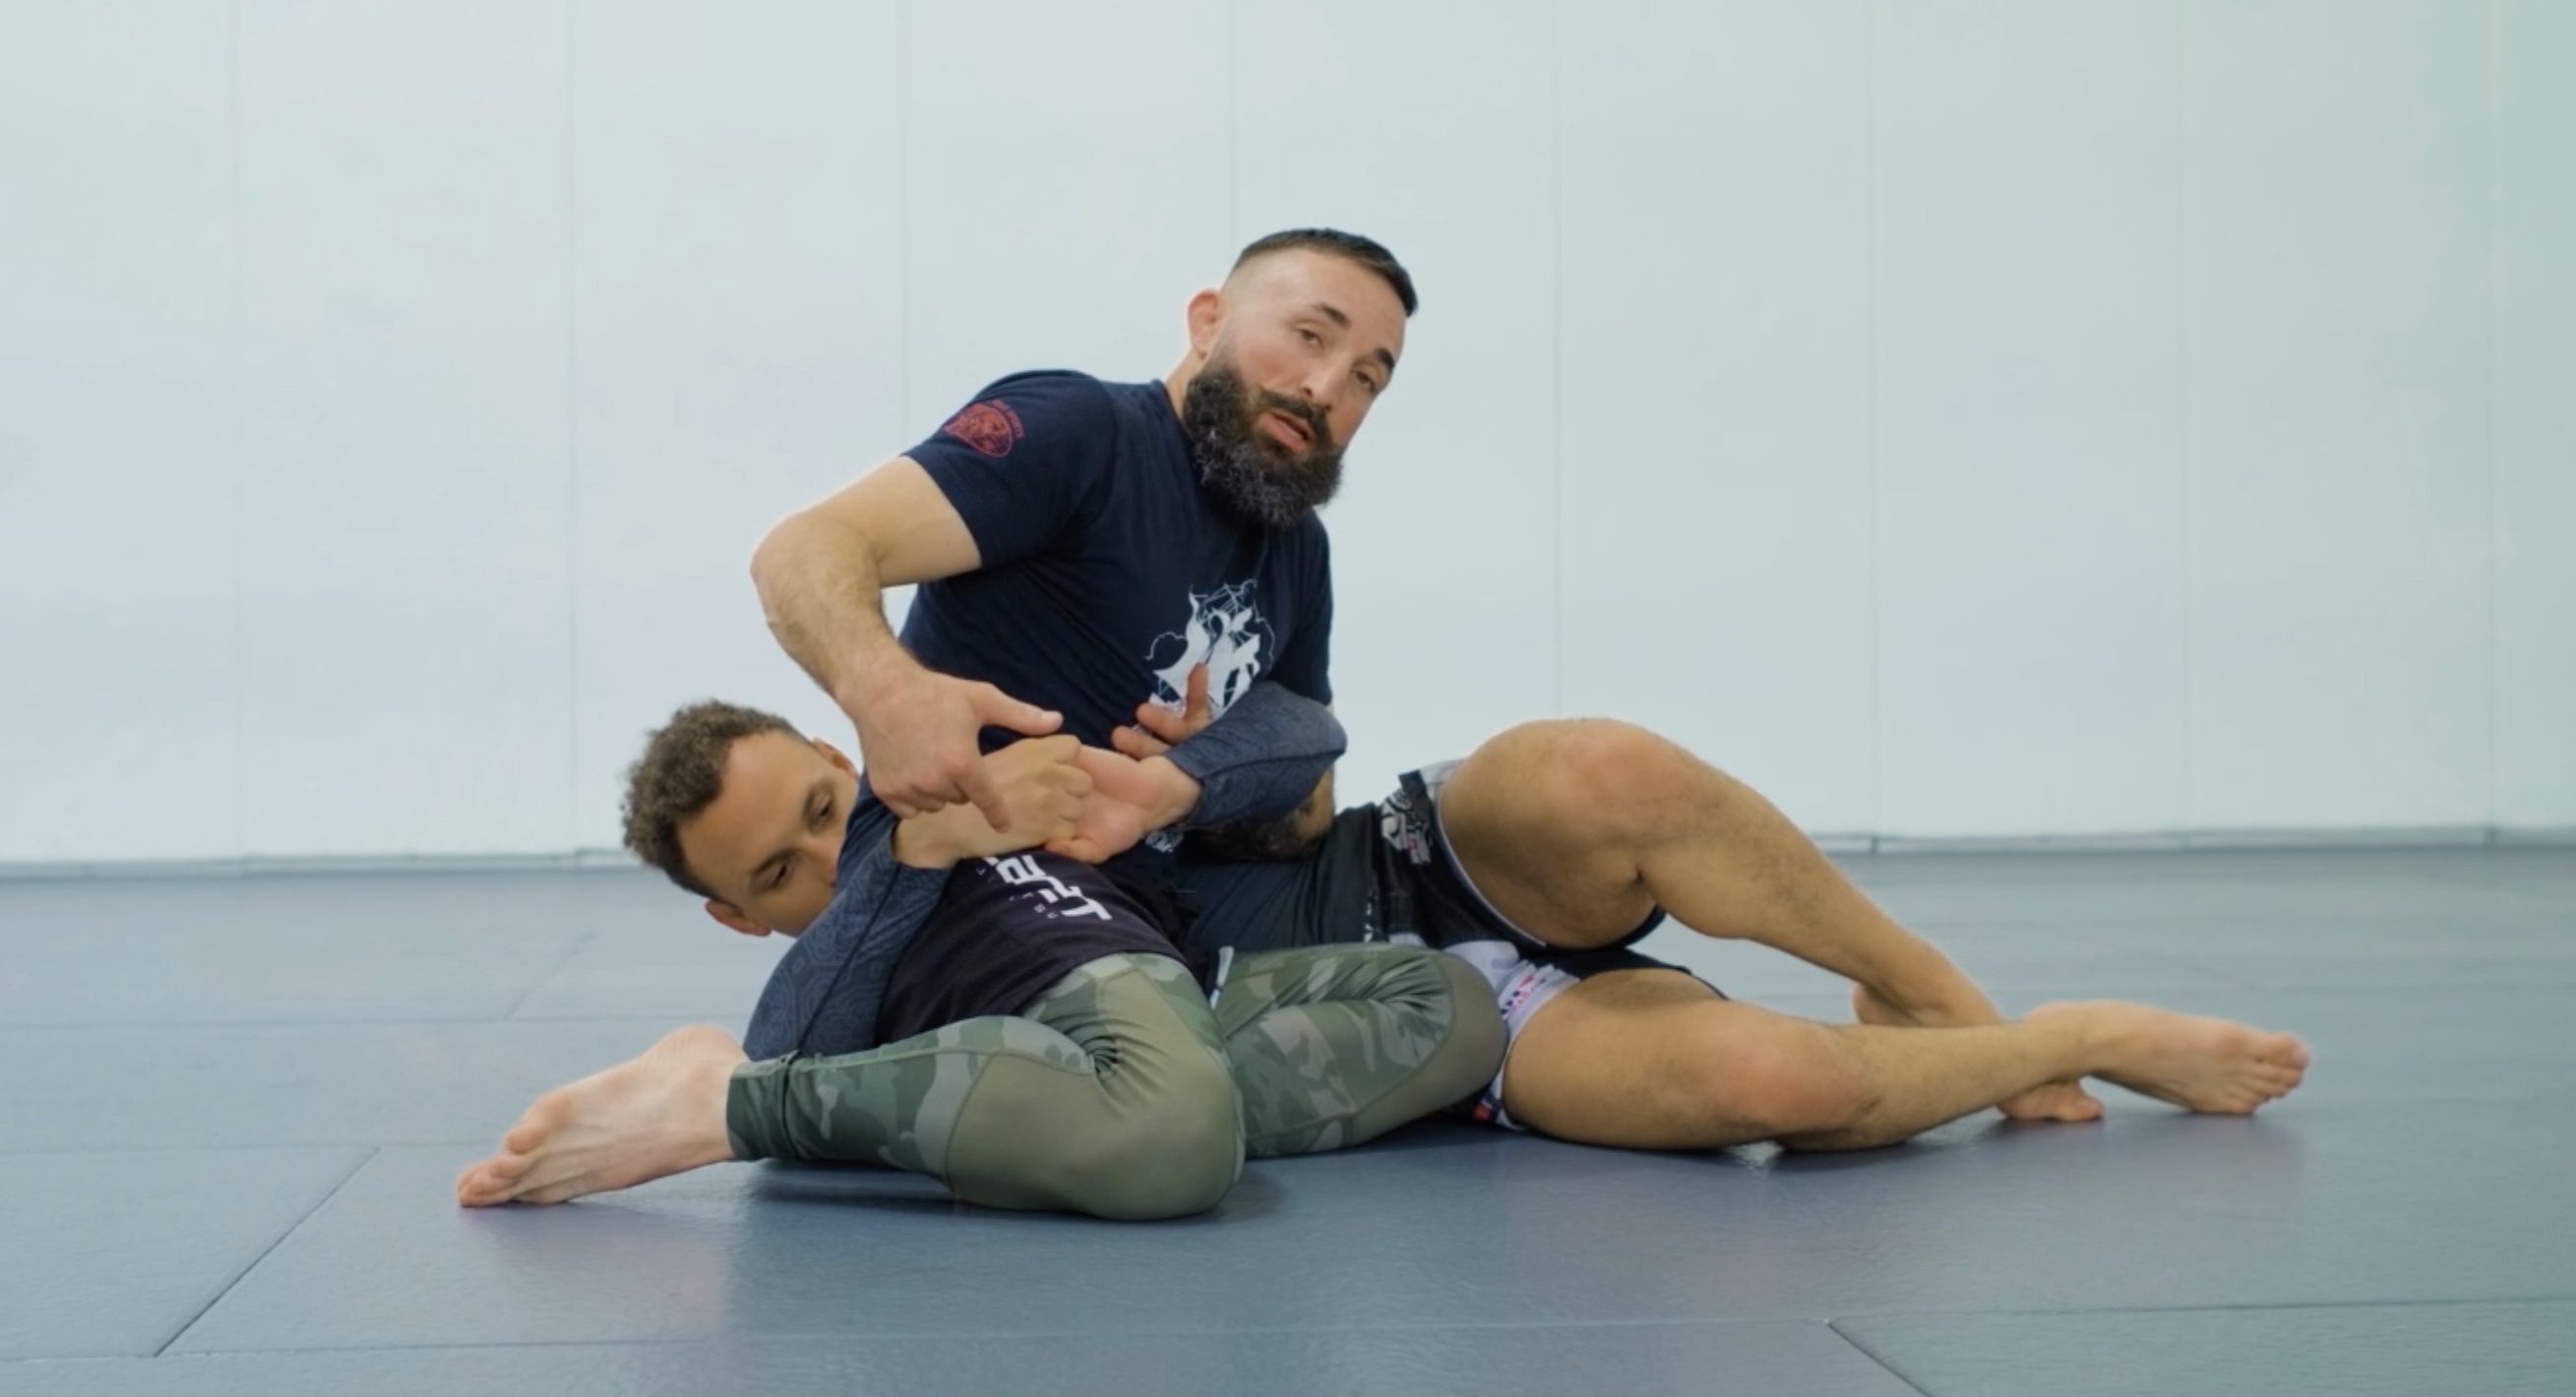
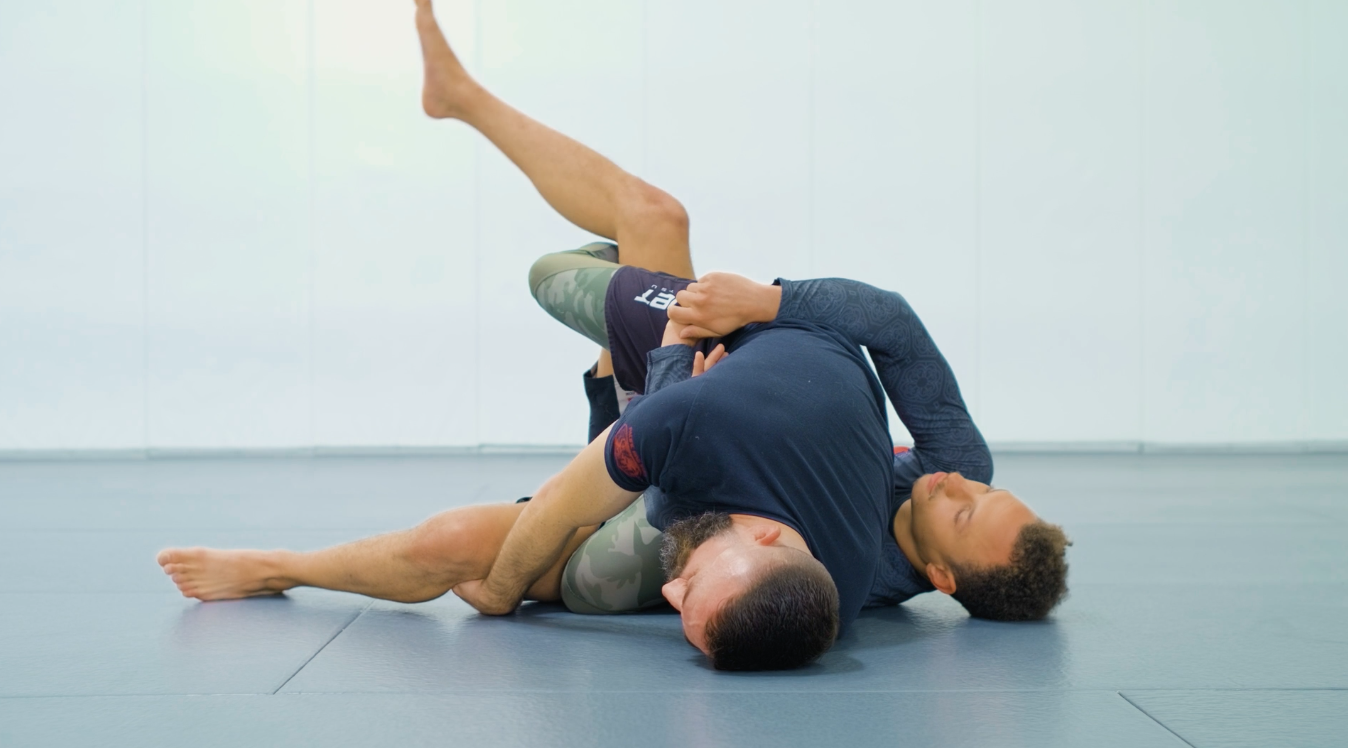
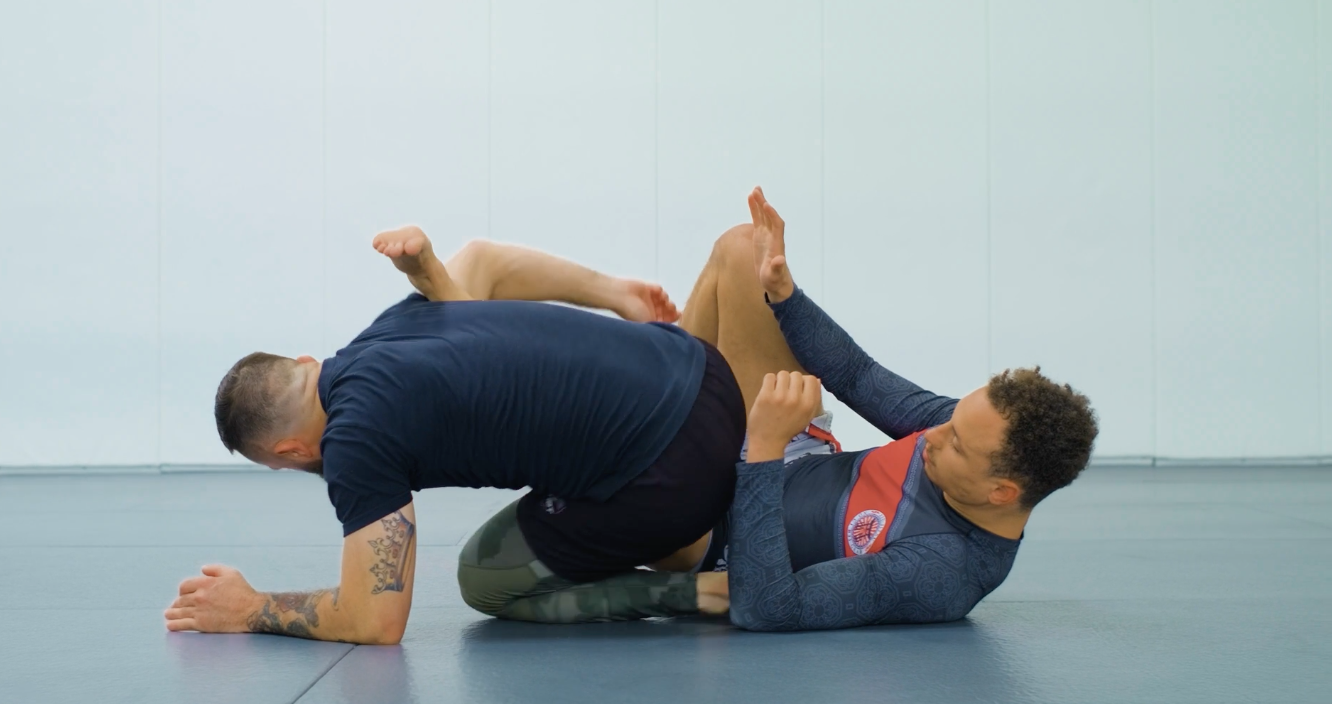
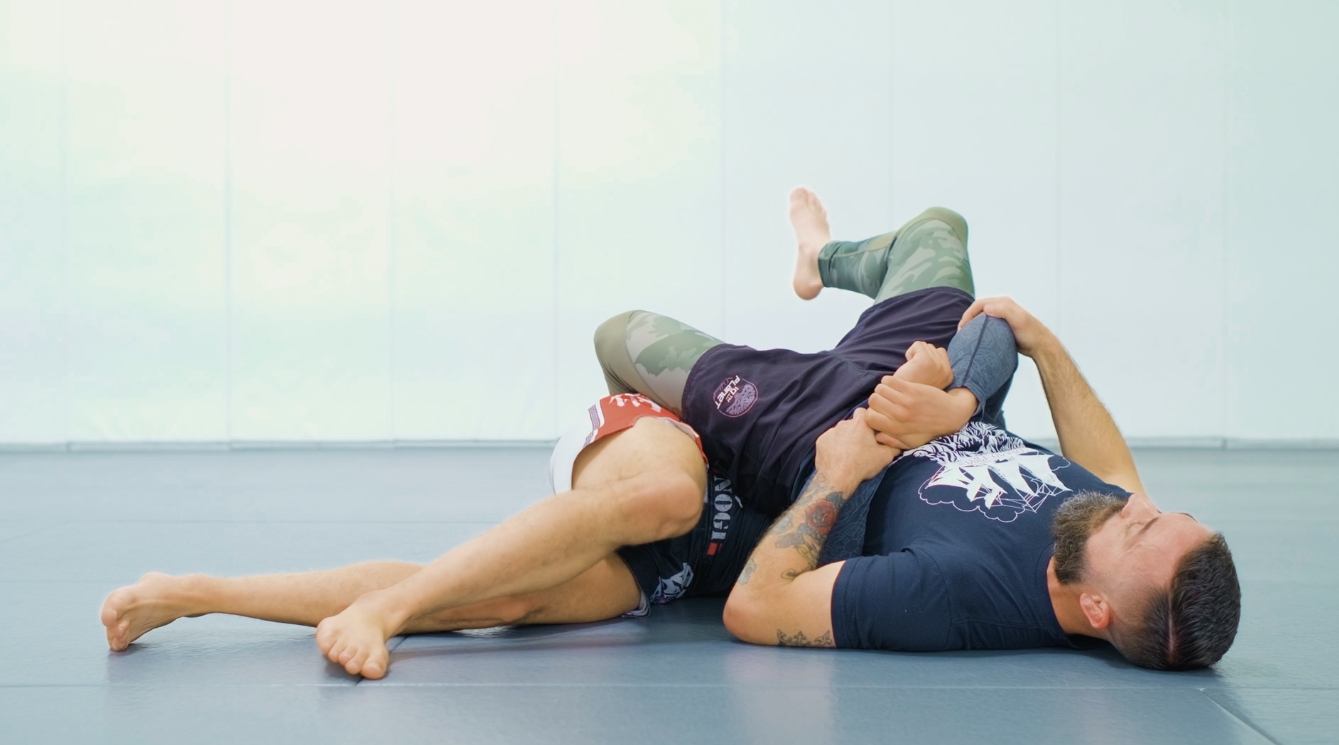
Knee Bar
Secondary threat. When they move to free the arm, the leg opens.
The knee bar is your simultaneous threat. This is the Trap Door dilemma in action — your opponent cannot defend the arm without opening the leg. When they pull the arm free, the knee bar is right there. You will learn to play with these dilemmas, threatening just enough to expose the sub you want. Be patient and don't force the subs, they will give it to you.
- Typically they defend by crossing their legs to shield the leg being attacked.
- Grab the lower leg that is shielding and pull it toward you, freeing the leg you want to attack.
- Once the leg is exposed, release the arm trap and scoop the attacked leg. Grab with both arms and hug tight, keeping their foot against your head to prevent rotation.
When your opponent tries to pull the arm free, it opens the knee bar. When they try to free the leg, it opens the arm lock. You win either way.
Watch: Knee Bar from the Trap Door
The dilemma in action
▾
Peephole
Read the scramble. The opening is small — but it's there.
As your opponent scrambles to escape the Trap Door, the Peephole submission opens up. Their movement creates the window — you need to be watching for it and ready to take it the moment it appears. This one will take some practice, you will need to be calm and comfortable being inverted. But remember, as long as you control their wrist, you are safe.

- When they are extending their legs to avoid Knee Bar and gripping your body tightly to avoid Arm Lock, we must move to attack the top arm.
- Remove the arm trap and get wrist control on their bottom arm, pushing it into your body to prevent their rotation.
- Dismount from the Trap Door and set your hips on theirs while pulling their top elbow down, creating strain on their grip.
- Drive your knee behind their elbow to your chest, breaking their grip. Maintain both their wrist and keep your knee bent to your chest giving them the space to get to their knees.
- When they get to their knees, the elbow is completely exposed creating a little peep like hole for you.
- Extend your bottom arm through while pushing your leg over their wrist and pulling their elbow toward you.
- Secure a Gable grip and triangle your legs, then squeeze for the bicep slicer finish.
Watch: Peephole
Catching the submission in the scramble
▾
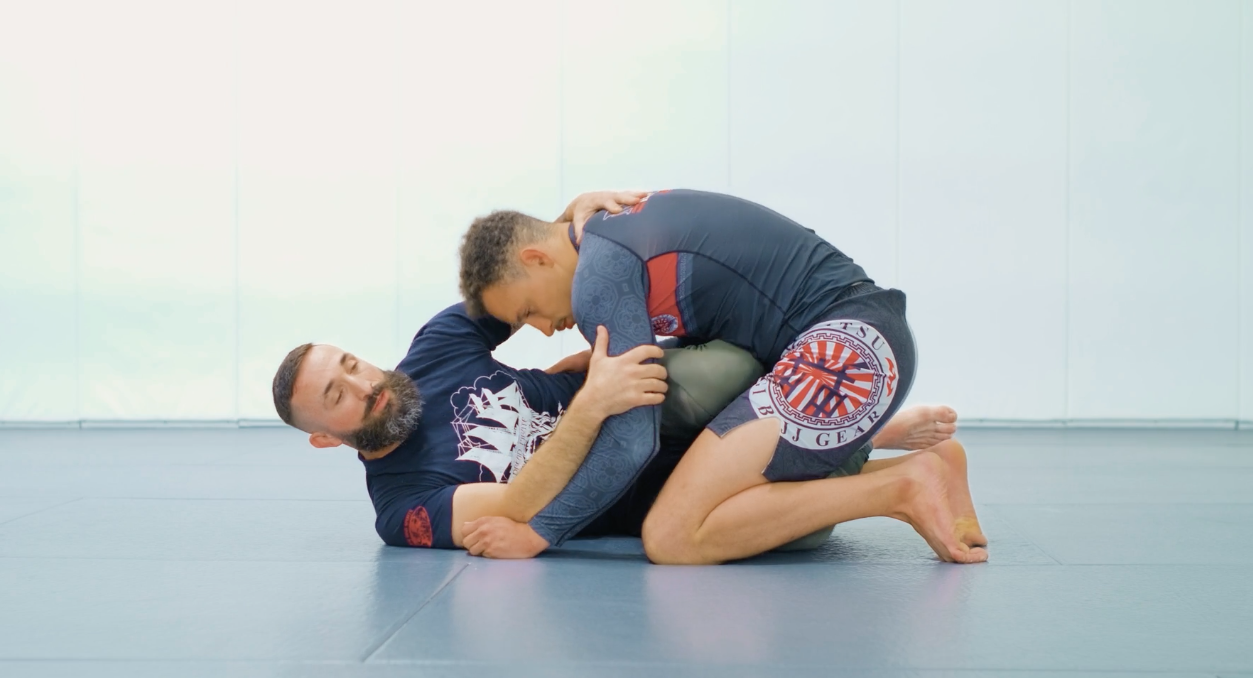
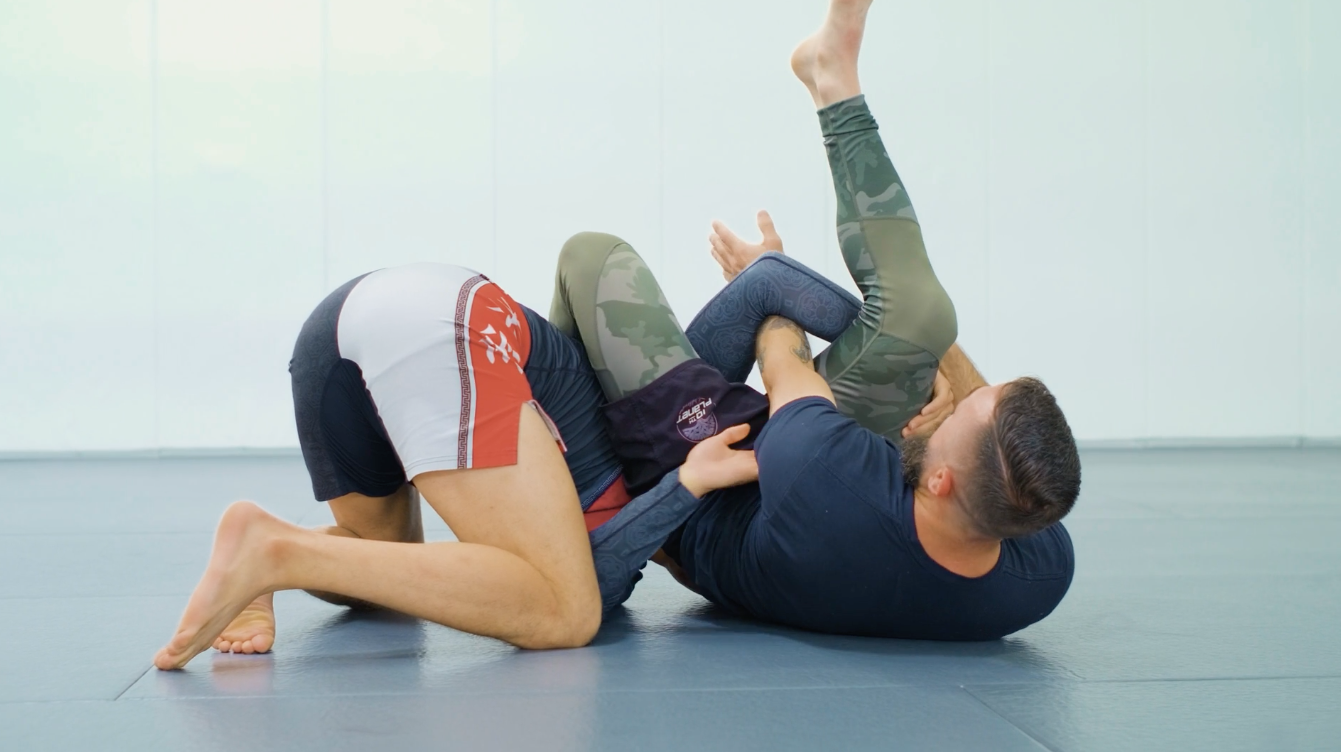
Bastille
They try to hide the arm. Let them — it's a trap.
As your opponent tries to hide their arm from your attacks, the option to slide to the Bastille presents itself.
- When they feel the arm lock coming, they will try to hide their arm by pulling it under your hips so you cannot extend it for the arm or wrist lock.
- Let them do this or force it yourself. Sit through to block their arm from opening back up. Base out and push your hips against their body, keeping your posture upright.
- Secure and finish by grabbing their exposed elbow and lifting it upwards.
Watch: Bastille
Catching the Bastille from Trap Door
▾
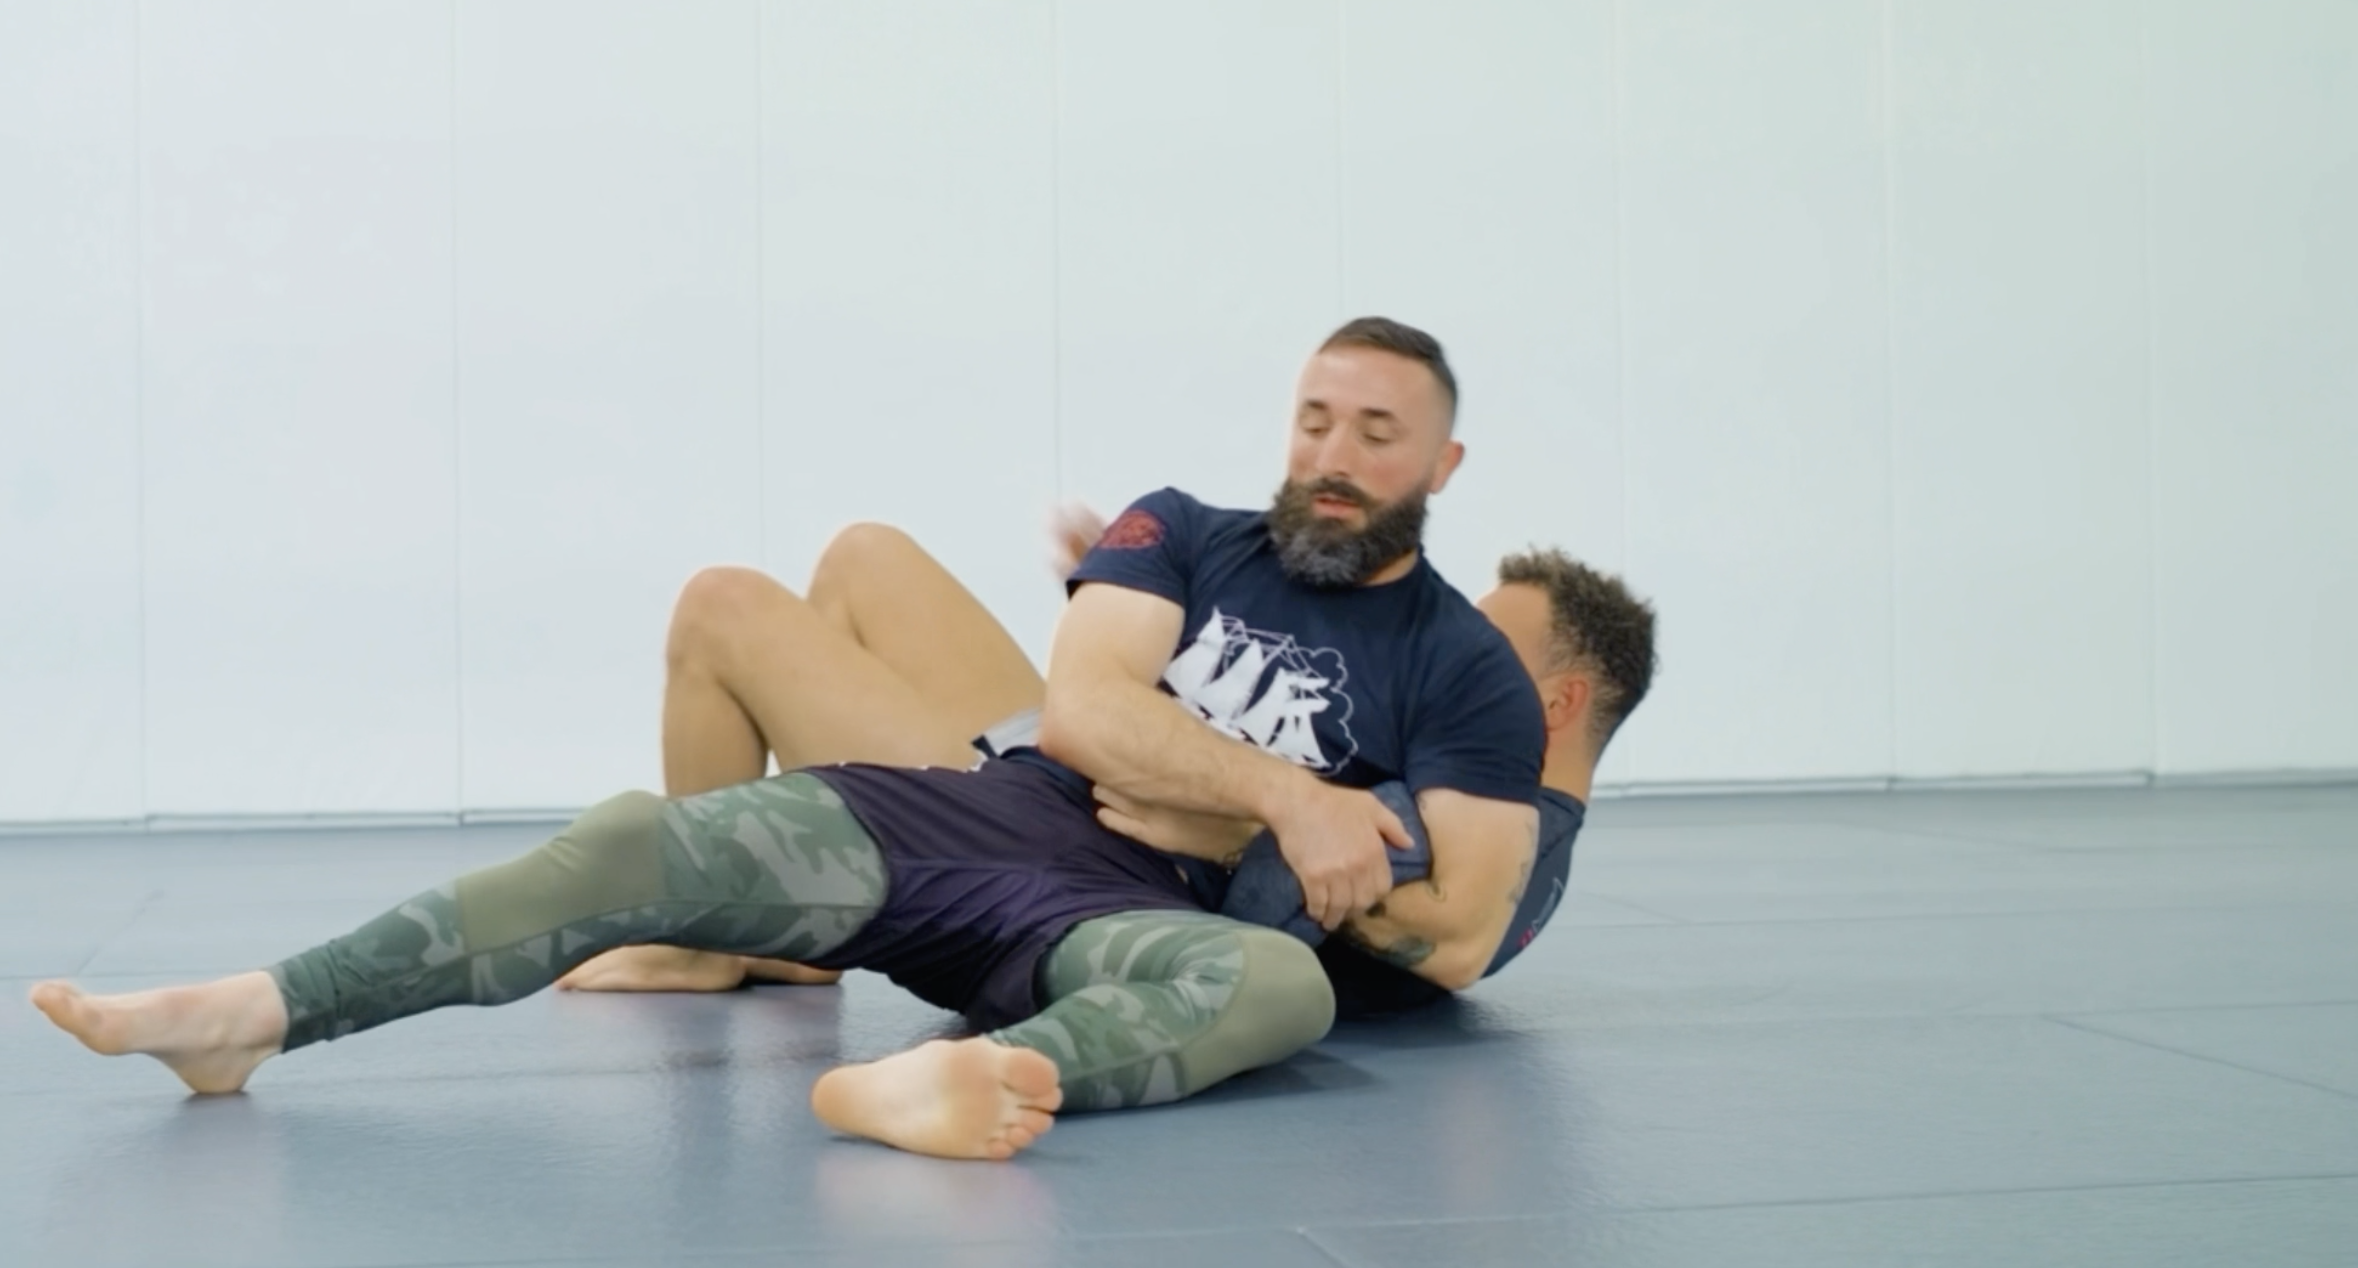
Bailout to Power Kimura
When you need to transition — bailout to Power Kimura and keep attacking.
The bailout to Power Kimura is a fluid transition from the Trap Door when you need to change your angle or your opponent is actively escaping. Power Kimura puts you above them, removes their ability to frame, and sets up three immediate submission options.
- Feel the Bastille position shifting — recognize when to bail.
- Roll onto your shoulder to elevate your hips and use your momentum to transition toward their head.
- Settle your weight into Power Kimura — bring your bottom hand to your opposite bicep and bring your top forearm and elbow to the mat.
- This creates an extremely tight shoulder lock that is very difficult to stop — which is exactly why it's called the Power Kimura.
Watch: Bailout to Power Kimura
Fluid transition from Bastille to Power Kimura
▾
Watch: Dismount from Bastille to Power Kimura
Transitioning the finish when Bastille stalls
▾
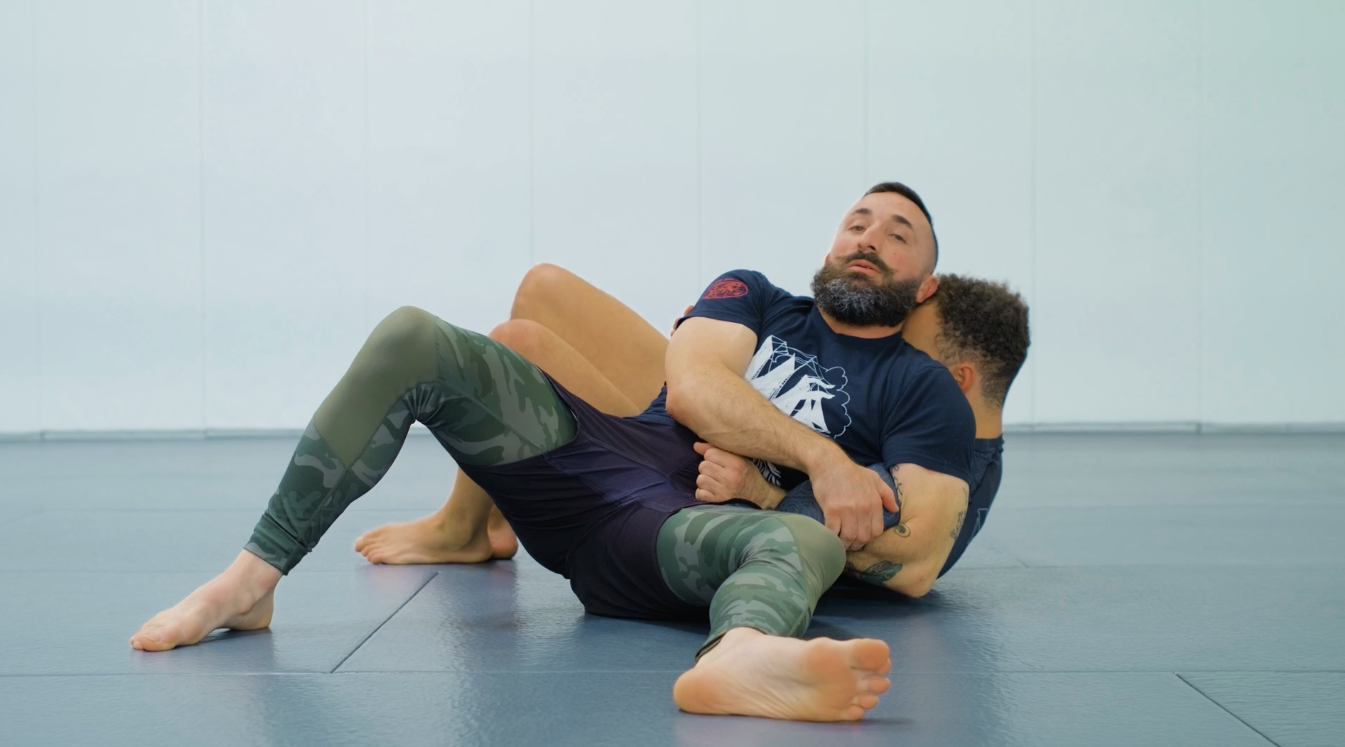
Power Kimura
Maximum leverage on the shoulder. Your force option.
The Power Kimura attacks the shoulder from North South using full chest pressure and hip drive. This is your force submission when your opponent is defending tightly.
- From North South, release the Kimura grip and slide your inside hand to grab your own bicep. Then with free hand grab your other elbow.
- Rotate so both elbows and forearms are flat on the mat. Then shift your hips to isolate their arm away from their head.
- Drive your hips down on their shoulder and lift their elbow with your arms.
- Finish the submission.
Power Kimura — no need to break their grip first. Rotate smoothly, because this comes on fast and they may not have time to tap. Apply it with control.
Watch: Power Kimura
Direct force submission from North South
▾
Power Kimura to Kimura
Switching to Kimura when the Power Kimura fails.
From North South, isolate the topside arm, breaking their grip to get rotation and finish Kimura.
- Use your feet to walk back around their head and pull them onto their side.
- Establish the Kimura grip — figure-four the wrist. Drive your chest down onto their tricep and rotate to the open side to break the grip before lifting the arm.
- Maintain strong pinch with your knees to keep their body secured. Keep their arm bent at 90 degree angle and tightly against your chest with good posture.
- Rotate and finish the submission.
Watch: Power Kimura to Kimura
Smooth transition from one attack to another
▾
Kimura to Bastille
Bastille is available from North South too — the system stays connected.
Bastille is not just a Quarterdeck or Trap Door submission. From the Kimura, when the arm isolates at the right angle, you can finish Bastille directly. The system always circles back — the same finish, from a different door.
- From the Kimura, when they lock their hands they give you exactly what you need. Transition your body to their forward facing side and use your hips to cover their grips.
- Now their arm is trapped. Force their top knee down so you can step over with your closest leg. Hooking their leg as you do so.
- With arm trapped and leg positioned, you can post your free hand to mat and transition to the other side.
- Use your hand and feet to guide yourself into a seated position on the other side, securing the Bastille setup.
- Drive your hips tight against theirs and keep your posture upright, then lift their exposed elbow to finish.
Bastille is available from Quarterdeck, the Outside Anchor, Side Control, and the Kimura. When you can reach the same finish from every angle, your opponent simply runs out of places to hide.
Watch: Kimura to Bastille
Bastille finish from the Kimura position
▾
Afterword
The Trap Door System is a living, growing framework. The techniques in this instructional represent the core of the system as it stands today, but the connections and options continue to evolve with each training session.
The goal was never to give you a list of moves — it was to give you a way of thinking about the game. When one door closes, another opens. When a sweep fails, a different one is already there. When a submission is not available, a better position waits.
Understand this: the system is built on timing. You cannot force it. The entries, the transitions, the finishes — they all depend on reading your opponent and moving at the right moment. That is not something you learn in a week. It took me many years to sharpen this game, and the path will be hard in the beginning. But you have to go down that path. There is no shortcut to honing these techniques. Mat time is the only currency that matters.
One thing you must also invest in — your back escapes. Many of these positions expose your back to your opponent. That is an inherent risk of this system, and if your back defense is weak, it will be exploited. Build that skill alongside this system, not after.
Do the work. Stay the course. In the long run, you will become a formidable force that no one wants to see across the mat.
That is the Trap Door System. Trust the flow. Keep training.
— Brian "Dread Pirate" Wilkinson
Acknowledgments
None of this happens without the right people on the mat.
This instructional would not exist without the people who showed up, put in the work, and helped make it real.
LJ Lowery — My uke throughout this project. A true asset to my game and to the development of the Trap Door System. His willingness to take the falls, hit the positions, and drill the details until they were right made this instructional possible. The system is sharper because of him.
Sumi Shan — Training partner and the eye behind the camera. His work capturing the technique footage brought this instructional to life in a way that still photos alone never could. Having someone you trust both on the mat and behind the lens is rare — I'm grateful for both.
To everyone who has trained with me, rolled with me, and pushed this system forward — thank you.